- Giới Thiệu
- Cấu Hình Website
- Cấu Hình Server
- Đăng Nhập CMS
- Trang Chủ Admin
- Nhà Phân Phối
- Cập nhật thông tin
- Khai báo bộ công thương
- Trang Chủ
- Cập nhật nội dung
- Trang Giới thiệu
- Cập nhật nội dung
- Trang tin tức
- Chỉnh sửa nội dung bài viết
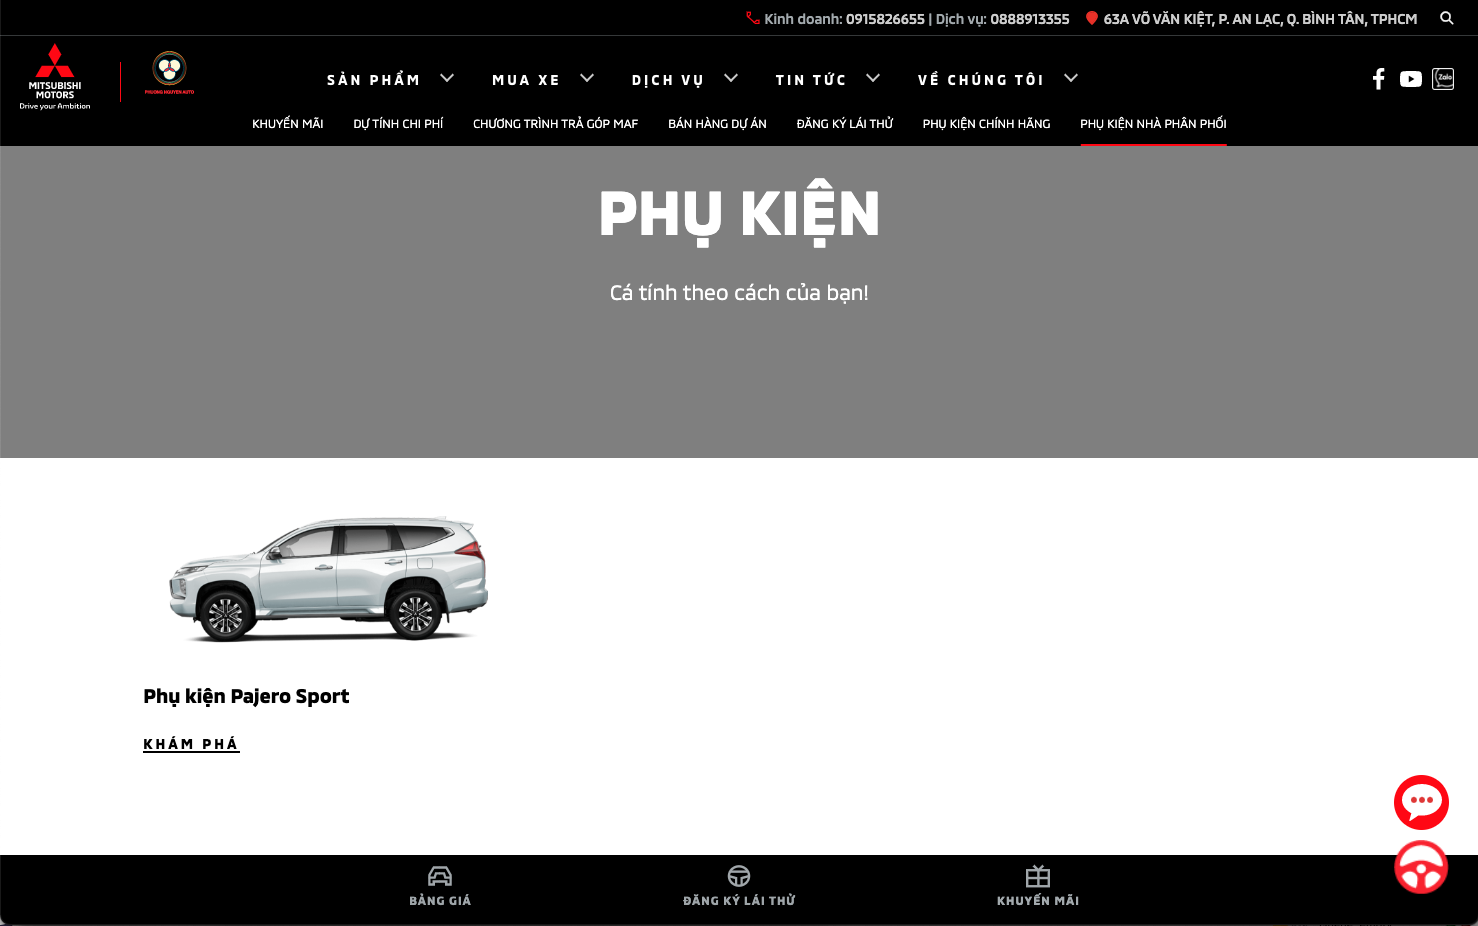
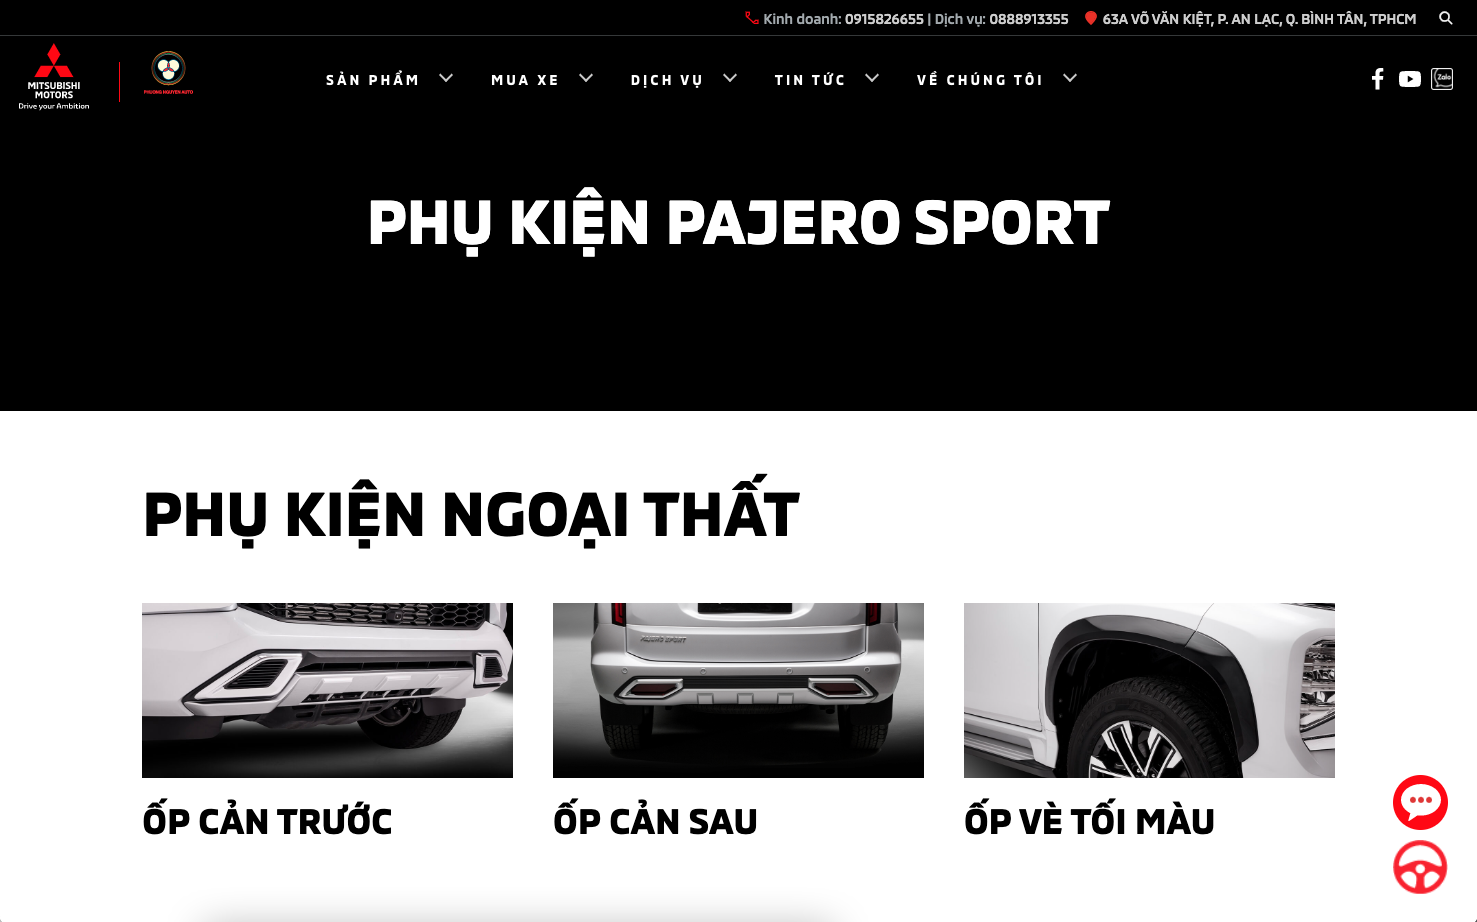
- Trang phụ kiện Nhà phân phối
- Cập nhật nội dung
- Khuyến Mãi
- Cập nhật nội dung
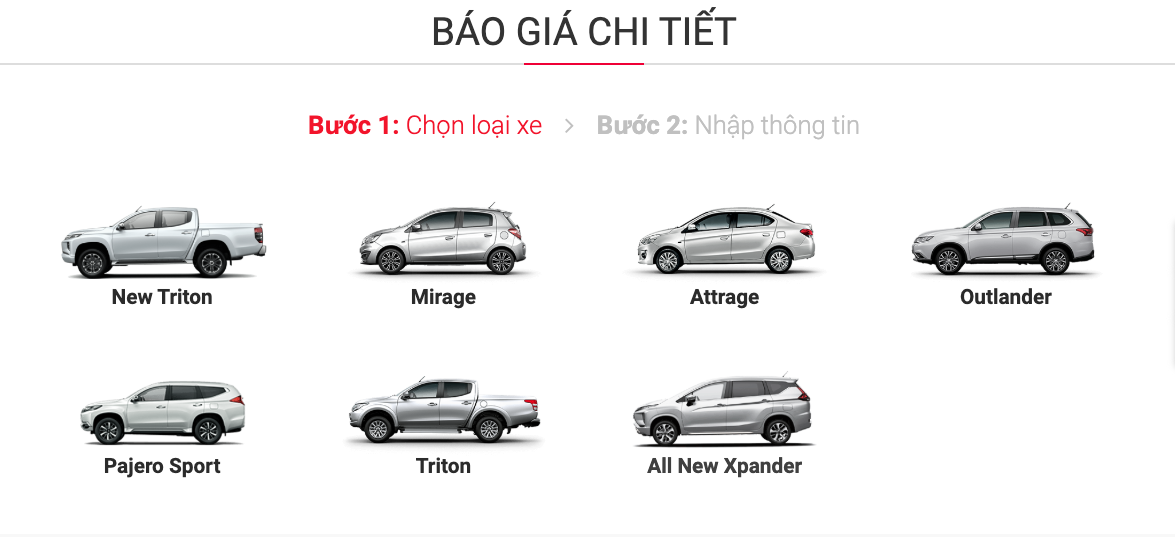
- Thông tin đăng ký
- Liên hệ
- Sự kiện lái thử
- Tạo trang sự kiện lái thử
Giới Thiệu
Cám ơn bạn đã sử dụng dịch vụ của chúng tôi. Dưới đây là hướng dẫn sử dụng website, Trong đó có các lưu ý về kích thước, nội dung của từng phần được chỉnh sửa theo quy định từ Mitsubishi Motors Việt Nam.
Nhà phân phối chỉ được phép cập nhật các trang mà chúng tôi có hướng dẫn bên dưới. Những trang còn lại Nhà Phân Phối không được phép điều chỉnh.
Nhà phân phối không được phép thay đổi cấu trúc source code bên hosting của Nhà phân phối. Mọi sự thay đổi đều được sự đồng ý từ phía Mitsubishi Motors Việt Nam. Nếu có xảy ra lỗi hay sự cố gì chúng tôi không chịu trách nhiệm.
Thanks!
DSquare Team
Cấu hình hosting / server phù hợp và chạy tốt với CMS
Phần Cứng:
CPU >= 2
RAM >= 2GB
HDD >= 10GB
Các extension bắt buộc trên Server hoặc Hosting:
PHP >= 7.0
MySQL >=5.7
OpenSSL PHP Extension
PDO PHP Extension
Mbstring PHP Extension
Tokenizer PHP Extension
XML PHP Extension
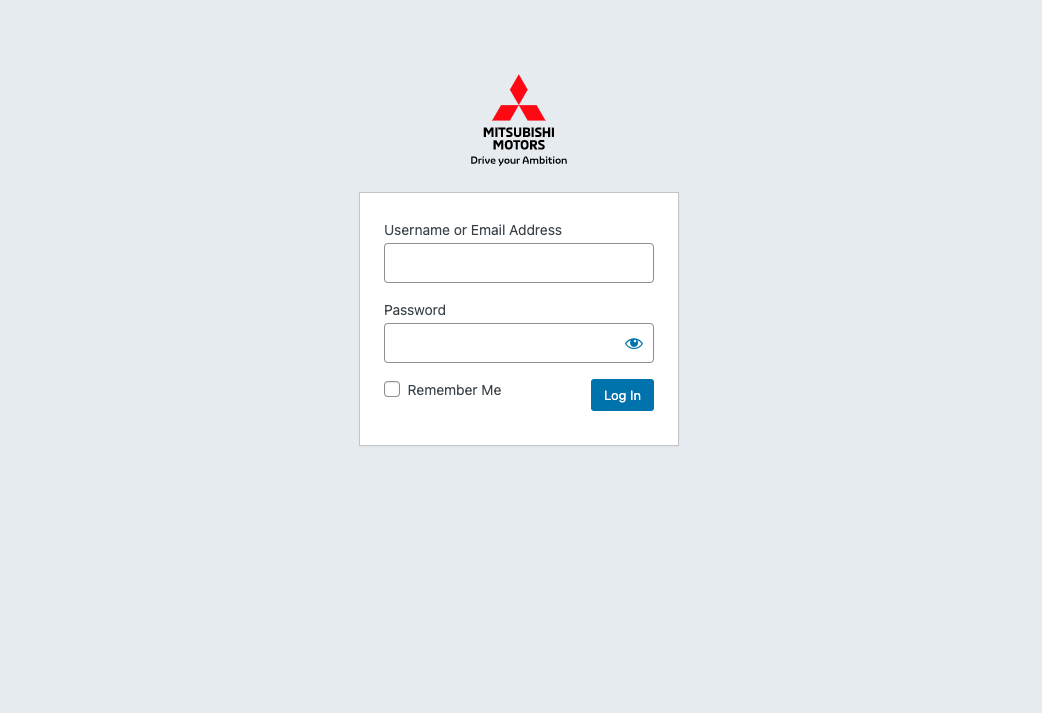
Đăng Nhập Hệ CMS
Đường link đăng nhập CMS: tên_miền_nhà_phân_phối/w/wp-admin/
Các Thông Tin Đăng Nhập:
Tài khoản đăng nhập (Username): Nhà phân phối đã được cung cấp.
Mật khẩu đăng nhập (Password): Nhà phân phối đã được cung cấp.
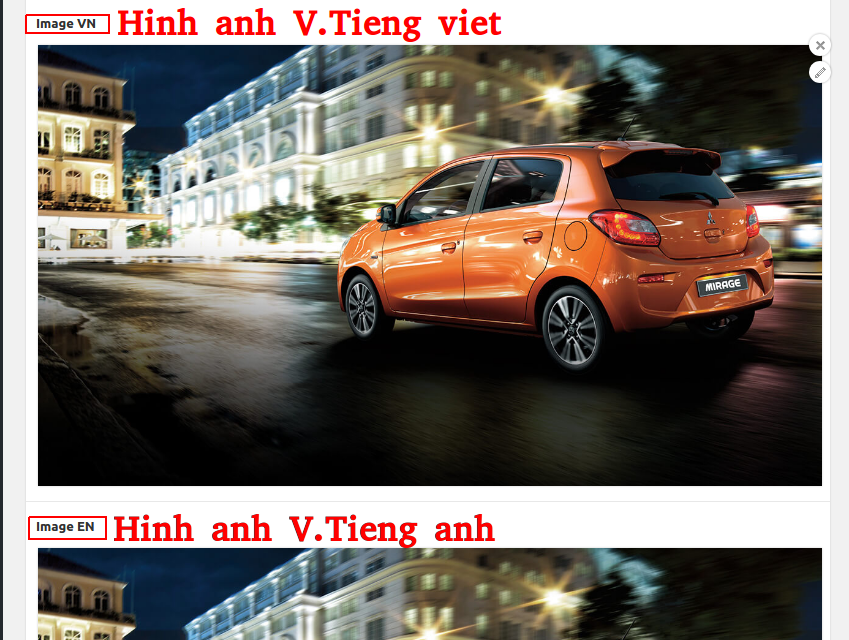
Giao diện khi đăng nhập thành công
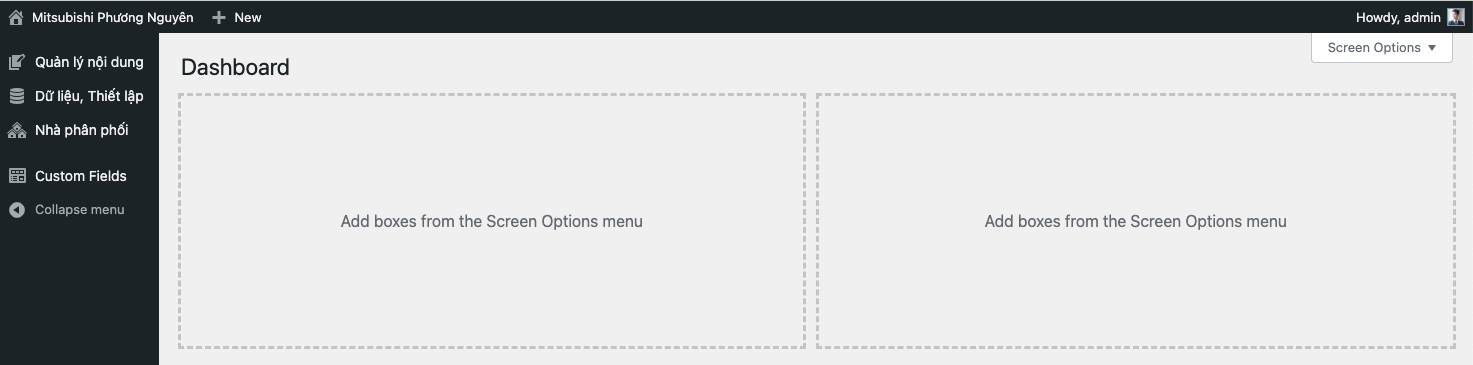
Giao diện khi đăng nhập thành công
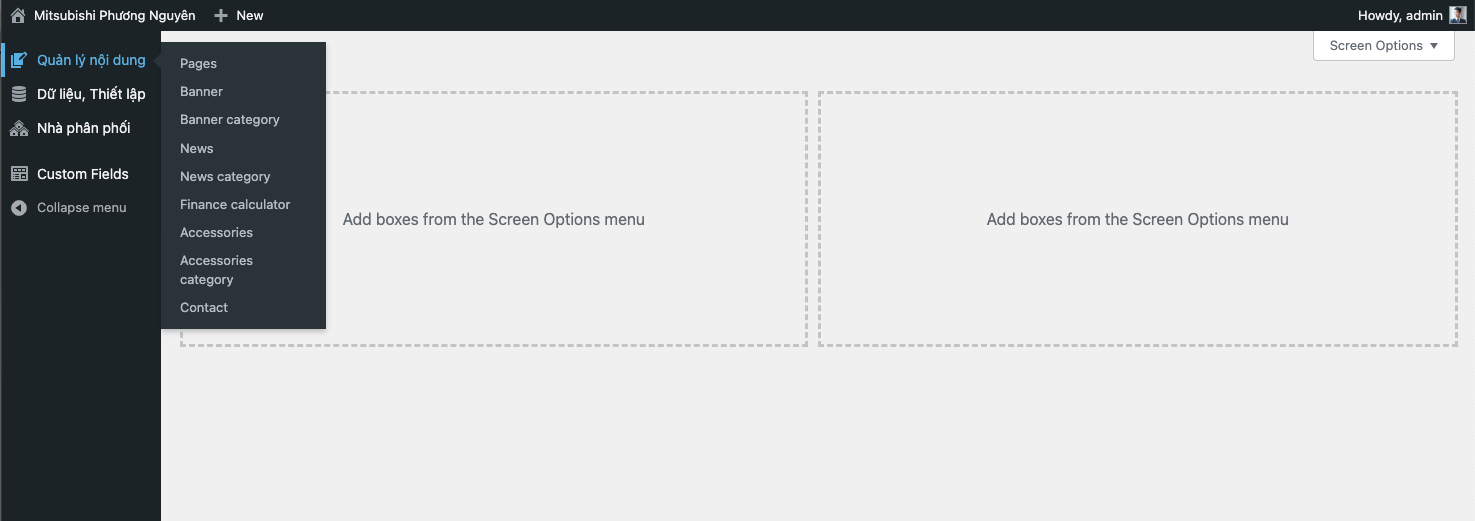
Thanh Menu quản lý nội dung
1 - Cập nhật thông tin đăng ký kinh doanh
1 - Chọn mục Nhà Phân Phối.
2 - Nhấn chọn Tab thông tin đăng ký kinh doanh
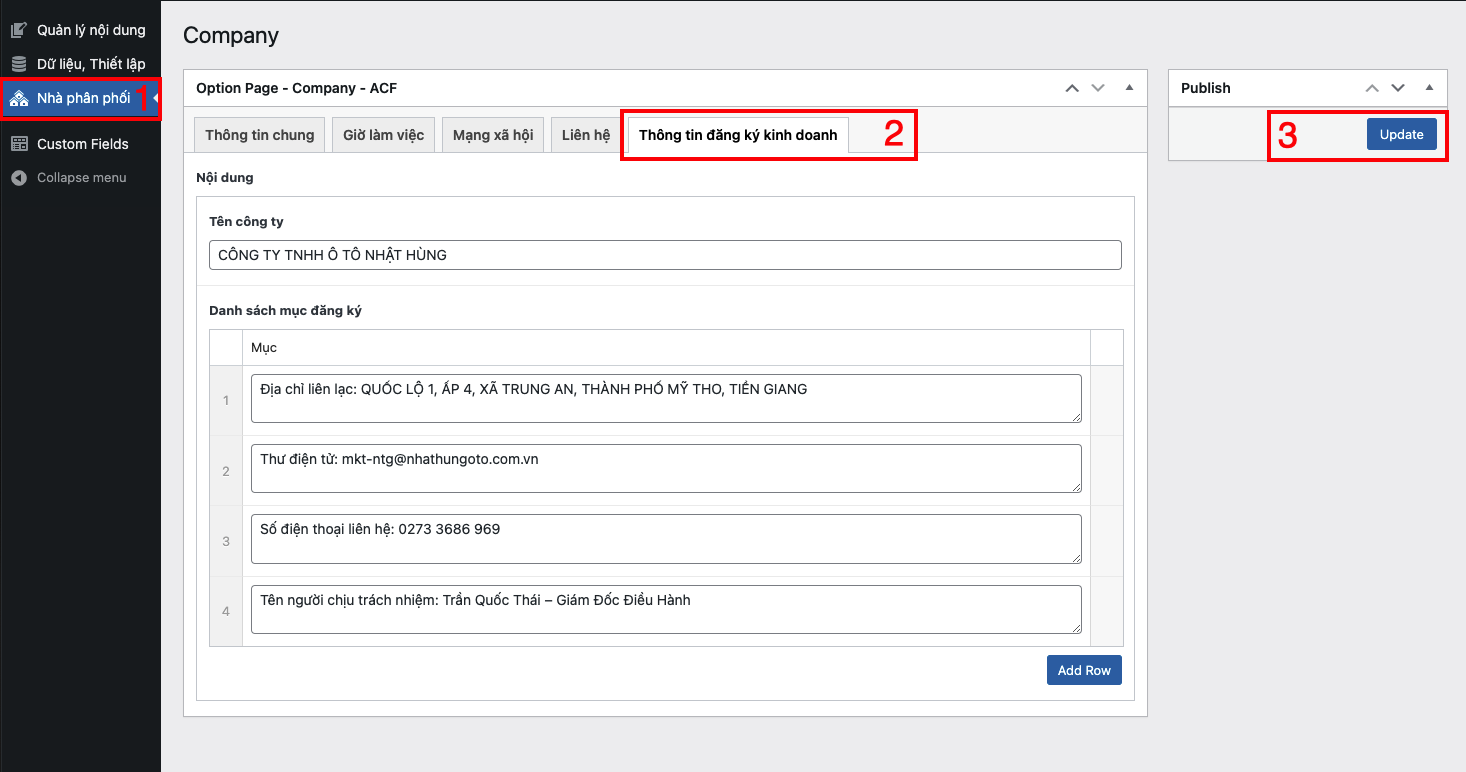
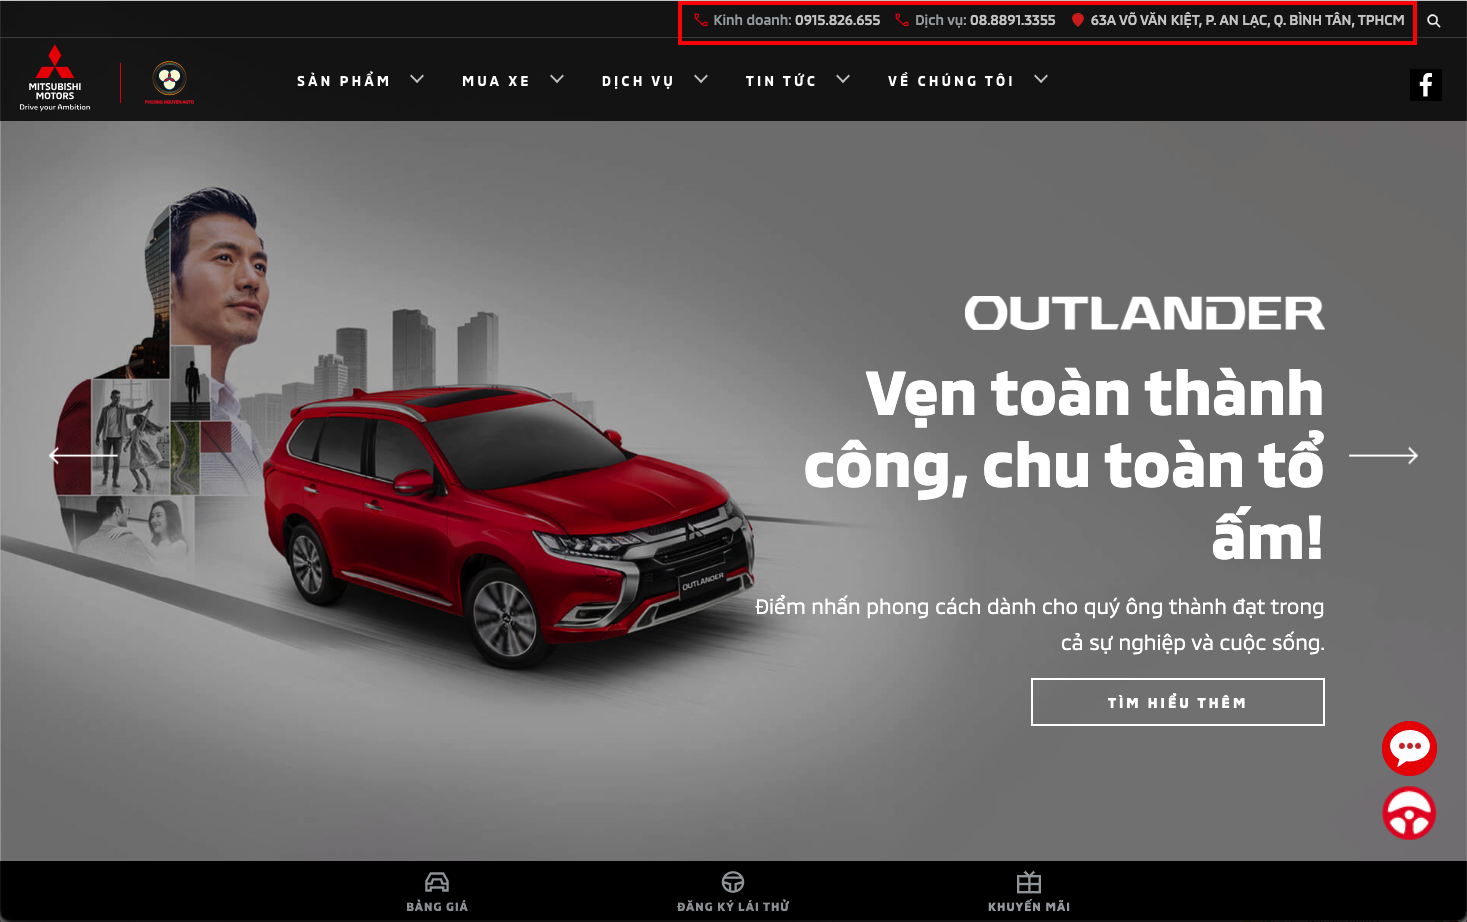
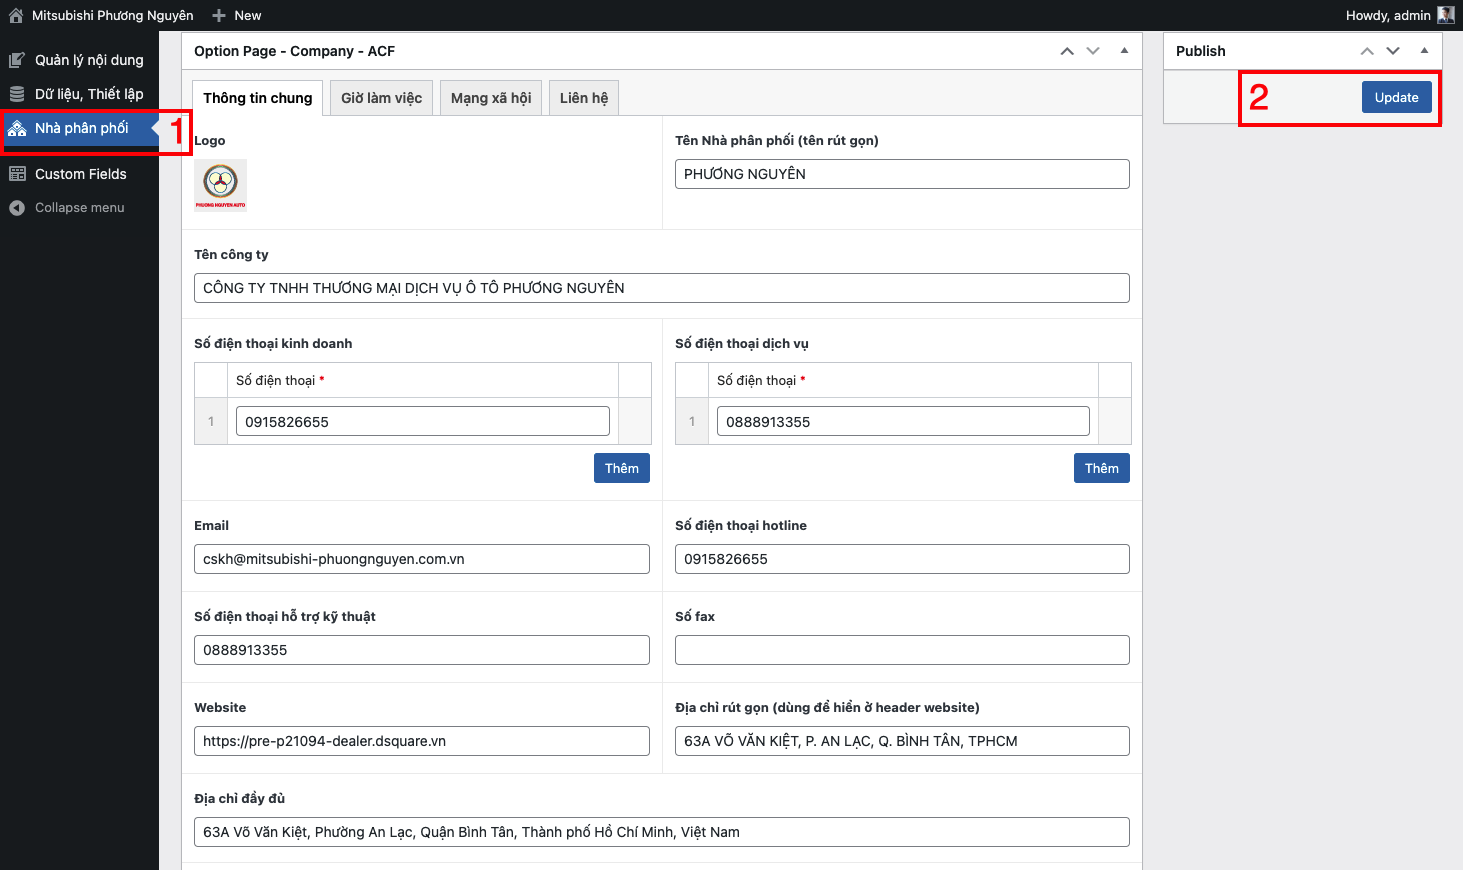
2. Cập nhật thông tin số điện thoại, địa chỉ
1 - Chọn mục Nhà Phân Phối.
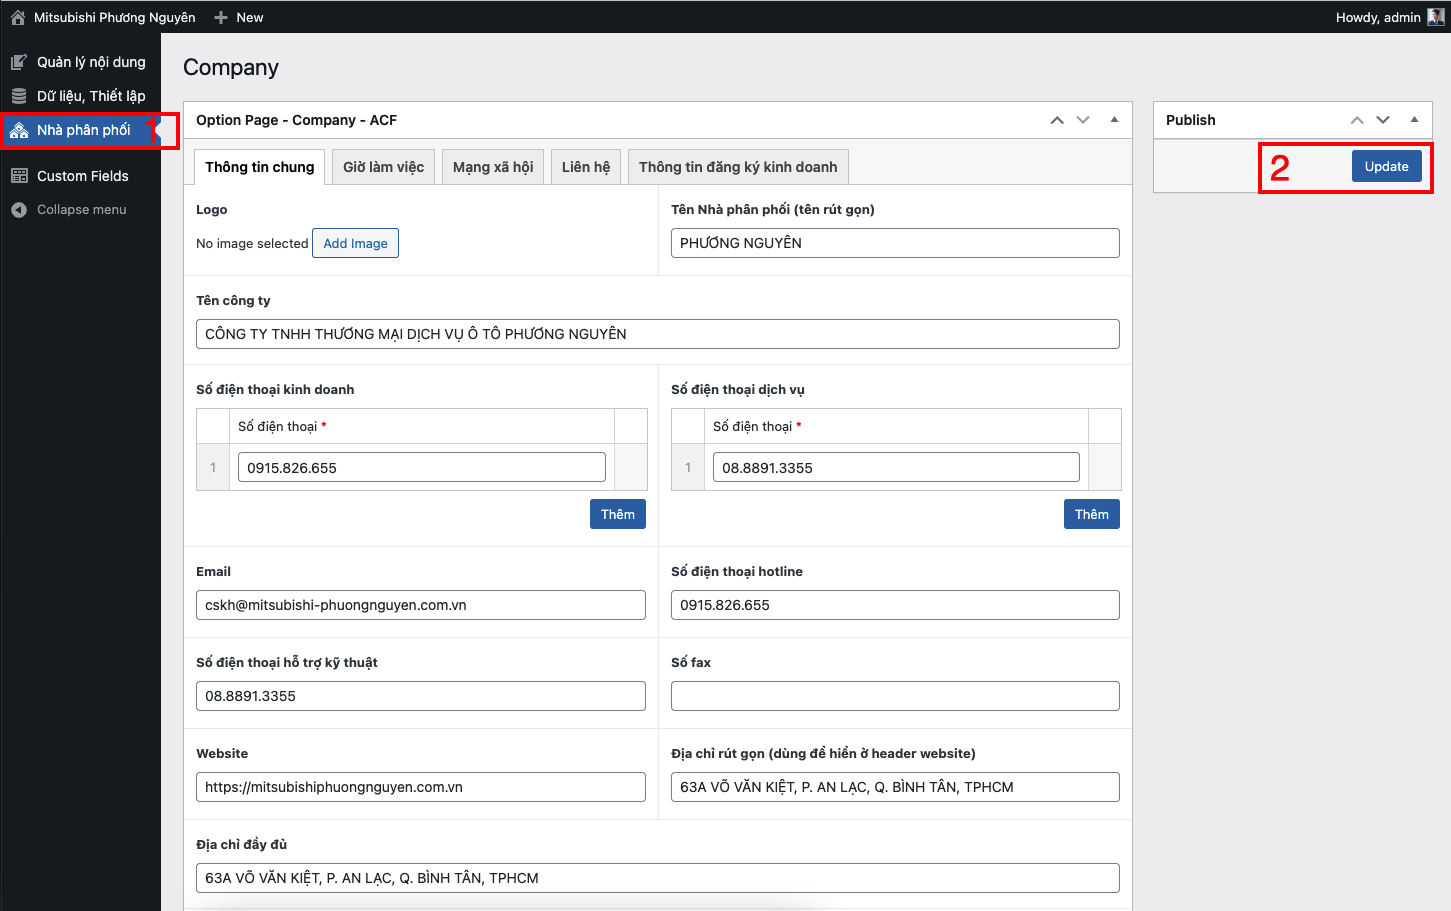
- Nhập thông tin.
2 - Nhấn Update để lưu.
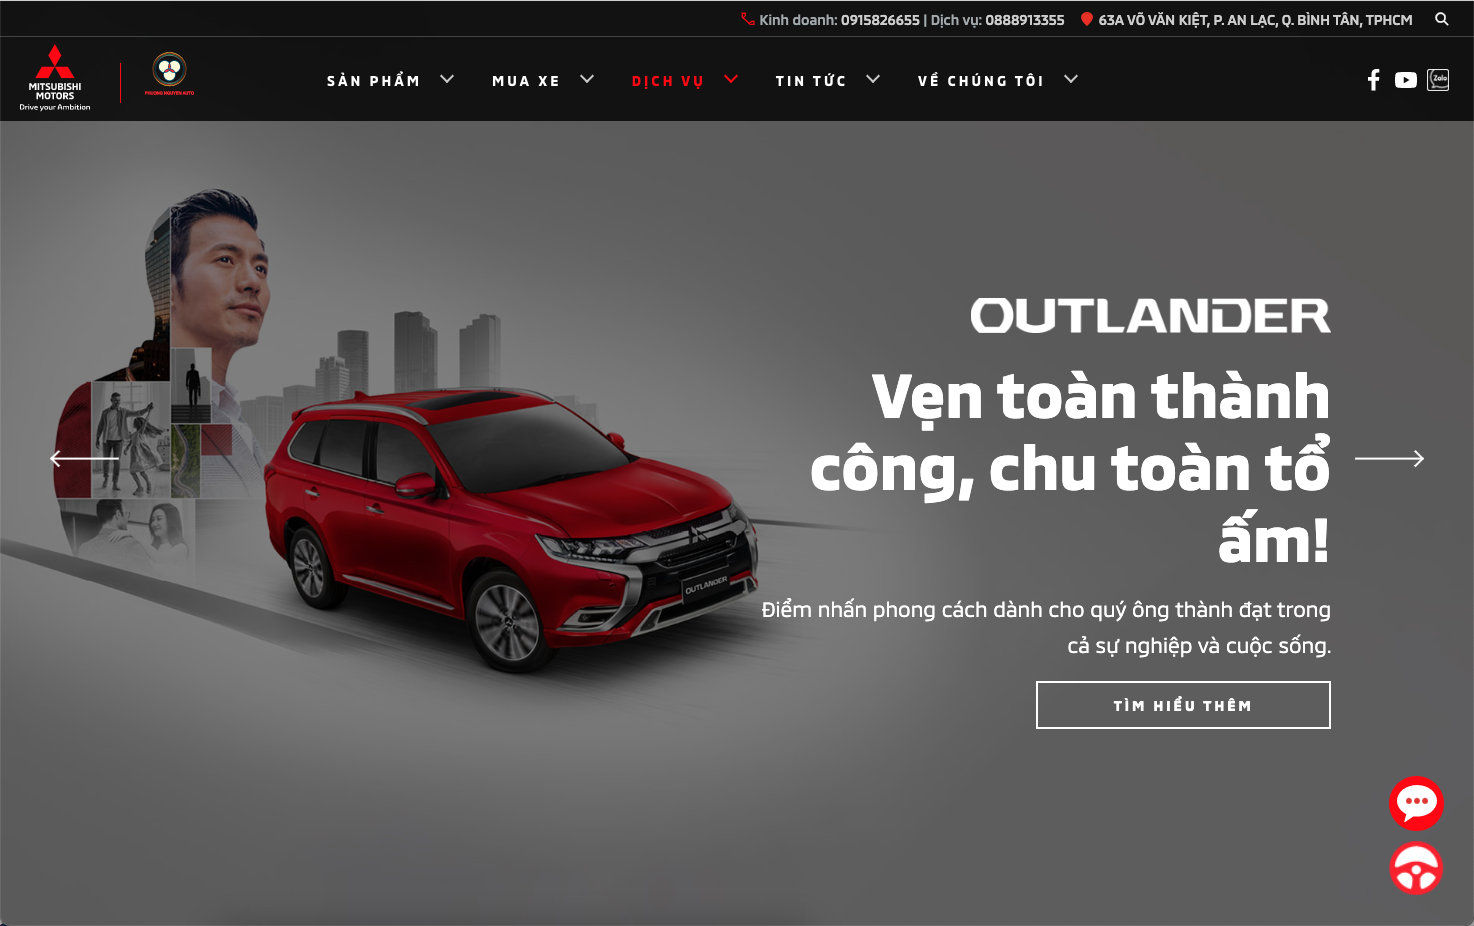
Thông tin hiển thị ngoài website

Giao diện cập nhật trong CMS

1 - Chọn mục Nhà Phân Phối.
2 - Nhấn chọn.
3 - Upload logo.
4 - Dán liên kết đã khai báo với Bộ Công Thương.
Nhấn Update để lưu.
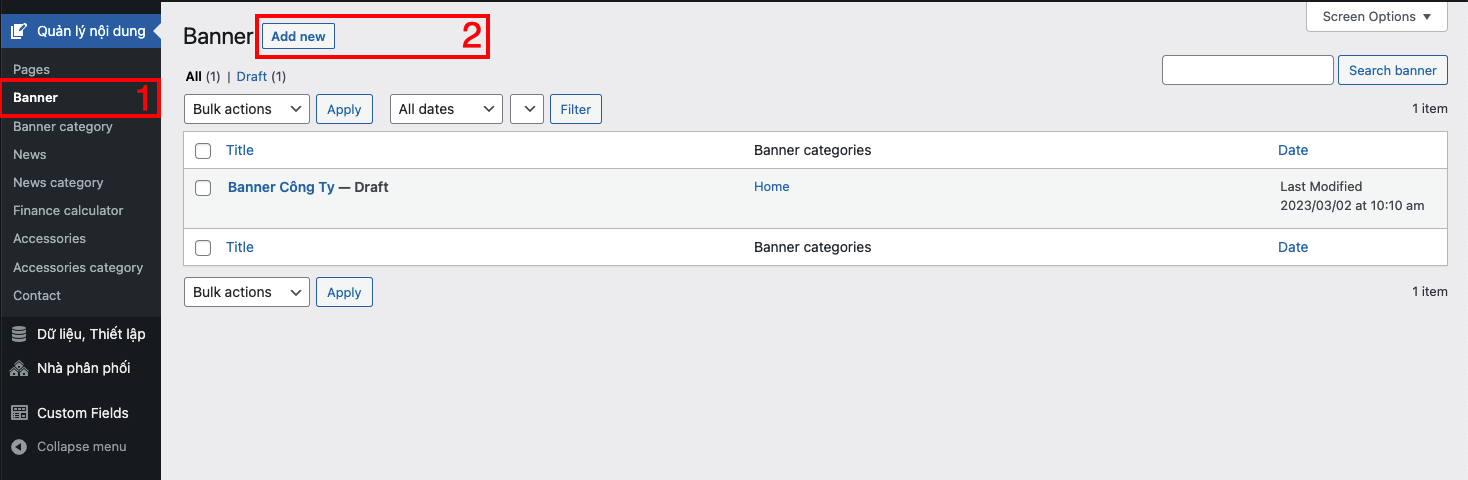
1. Thay đổi Banner
1 - Chọn mục banner.
2 - Tạo mới.
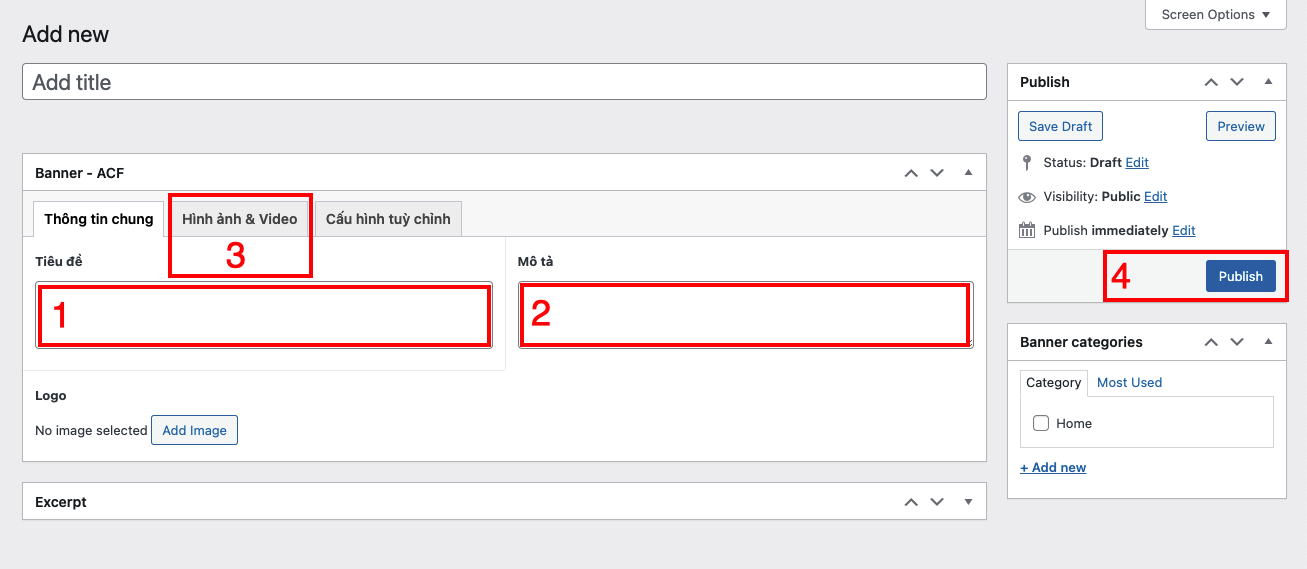
1 - Nhập tiêu đề cho banner.
2 - Nhập mô tả cho banner.
3 - Upload hình ảnh.
4 - Nhấn Publish để lưu.
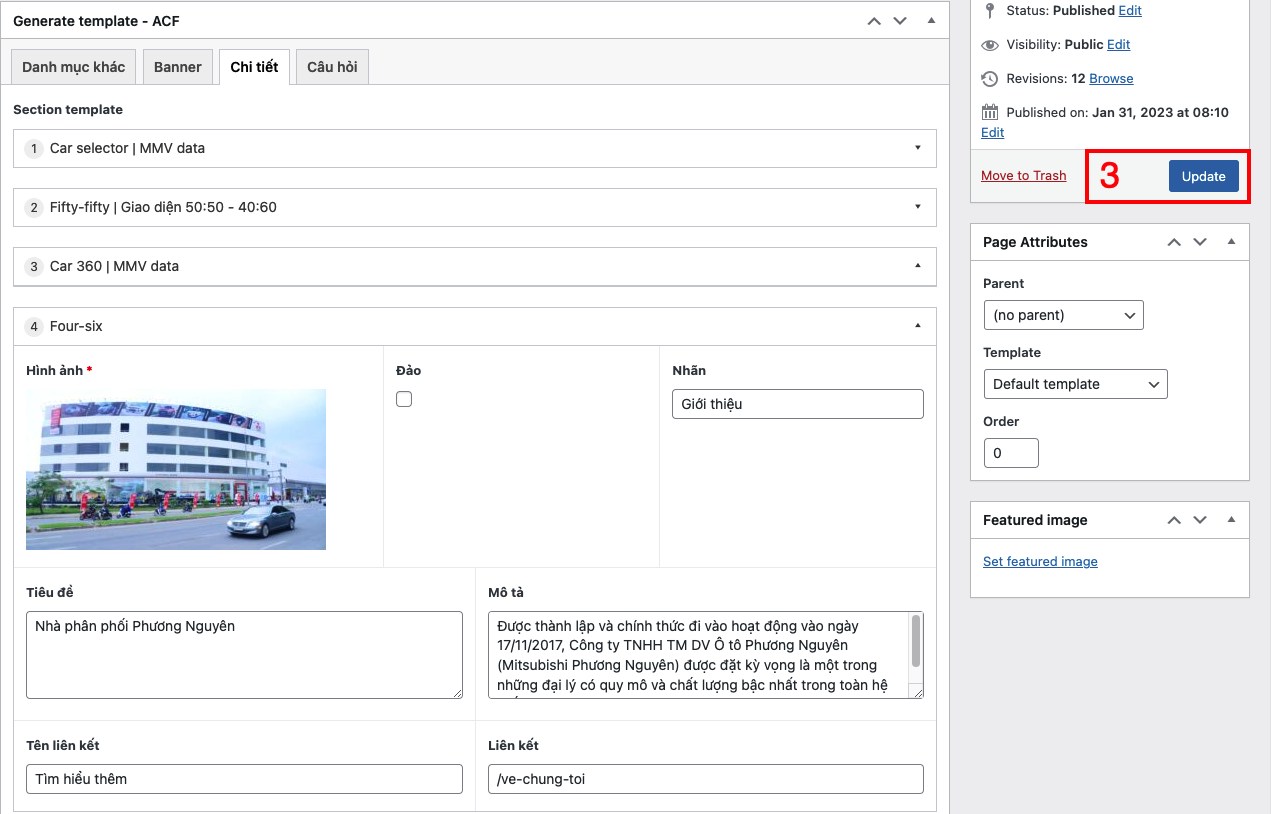
2 - Section Giới thiệu Nhà Phân Phối
1 - Nhấn chọn mục Pages.
2 - Nhấn chọn chỉnh sửa
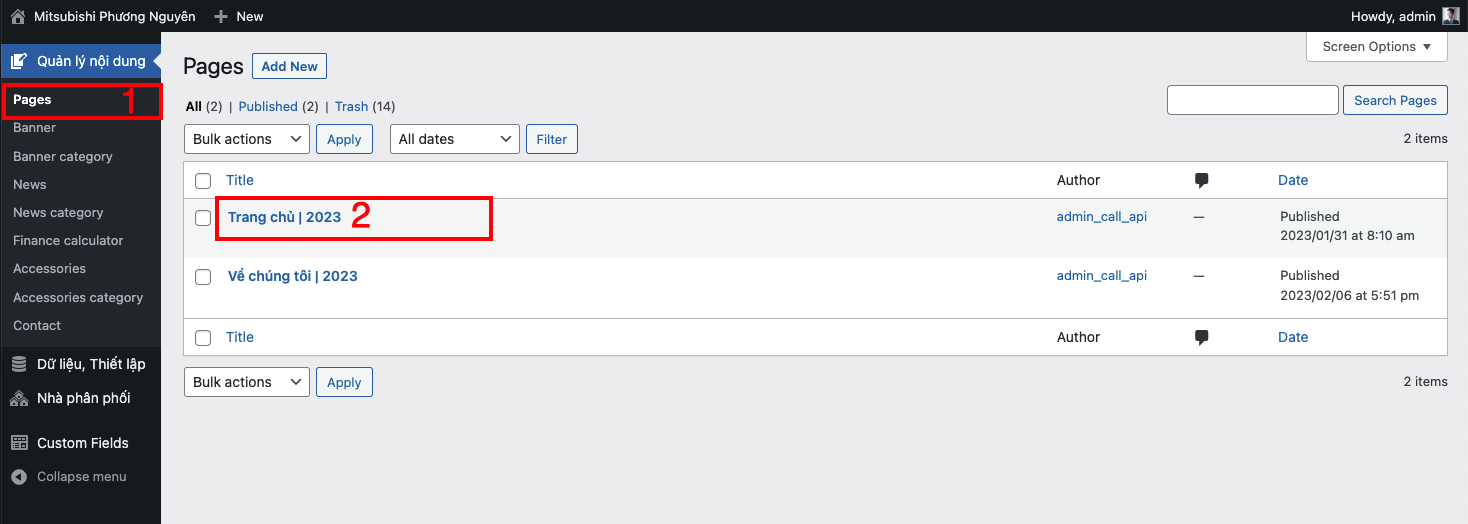
3 - Nhấn Update để lưu thông tin
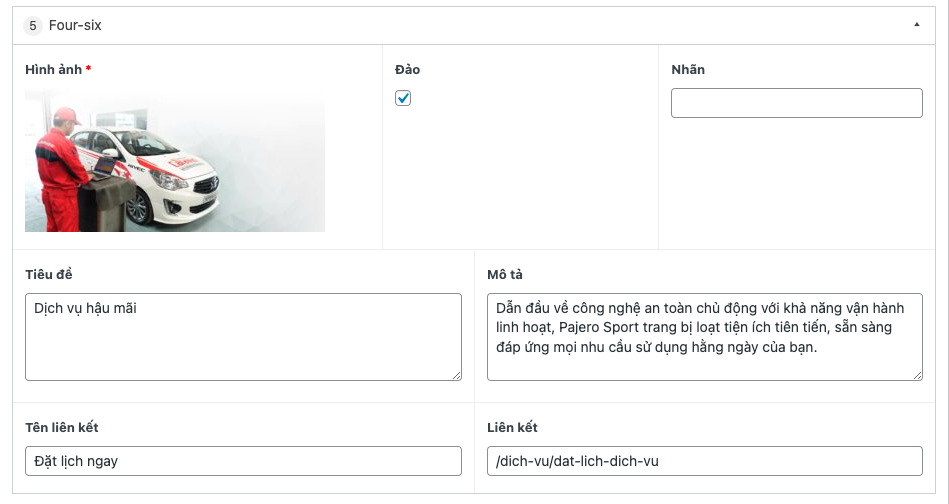
3 - Section dịch vụ hậu mãi

1 - Nhấn chọn mục Pages.
2 - Nhấn chọn chỉnh sửa
4 - Section thông tin Nhà Phân Phối
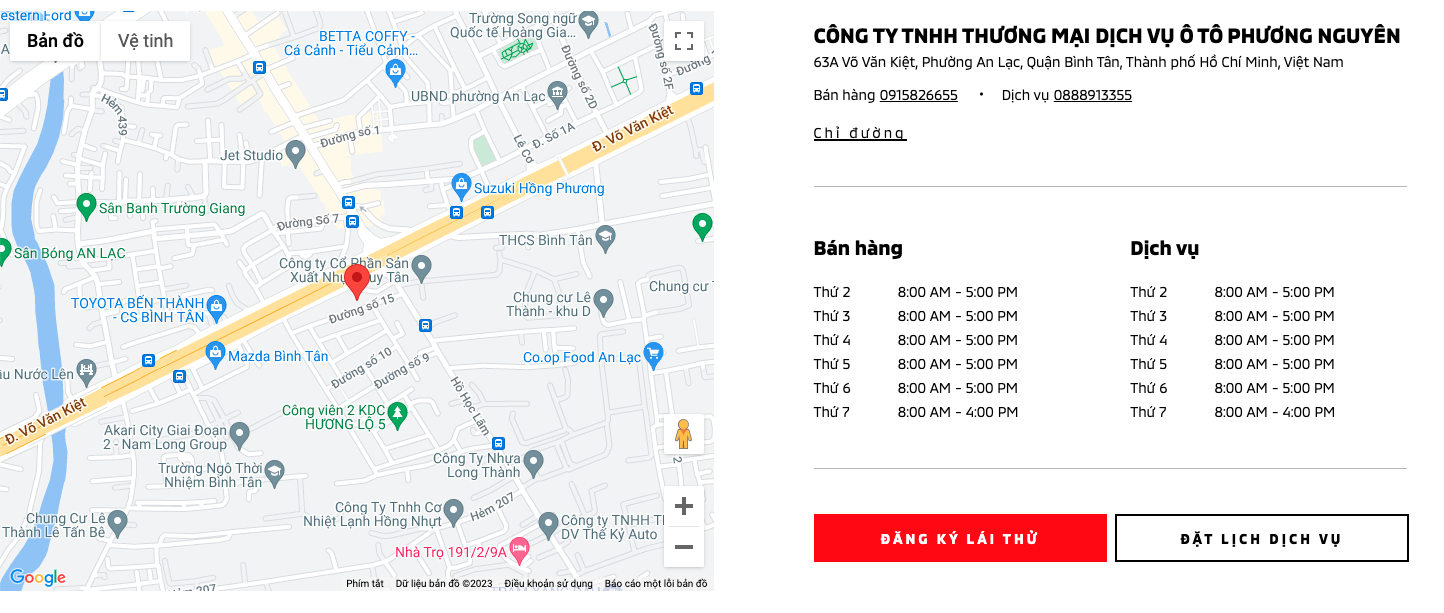
1 - Chọn mục Nhà phân phối.
2 - Nhấn Update để lưu thông tin.
Chỉnh/Sửa Nội Dung Sản phẩm
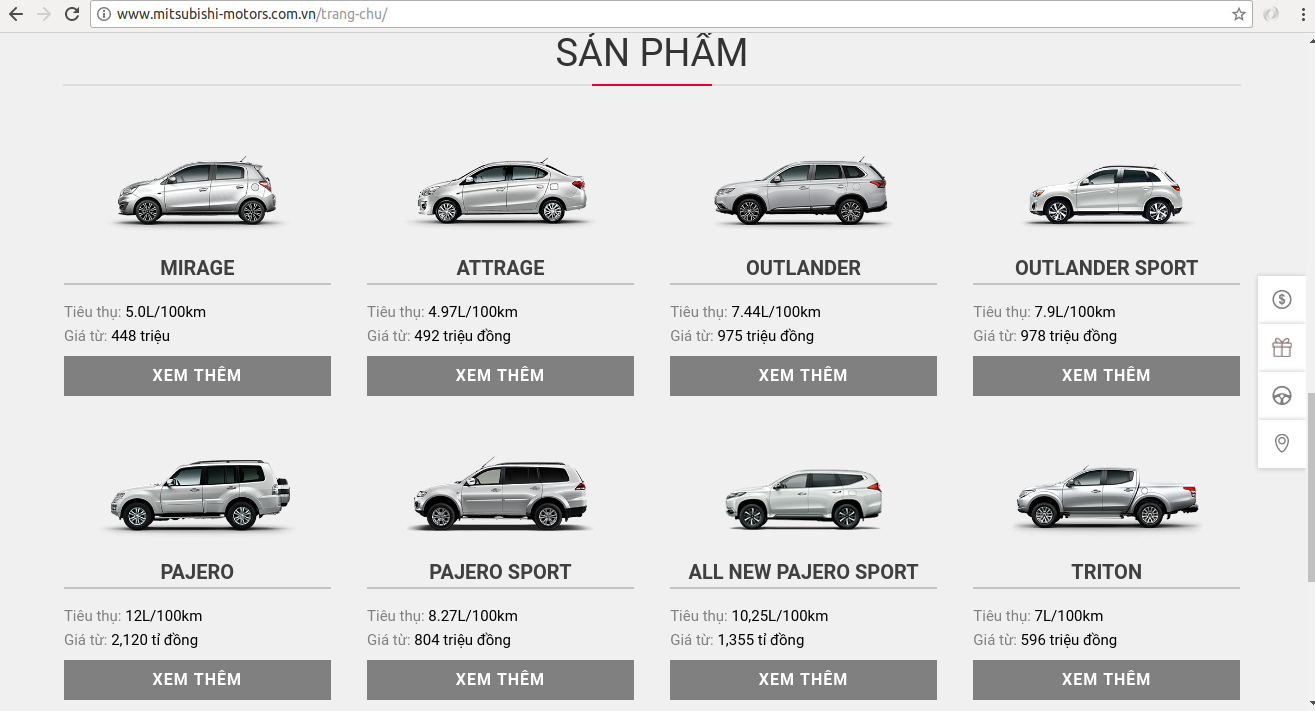
Thay đổi nội dung
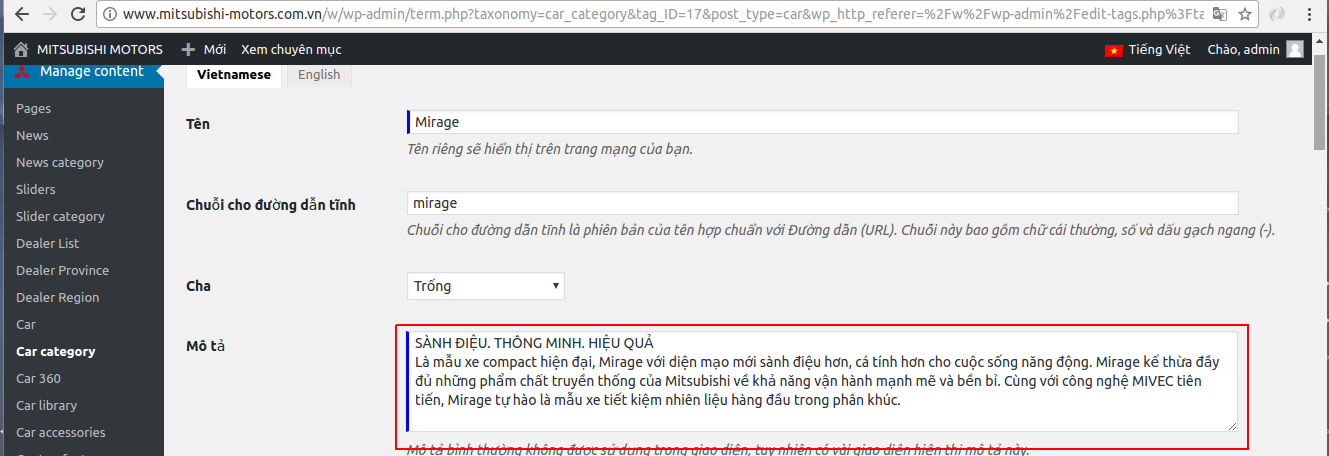
Bước 1 - Đăng nhập Back-End.
Bước 2 - Chọn Mục Manage content ( 1 ) => Car category ( 2 ) => Chọn ( 3 ) để chỉnh sửa
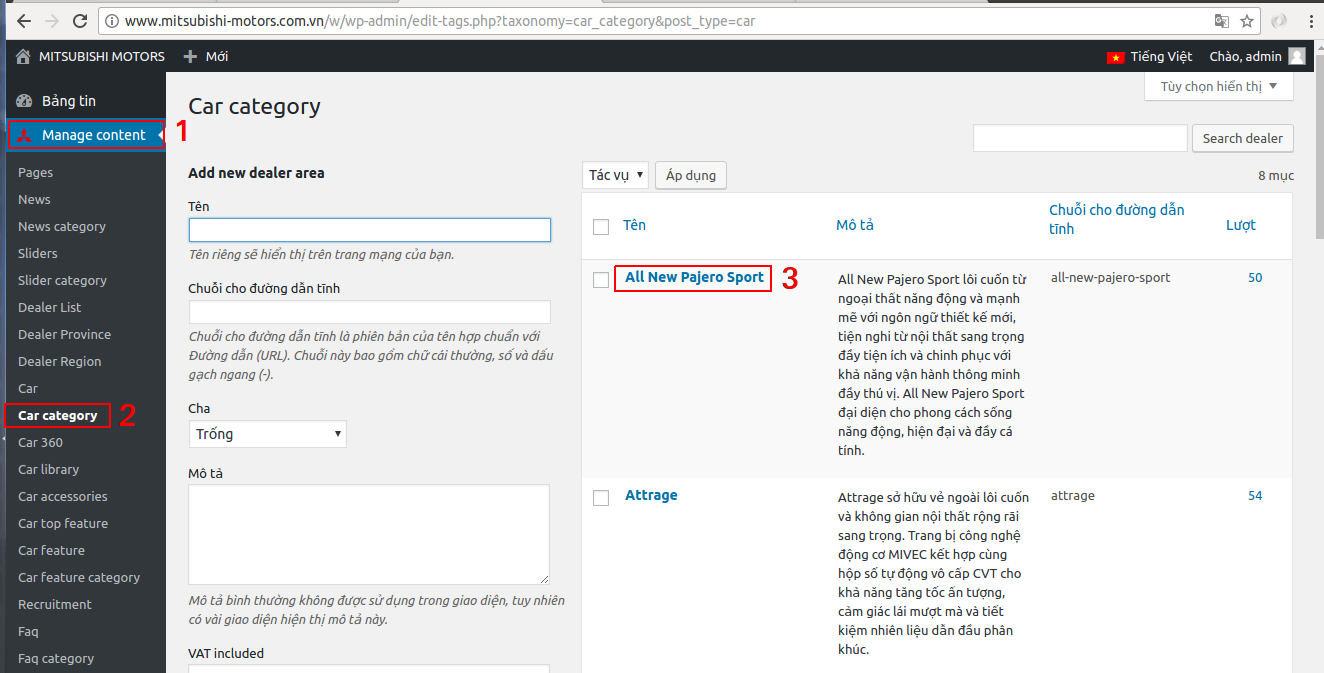
Bước 3 - Thông tin chỉnh sửa nội dung:

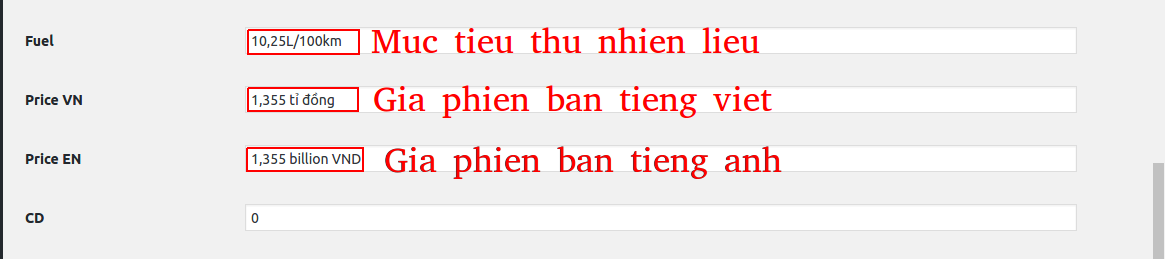
- Sau khi chỉnh sửa xong. Nhấn Cập nhật để lưu lại.
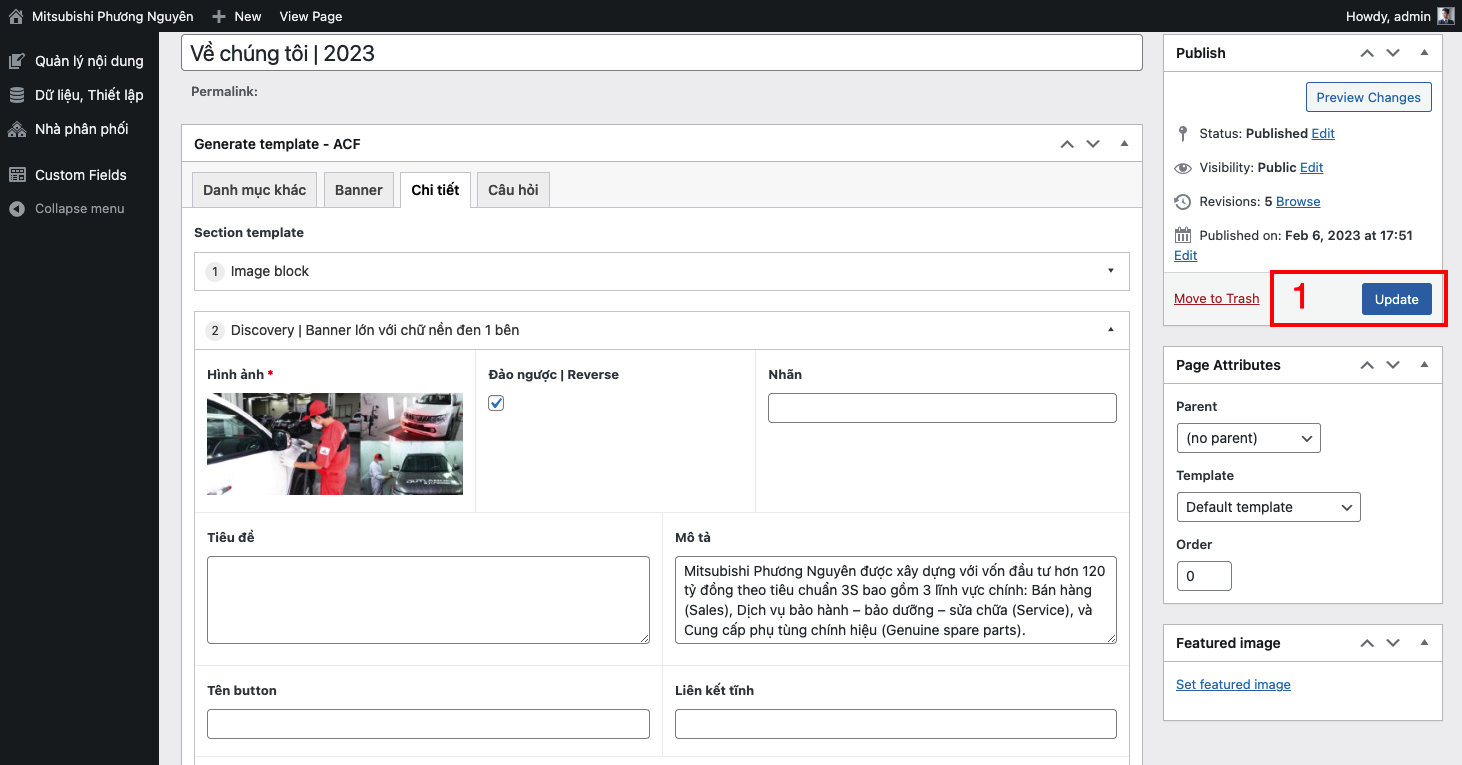
Thay đổi nội dung trang giới thiệu
1 - Chọn mục Pages.
2 - Nhấn chọn chỉnh sửa
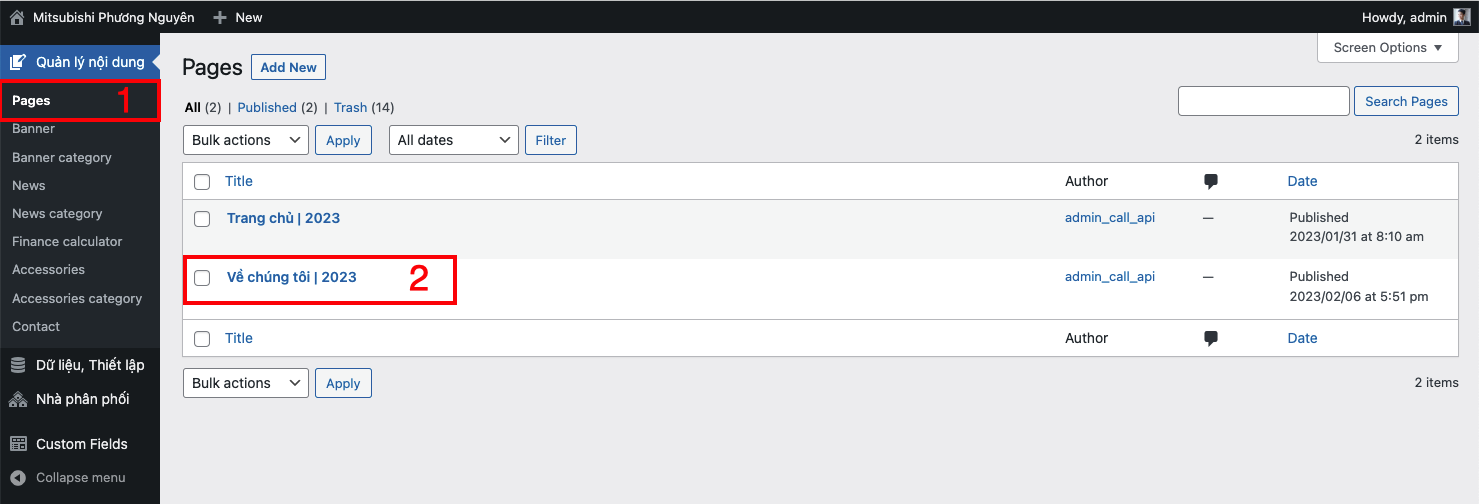
1 - Nhấn Update để lưu thông tin.
Chỉnh/Sửa section đặc điểm nổi bật
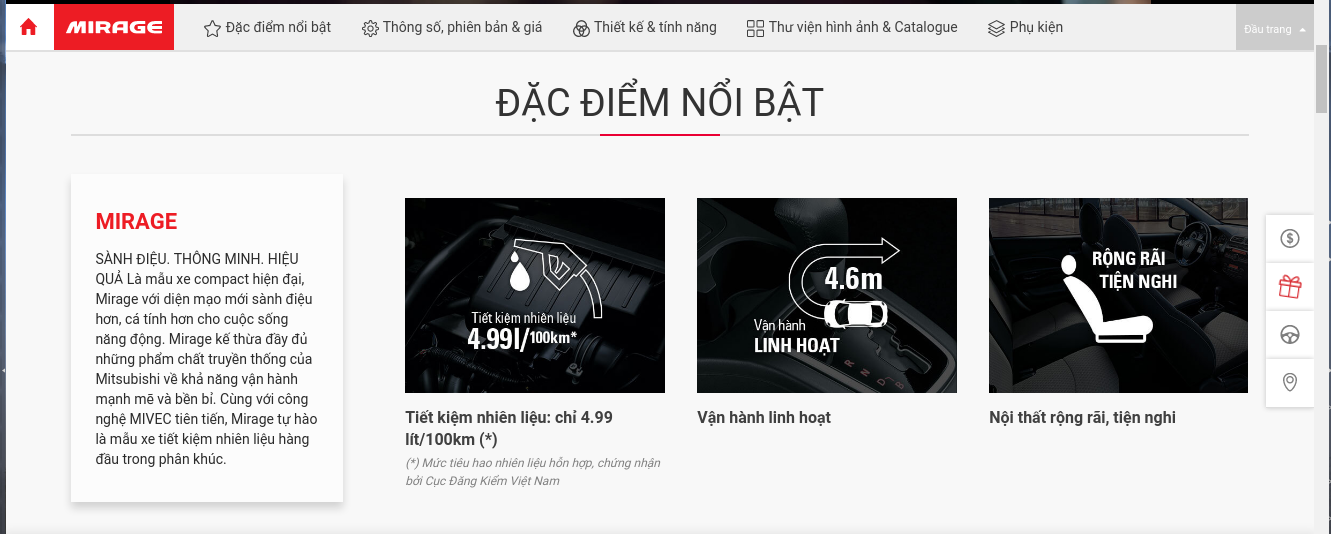
1. Thay đổi nội dung mô tả ngắn sản phẩm
Bước 1 - Đăng nhập Back-End.
Bước 2 - Chọn Mục Manage content ( 1 ) => Car category ( 2 ) => Chọn ( 3 ) để chỉnh sửa
Bước 3 - Thông tin chỉnh sửa nội dung:
- Sau khi chỉnh sửa xong. Nhấn Cập nhật để lưu lại.
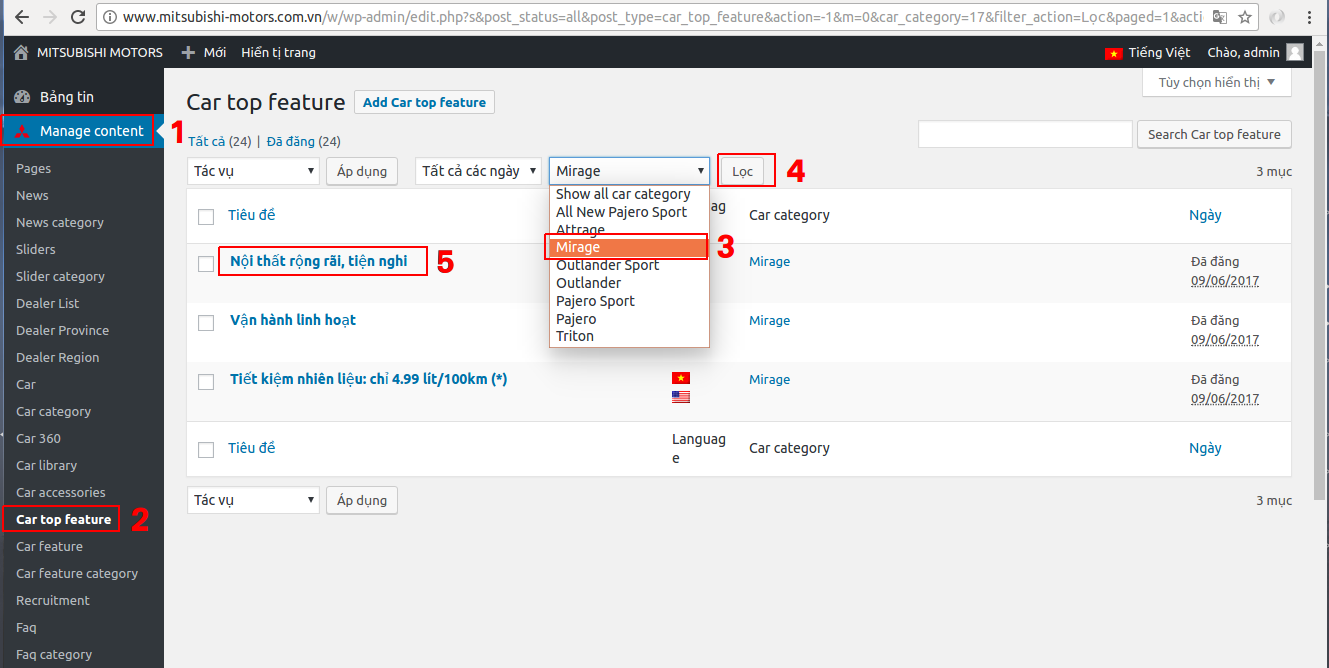
2. Chỉnh/Sửa section đặc điểm nổi bật
Bước 1 - Đăng nhập Back-End.
Bước 2 - Chọn Mục Manage content ( 1 ) => Car top feature ( 2 ) => Chọn sản phẩm ( 3 ). Nhấn ( 4 ) để liệt kê danh sách cần chỉnh sửa của từng sản phẩm.
Bước 3 Nhấn ( 5 ) để chỉnh sửa
Bước 4 - Thông tin chỉnh sửa nội dung:
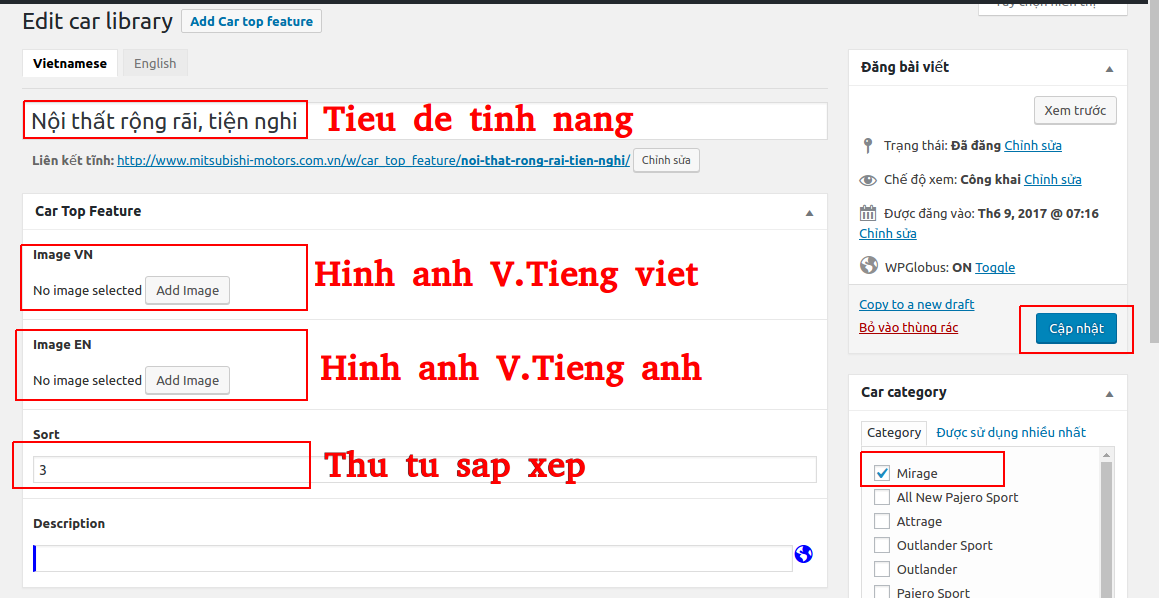 - Sau khi chỉnh sửa xong. Nhấn Cập nhật để lưu lại.
Chỉnh/Sửa Thông tin khuyến mãi cho từng sản phẩm
Bước 1 - Chọn Mục Manage content => Car => Chọn xe để chỉnh sửa

Chỉnh/Sửa section thông số kỹ thuật
1. Chỉnh/Sửa hình ảnh 360, màu sắc của sản phẩm
Bước 1 - Đăng nhập Back-End.
Bước 2 - Chọn Mục Manage content ( 1 ) => Car 360 ( 2 ) => Chọn ( 3 ) để chỉnh sửa => Nhấn Lọc ( 4 )
Bước 3 - Nhấn ( 5 ) để chỉnh sửa.
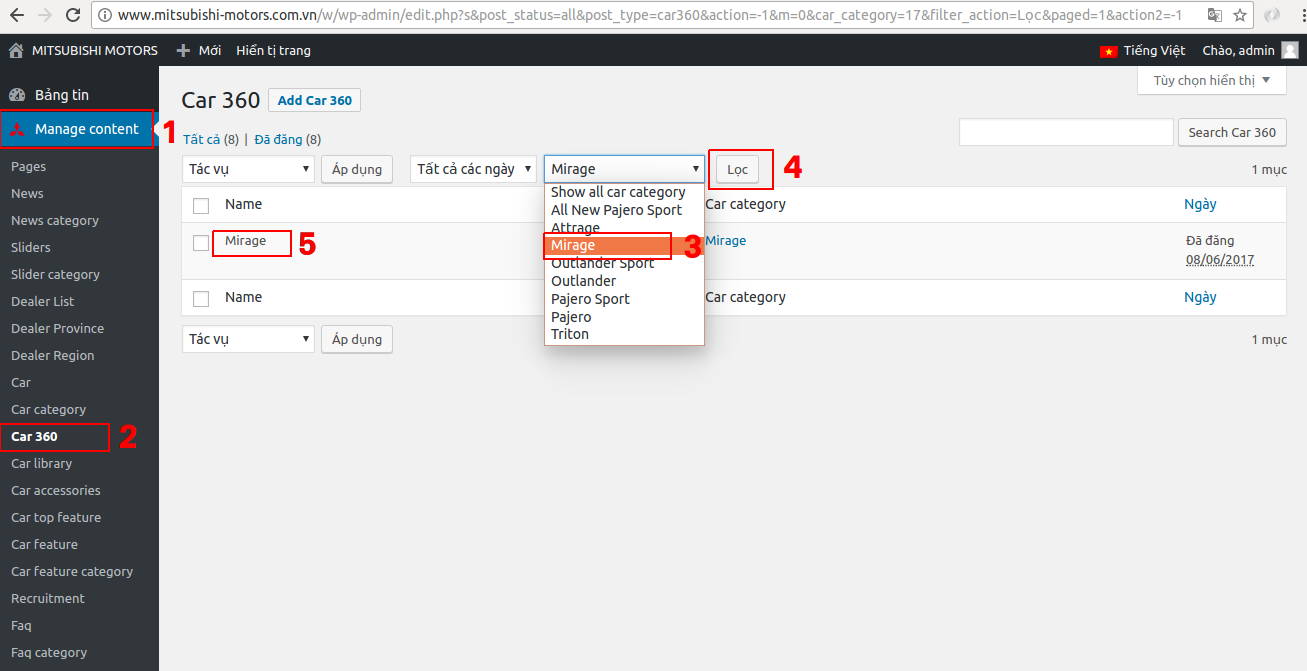
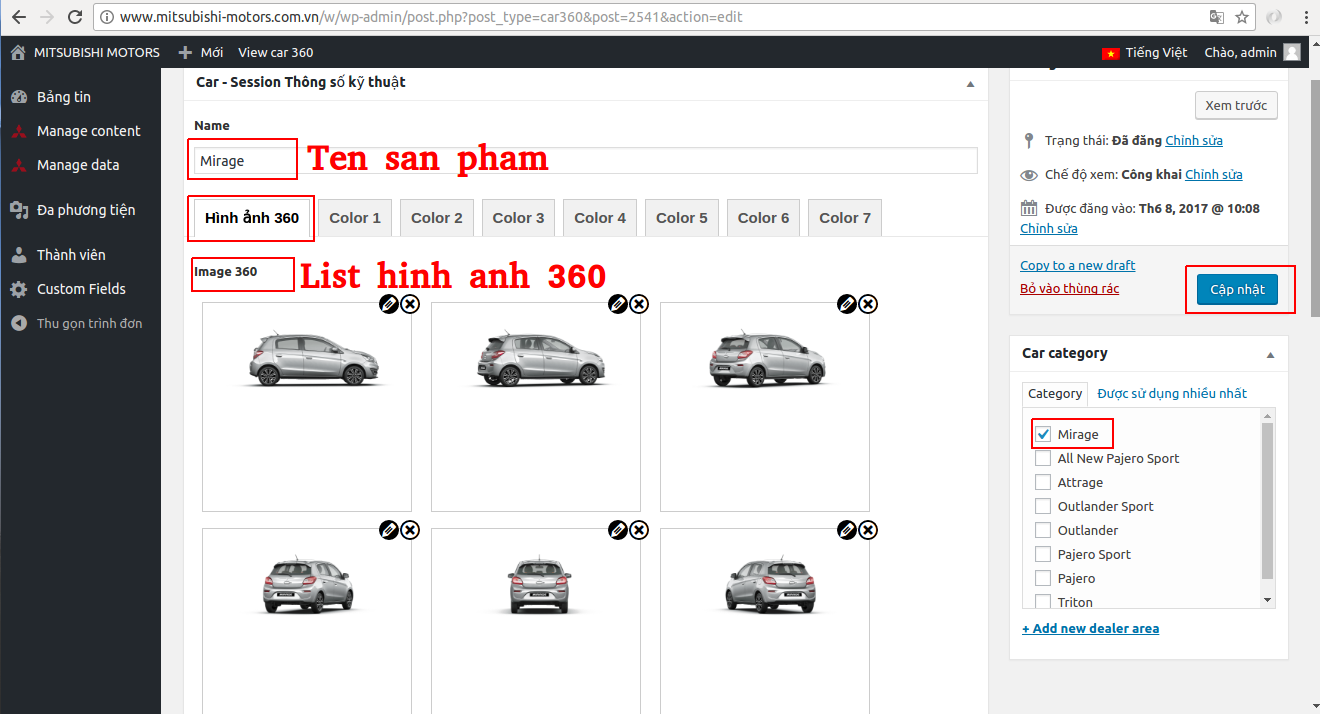
Bước 4 - Thông tin chỉnh sửa nội dung:
*Tab Hình ảnh 360
*Tab Hình ảnh hiển thị theo màu xe
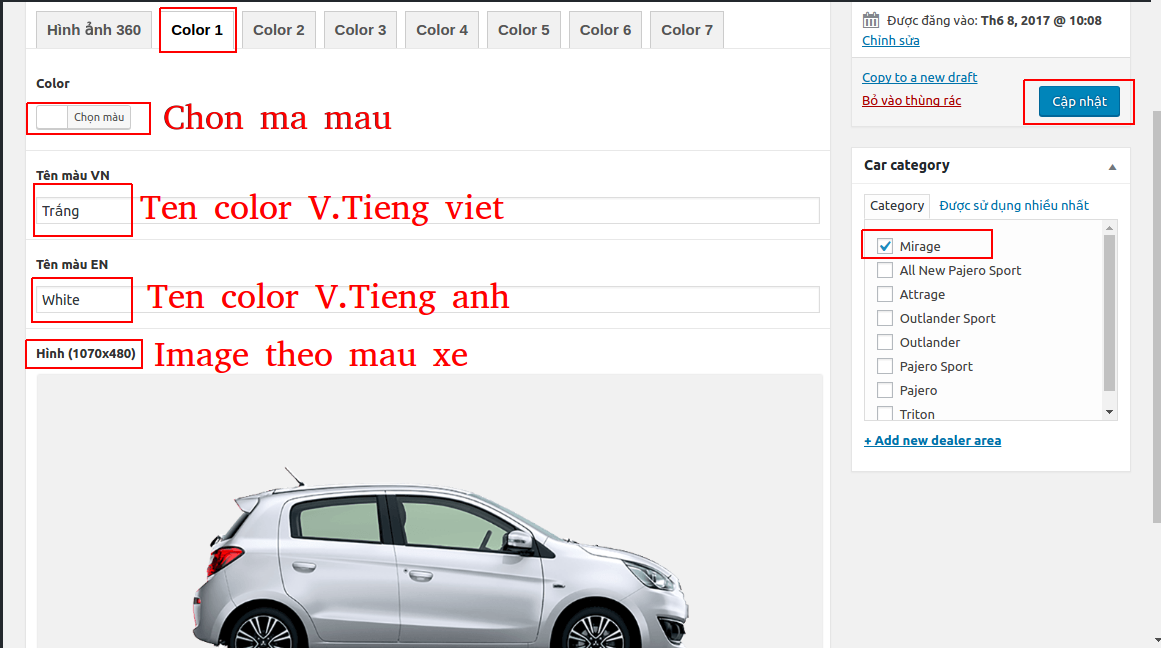
- Sau khi chỉnh sửa xong. Nhấn Cập nhật để lưu lại.
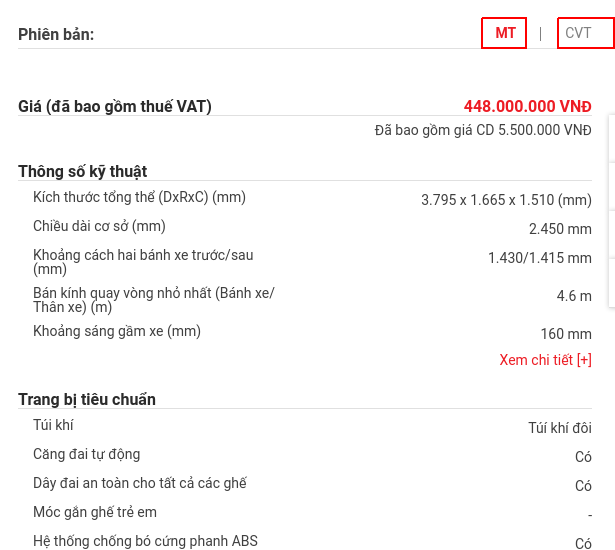
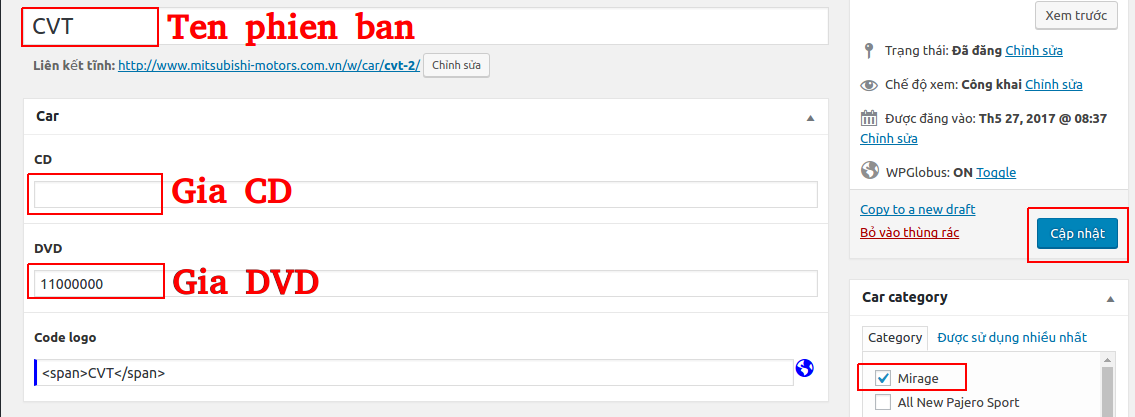
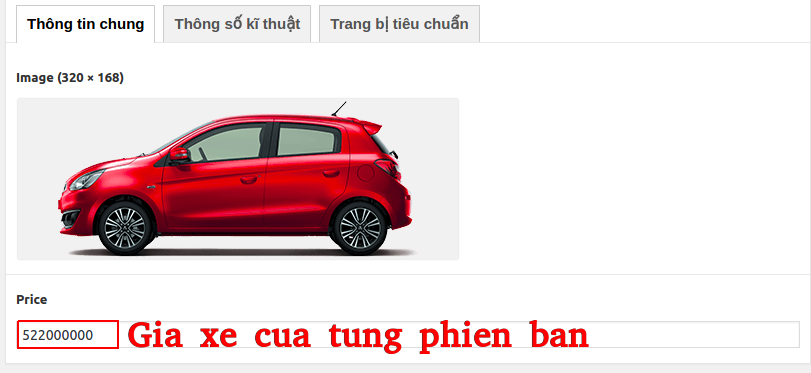
1. Chỉnh/Sửa thông tin của từng phiên bản ( Giá, Thông số, Trang bị )
Bước 1 - Đăng nhập Back-End.
Bước 2 - Chọn Mục Manage content ( 1 ) => Car ( 2 ) => Chọn ( 3 ) để lọc => Nhấn Lọc ( 4 )
Bước 3 - Nhấn ( 5 ) để chỉnh sửa.
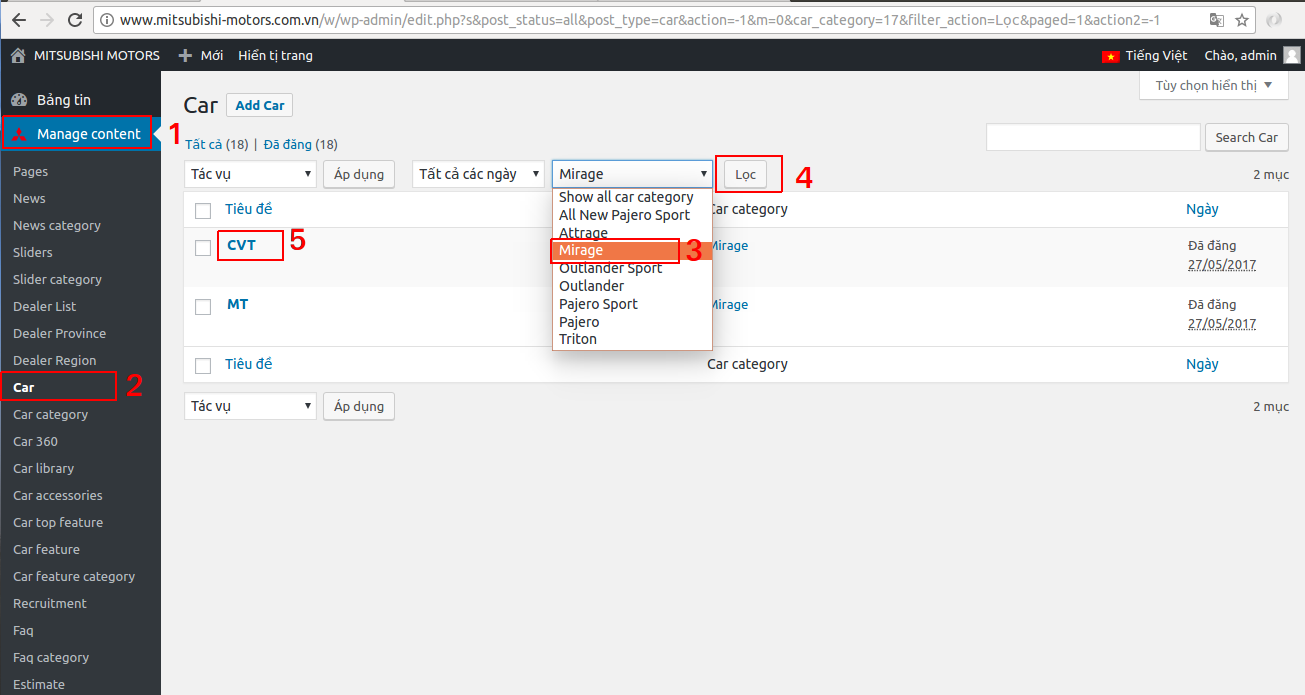
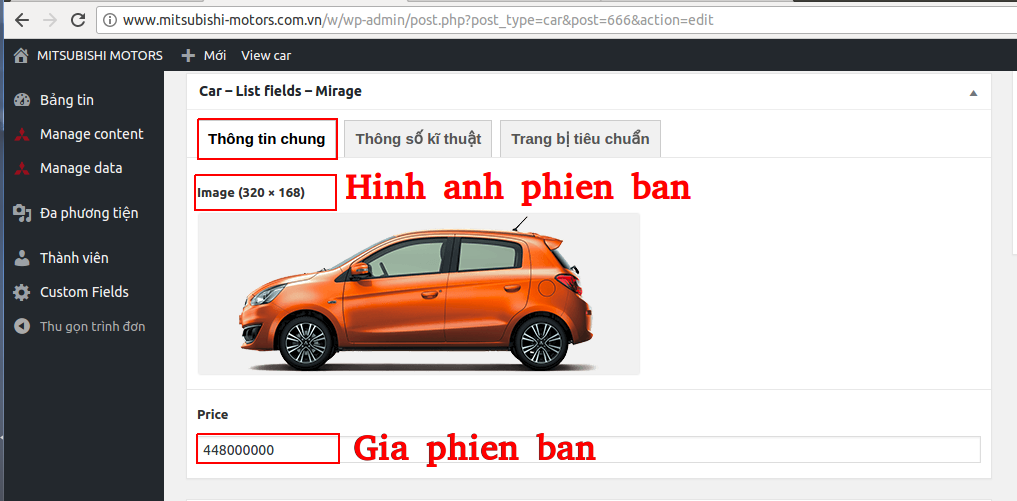
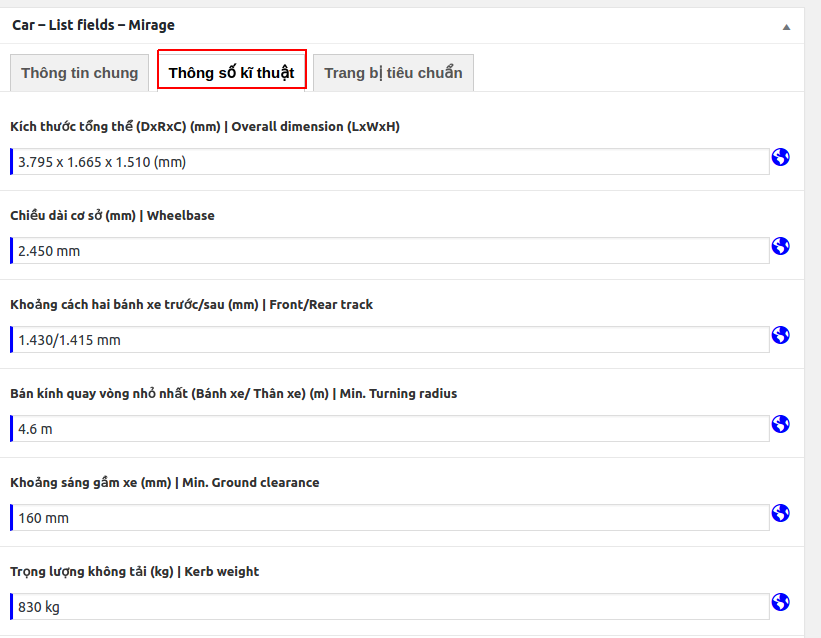
Bước 4 - Thông tin chỉnh sửa nội dung:
*Thông tin chung của sản phẩm
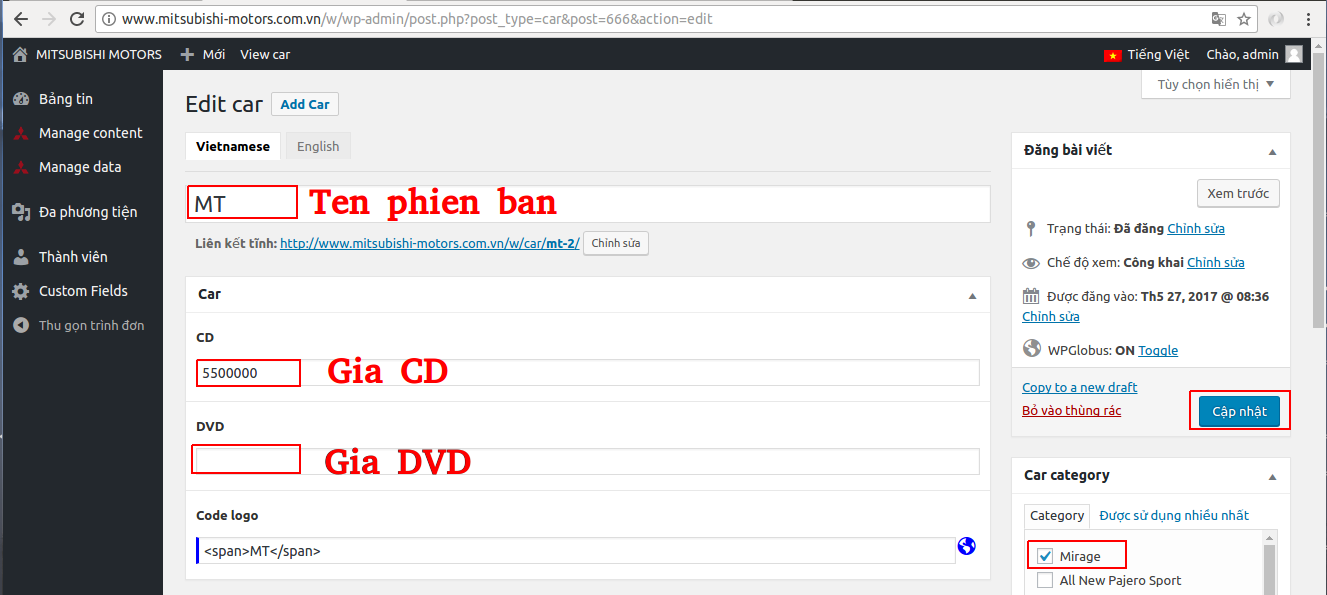
*Tab Thông tin chung
*Tab Thông số kỹ thuật
*Tab Trang bị tiêu chuẩn
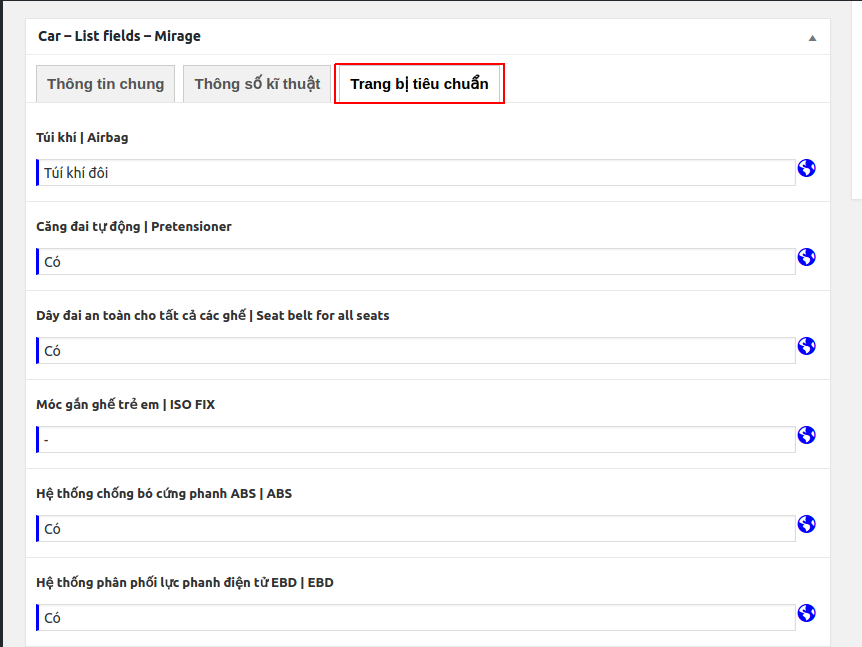
- Sau khi chỉnh sửa xong. Nhấn Cập nhật để lưu lại.
Chỉnh/Sửa section ngoại thất của sản phẩm
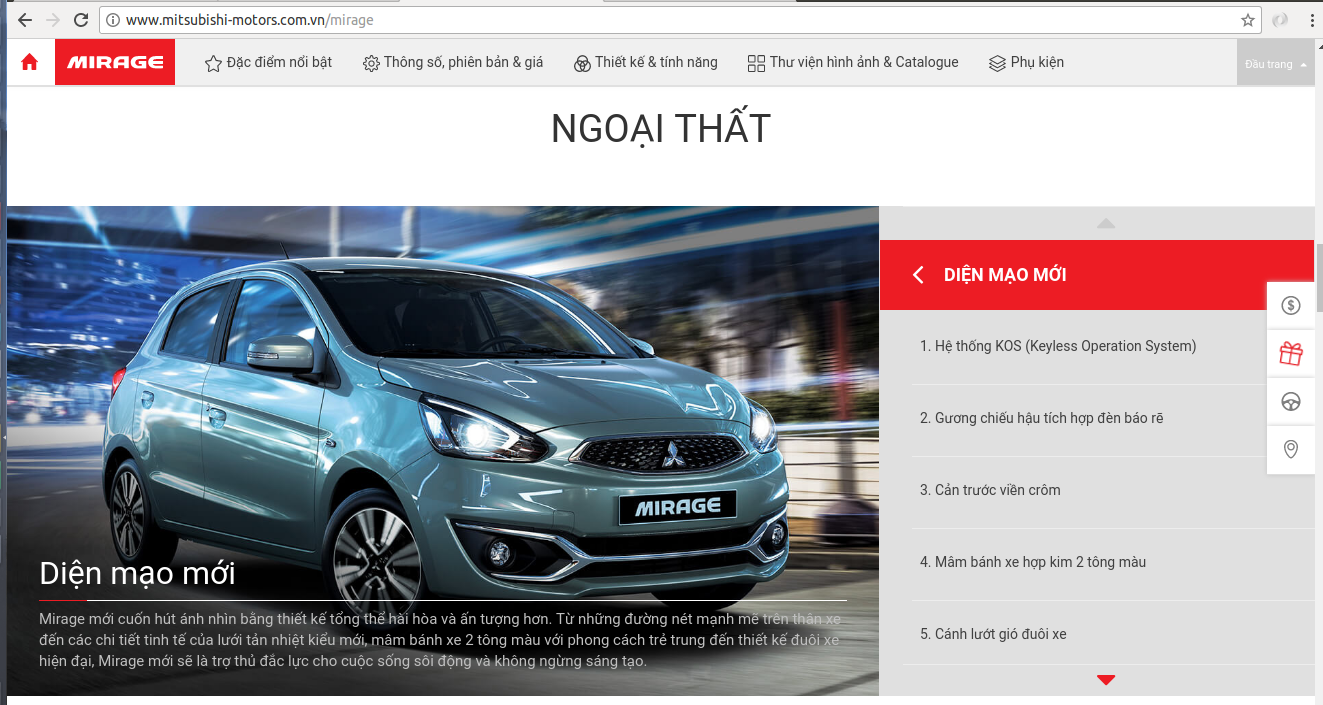
Thay đổi nội dung
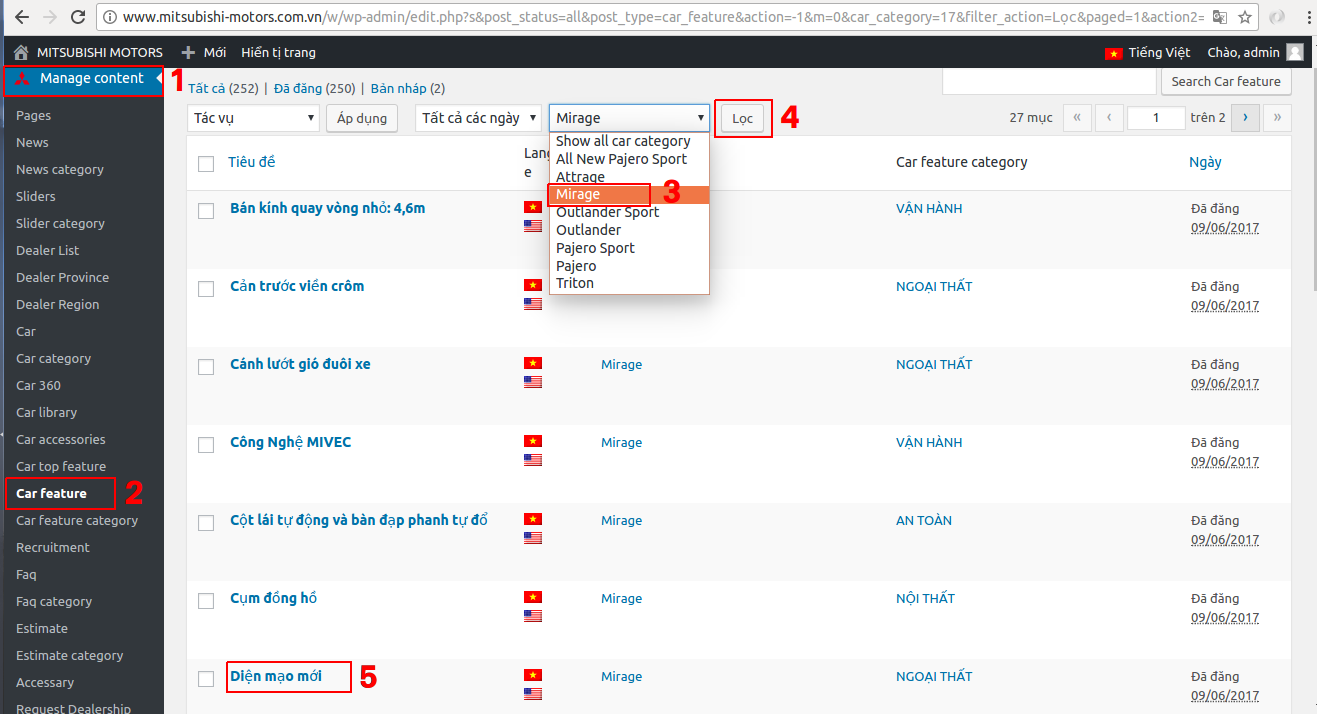
Bước 1 - Đăng nhập Back-End.
Bước 2 - Chọn Mục Manage content ( 1 ) => Car feature ( 2 ) => Chọn ( 3 ) để lọc => ( 4 )
Bước 3 - Nhấn (5) để cập nhật nội dung.
Bước 4 - Thông tin chỉnh sửa nội dung:
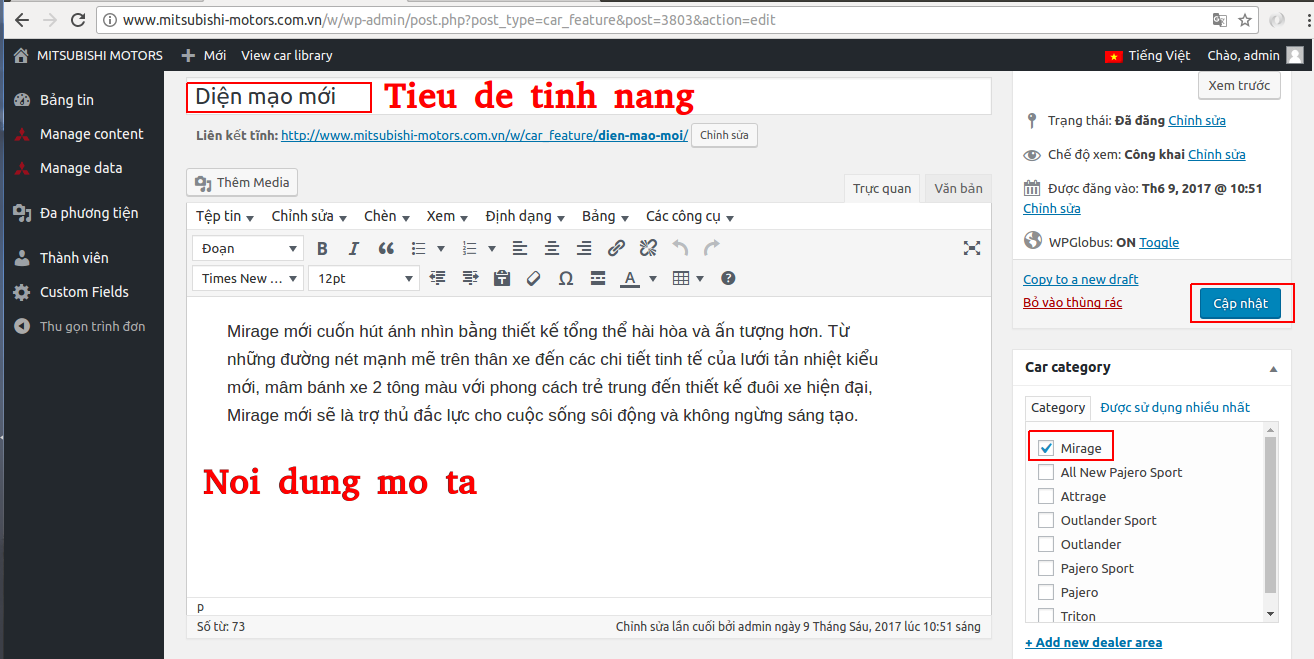
- Sau khi chỉnh sửa xong. Nhấn Cập nhật để lưu lại.
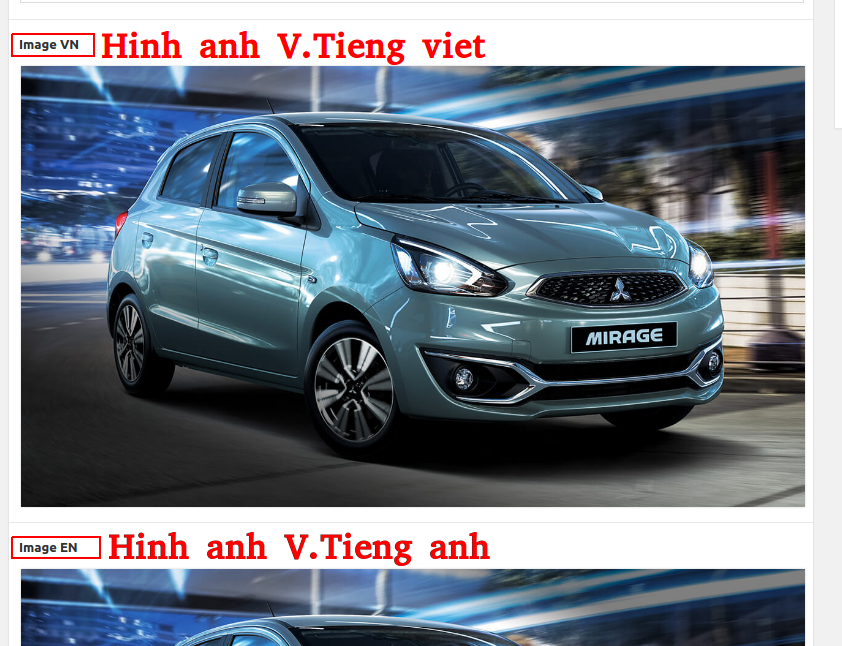
Chỉnh/Sửa section nội thất của sản phẩm
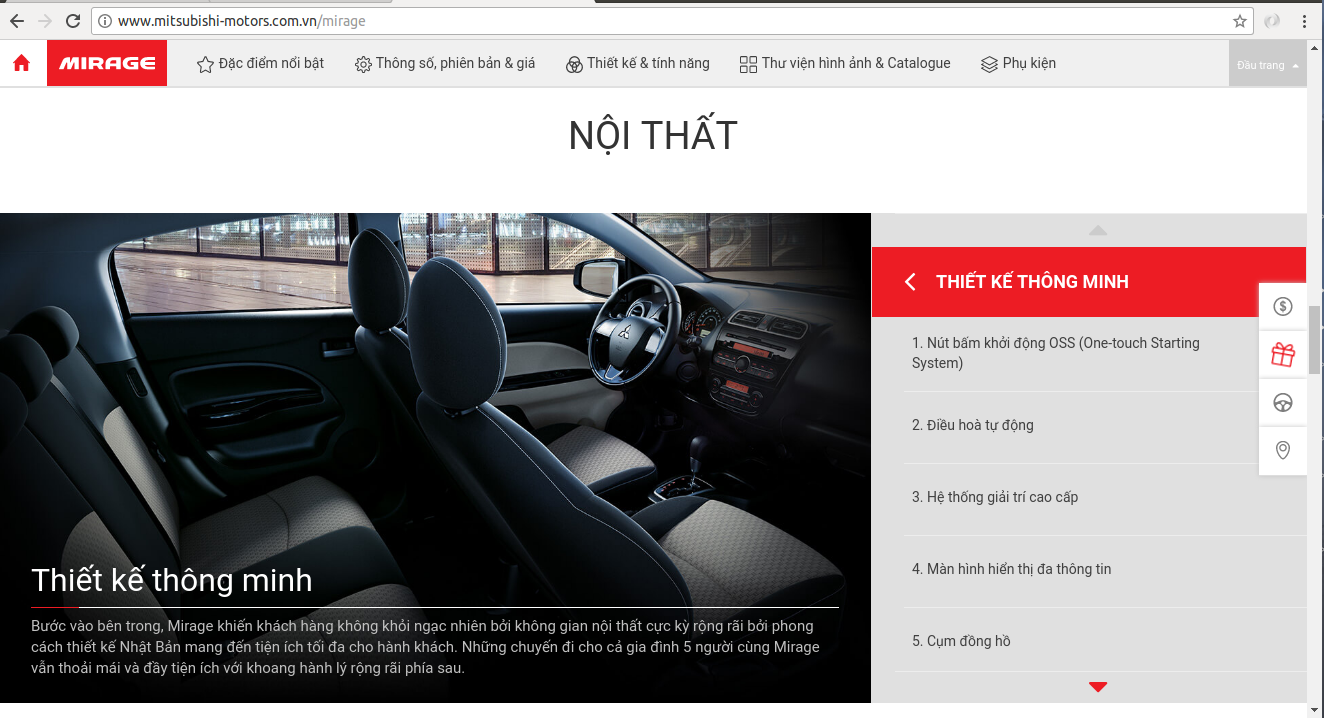
Thay đổi nội dung
Bước 1 - Đăng nhập Back-End.
Bước 2 - Chọn Mục Manage content ( 1 ) => Car feature ( 2 ) => Chọn ( 3 ) để lọc => ( 4 )
Bước 3 - Nhấn (5) để cập nhật nội dung.
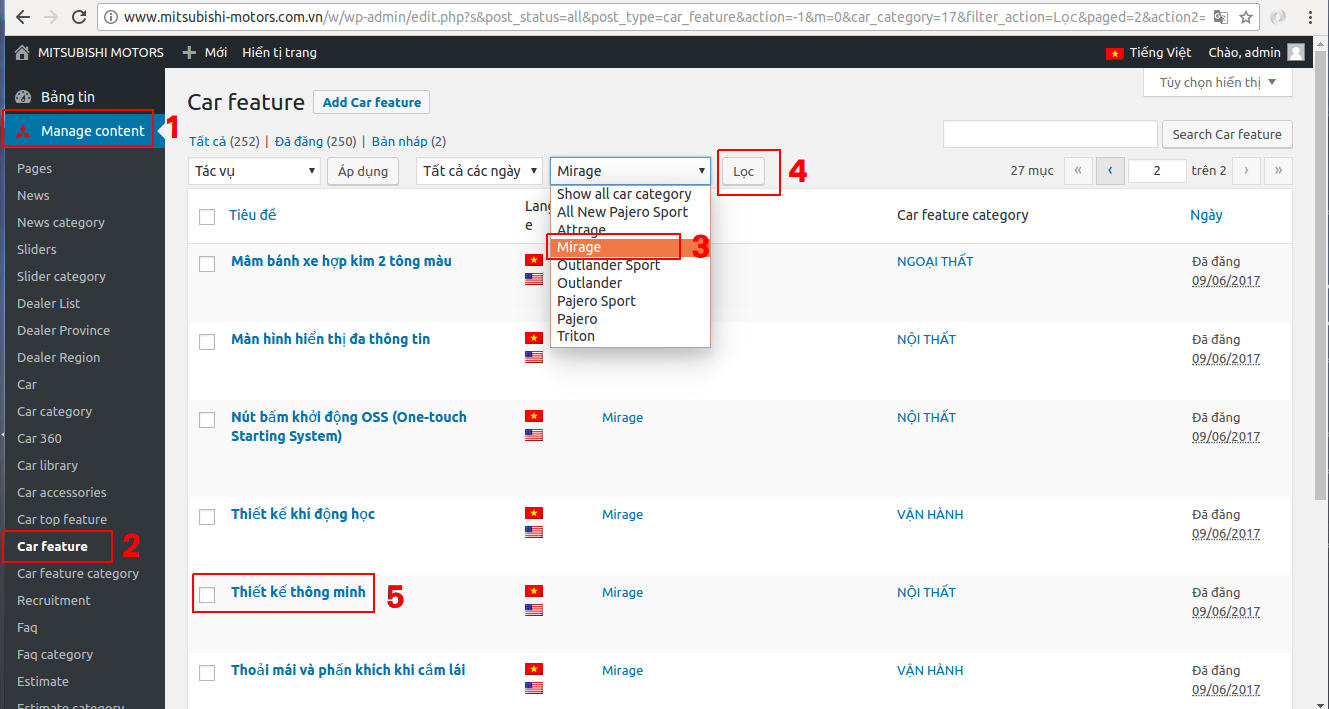
Bước 4 - Thông tin chỉnh sửa nội dung:
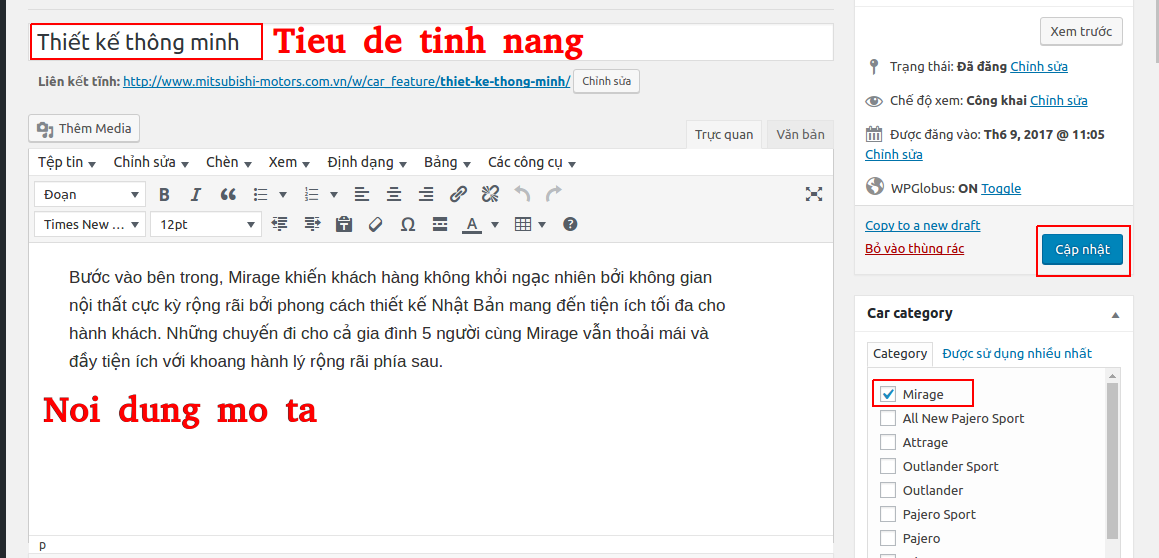
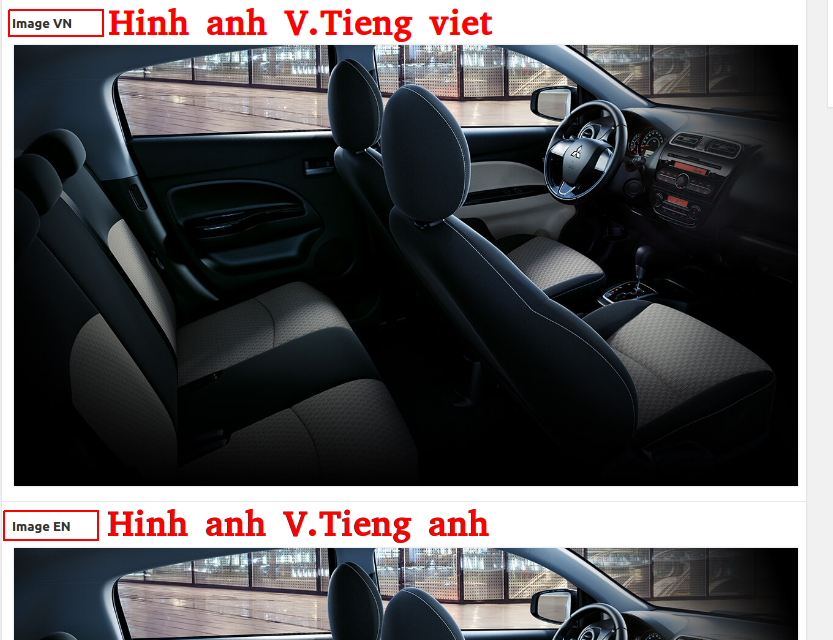
- Sau khi chỉnh sửa xong. Nhấn Cập nhật để lưu lại.
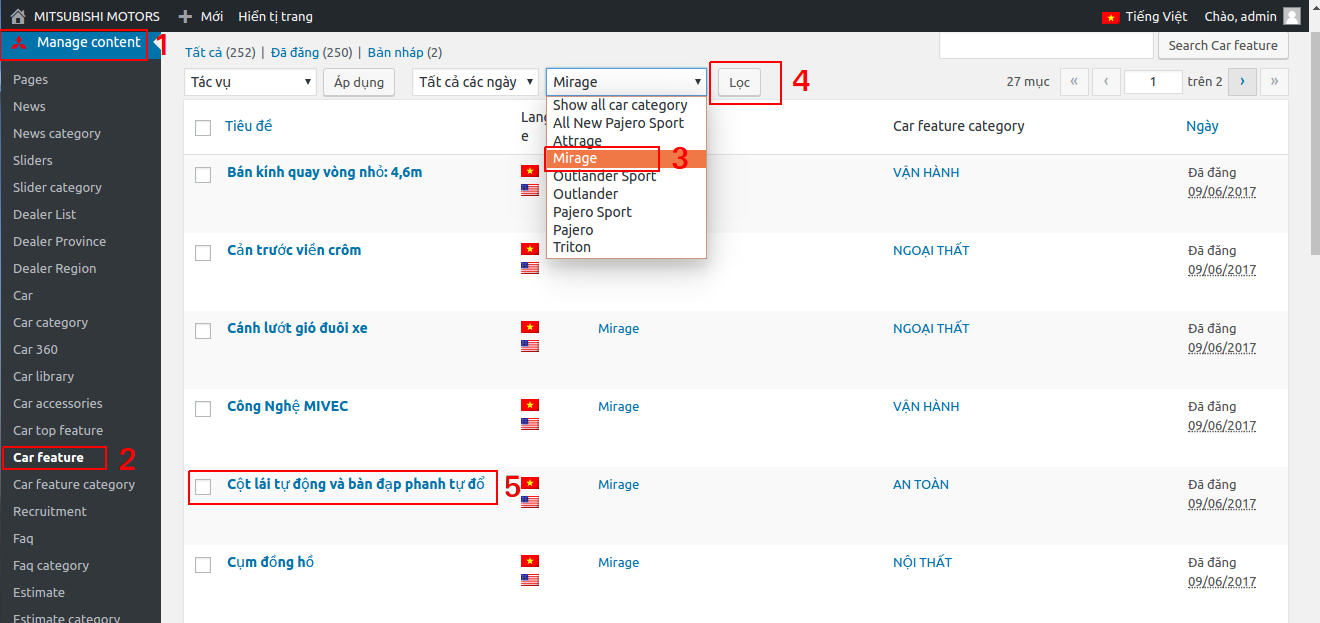
Chỉnh/Sửa section vận hành của sản phẩm
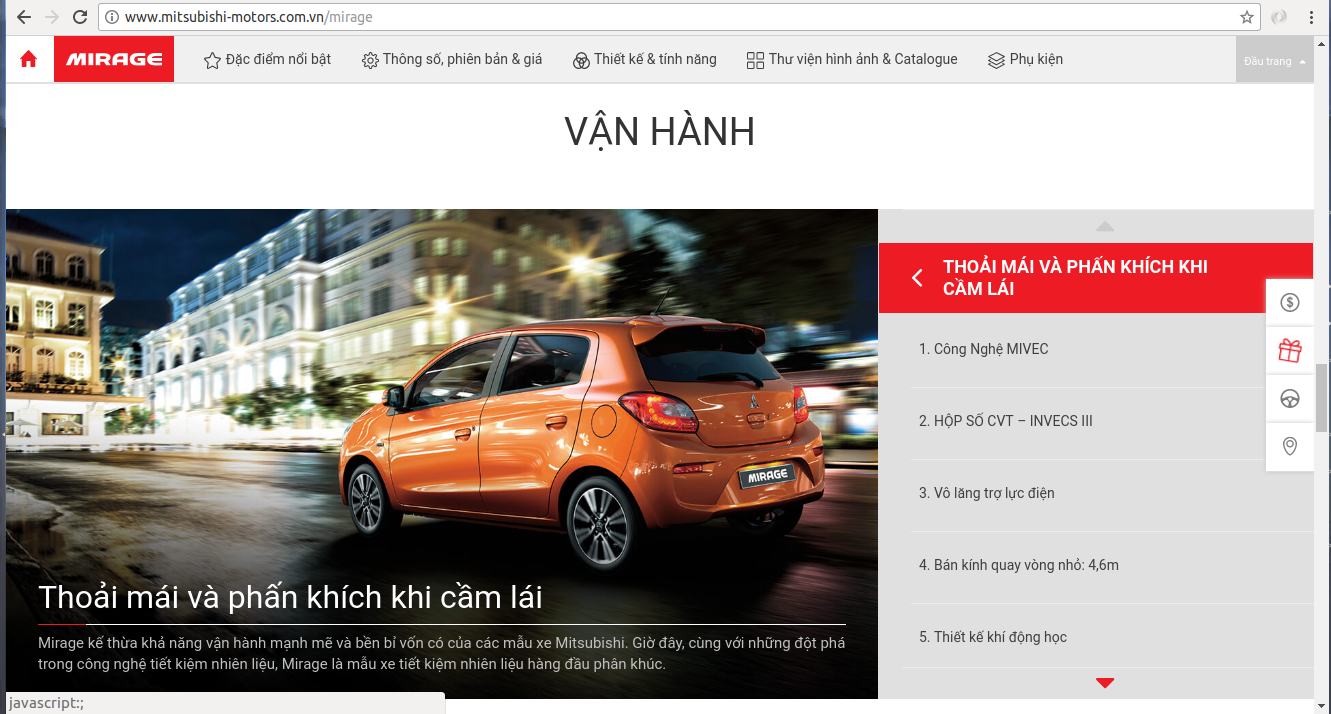
Thay đổi nội dung
Bước 1 - Đăng nhập Back-End.
Bước 2 - Chọn Mục Manage content ( 1 ) => Car feature ( 2 ) => Chọn ( 3 ) để lọc => ( 4 )
Bước 3 - Nhấn (5) để cập nhật nội dung.
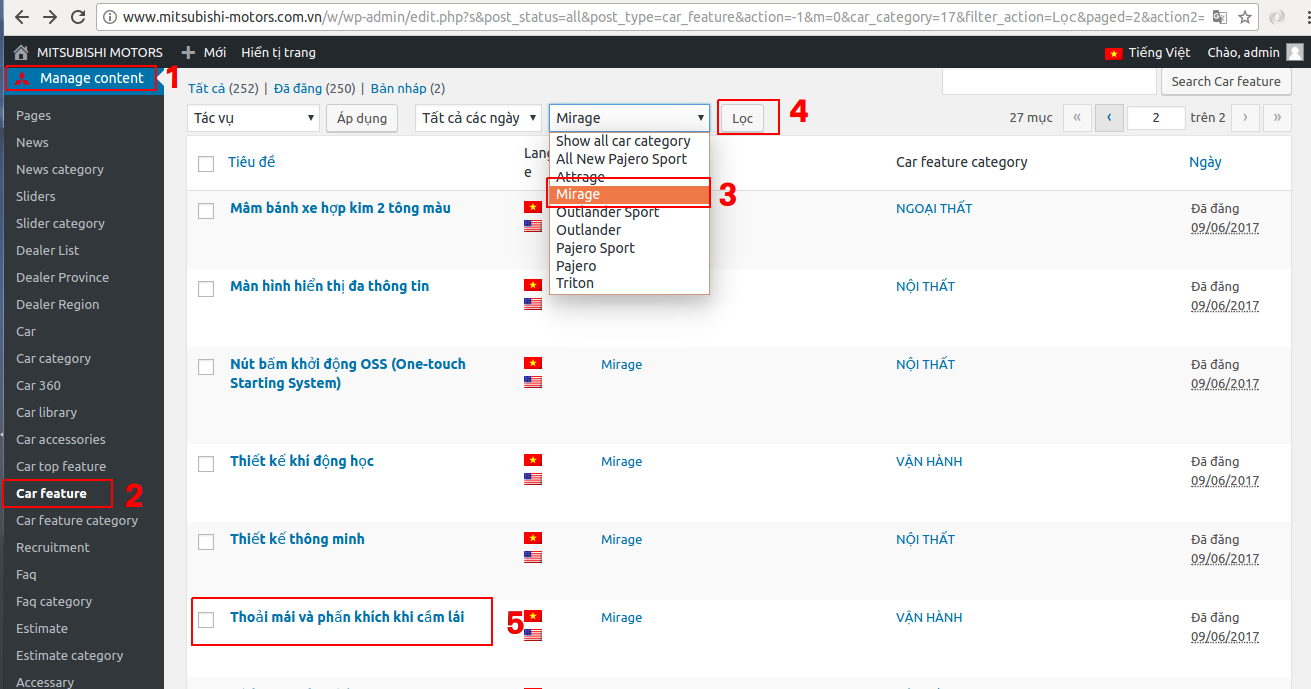
Bước 4 - Thông tin chỉnh sửa nội dung:
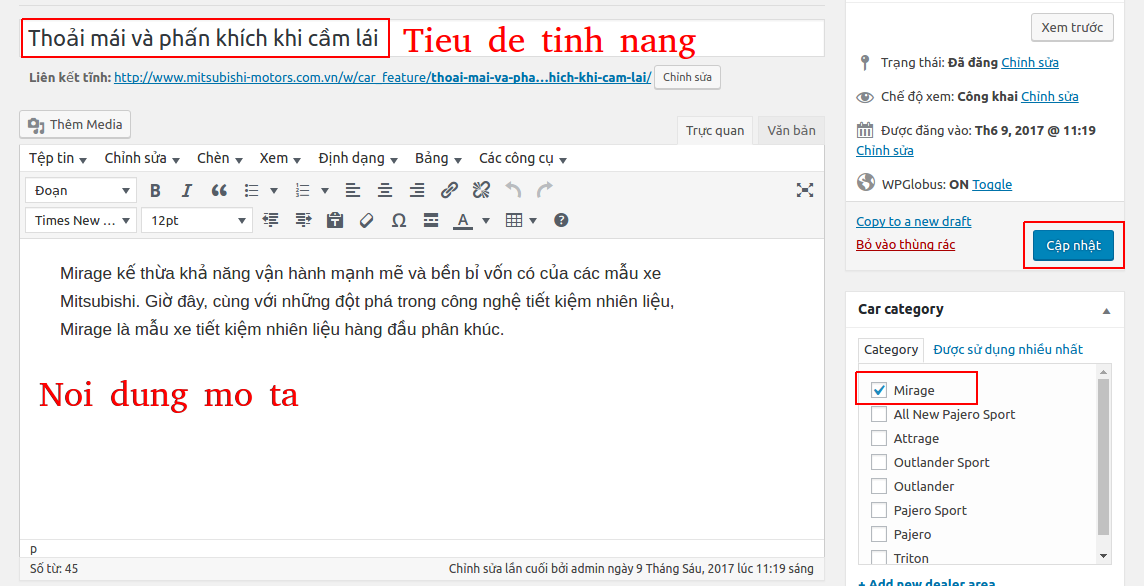
- Sau khi chỉnh sửa xong. Nhấn Cập nhật để lưu lại.
Chỉnh/Sửa section an toàn của sản phẩm
Thay đổi nội dung
Bước 1 - Đăng nhập Back-End.
Bước 2 - Chọn Mục Manage content ( 1 ) => Car feature ( 2 ) => Chọn ( 3 ) để lọc => ( 4 )
Bước 3 - Nhấn (5) để cập nhật nội dung.
Bước 4 - Thông tin chỉnh sửa nội dung:
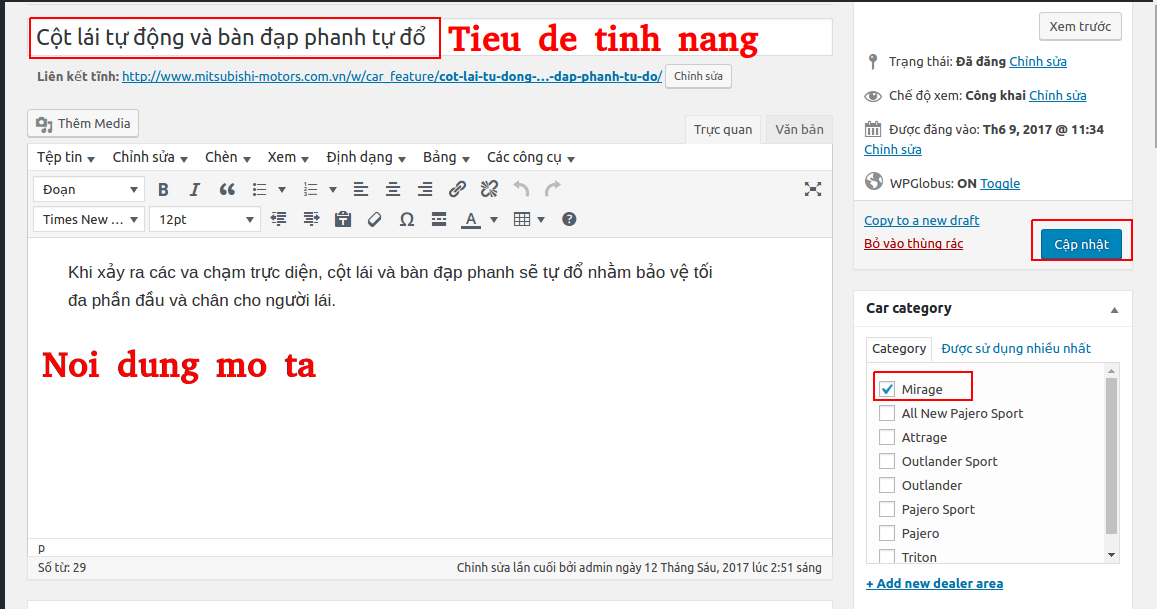
- Sau khi chỉnh sửa xong. Nhấn Cập nhật để lưu lại.
Chỉnh/Sửa section thư viện hình ảnh và catalogue của sản phẩm
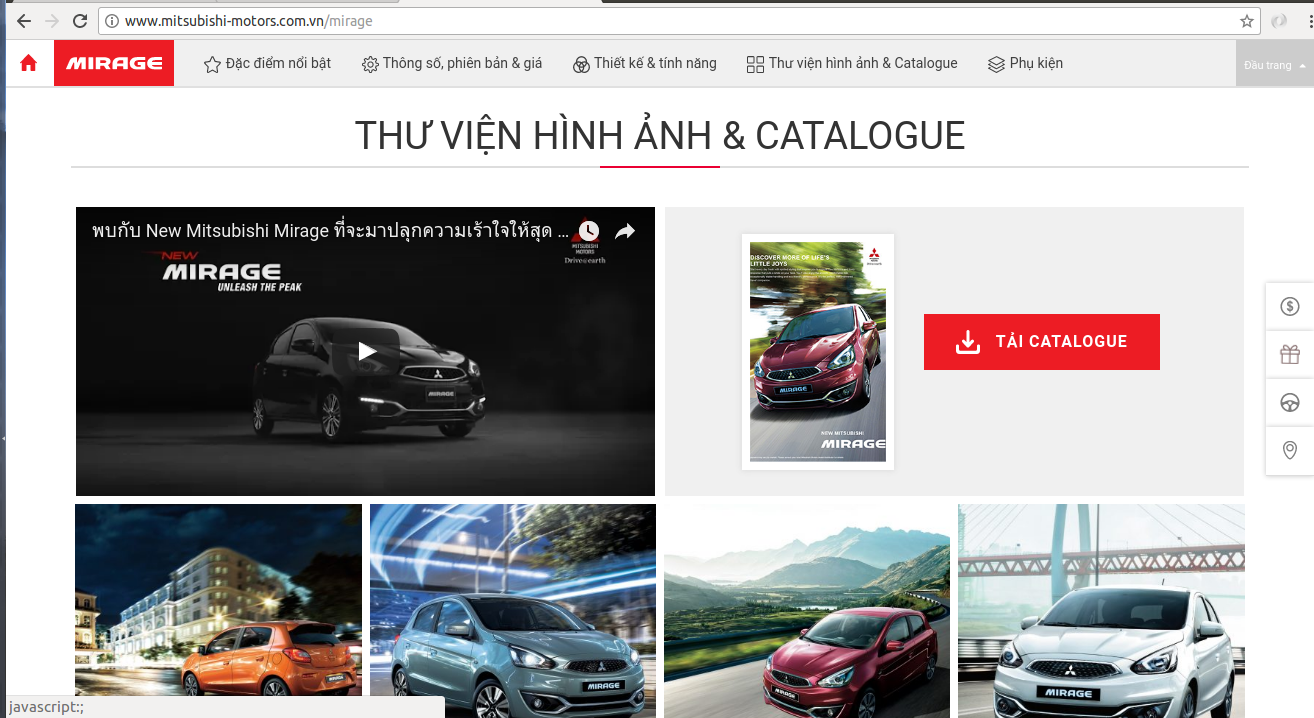
Thay đổi nội dung
Bước 1 - Đăng nhập Back-End.
Bước 2 - Chọn Mục Manage content ( 1 ) => Car feature ( 2 ) => Chọn ( 3 ) để lọc => ( 4 )
Bước 3 - Nhấn (5) để cập nhật nội dung.
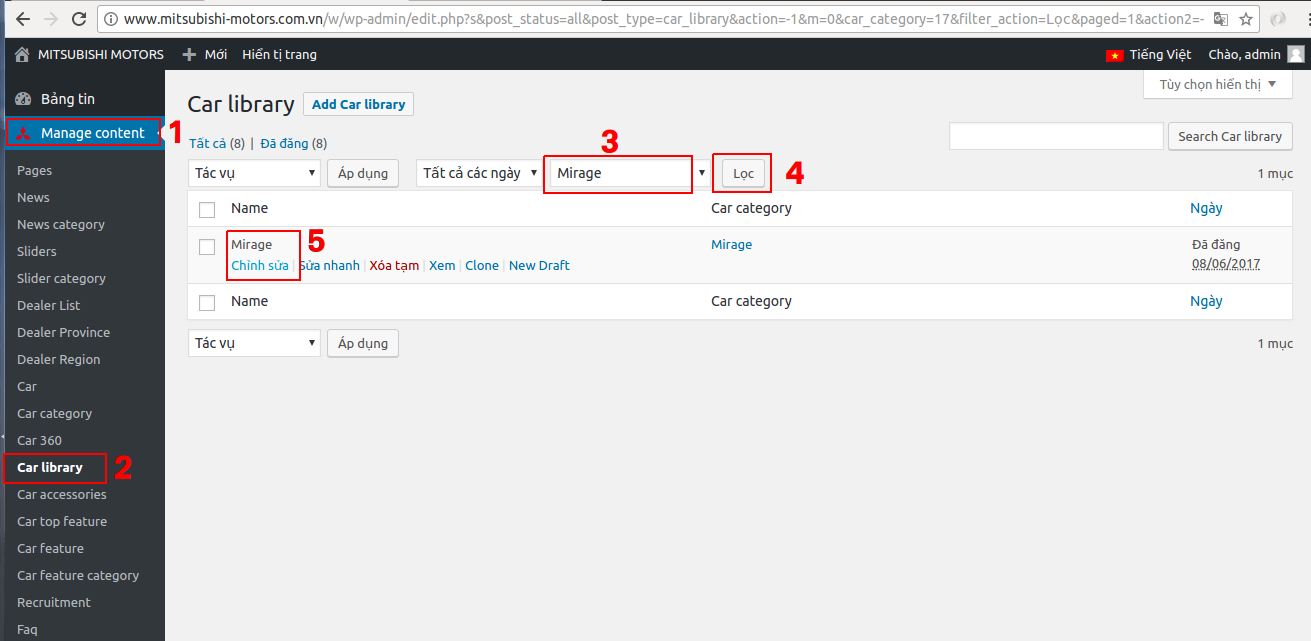
Bước 4 - Thông tin chỉnh sửa nội dung:
*Tag video & catalogue
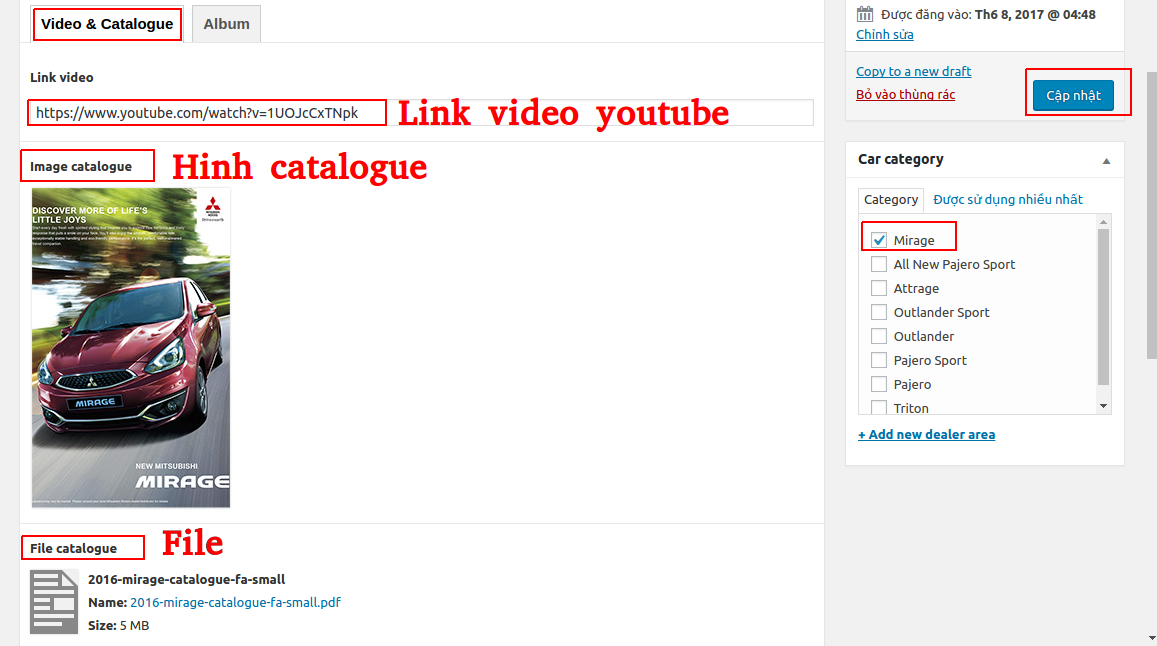
*Tag Album
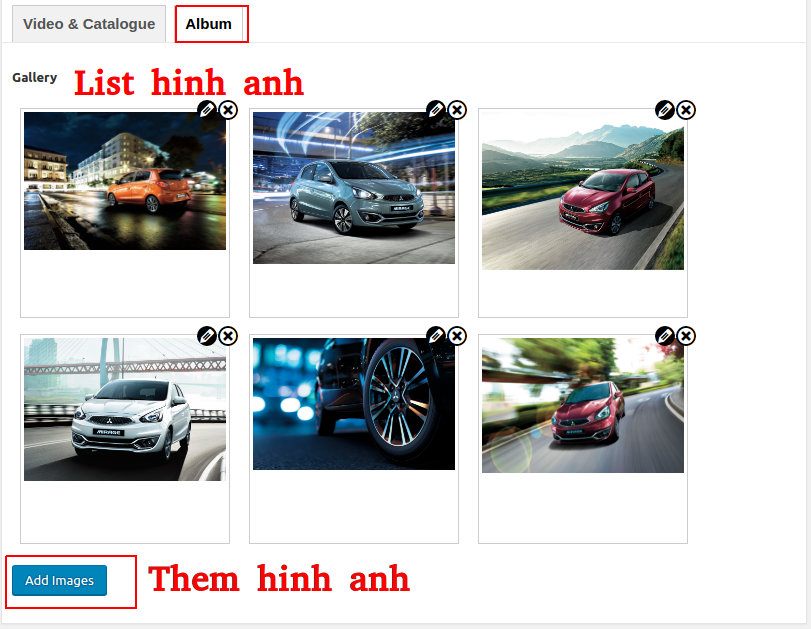
- Sau khi chỉnh sửa xong. Nhấn Cập nhật để lưu lại.
Chỉnh/Sửa section tin tức liên quan của sản phẩm
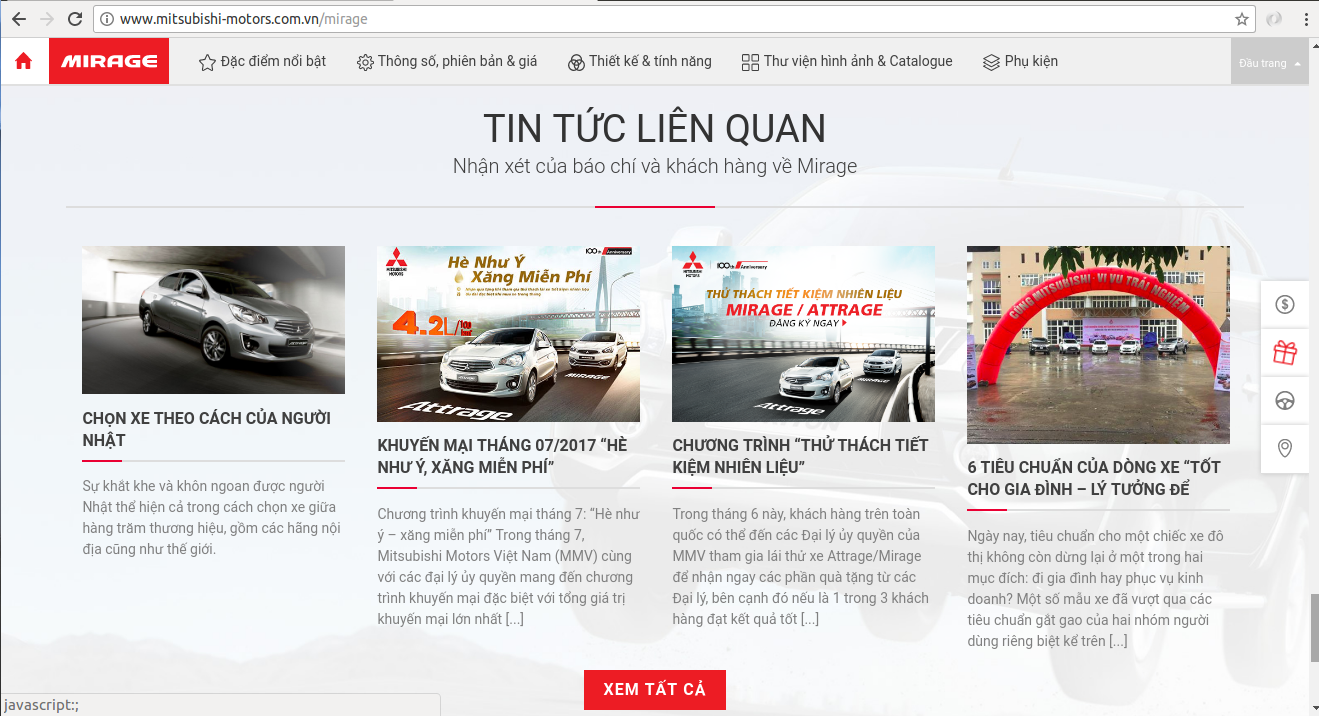
Thay đổi nội dung
Bước 1 - Đăng nhập Back-End.
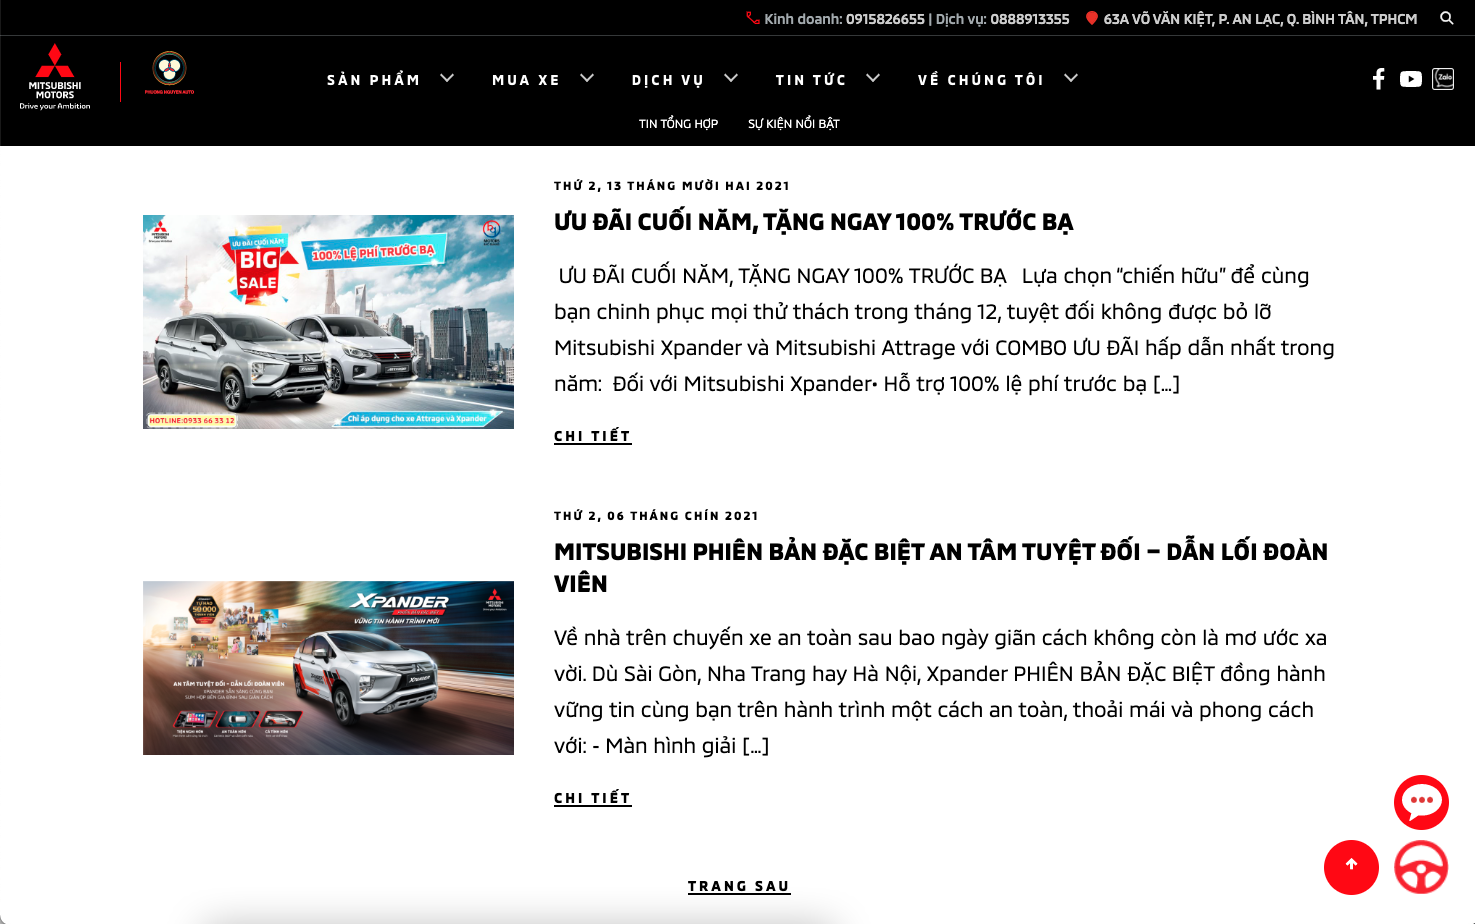
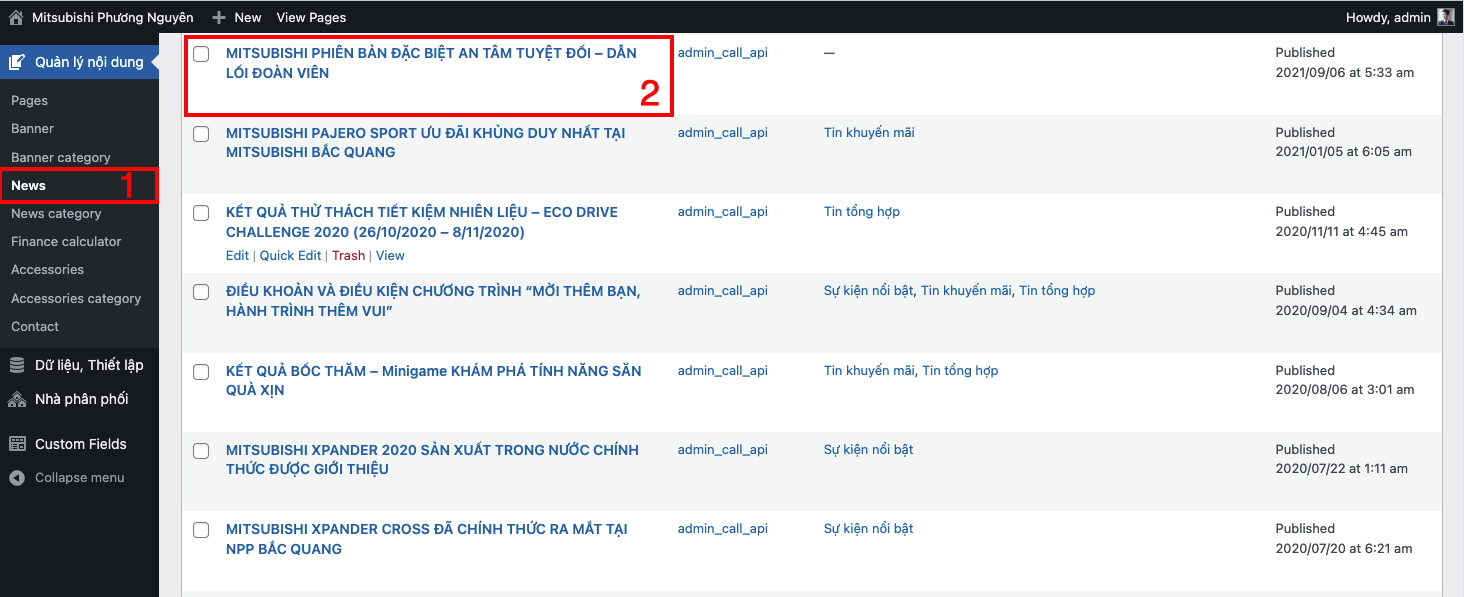
Bước 2 - Chọn Mục Manage content ( 1 ) => News ( 2 ) sẽ hiện danh sách các bài viết như hình bên dưới.
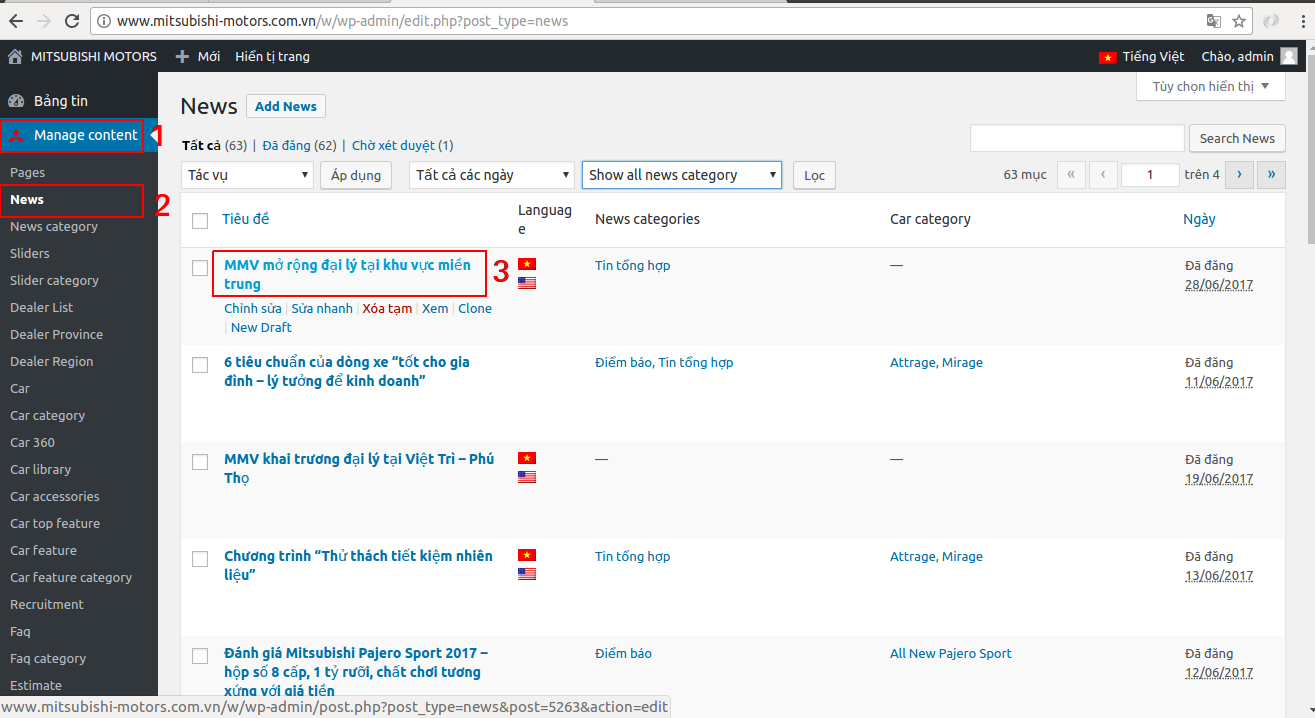
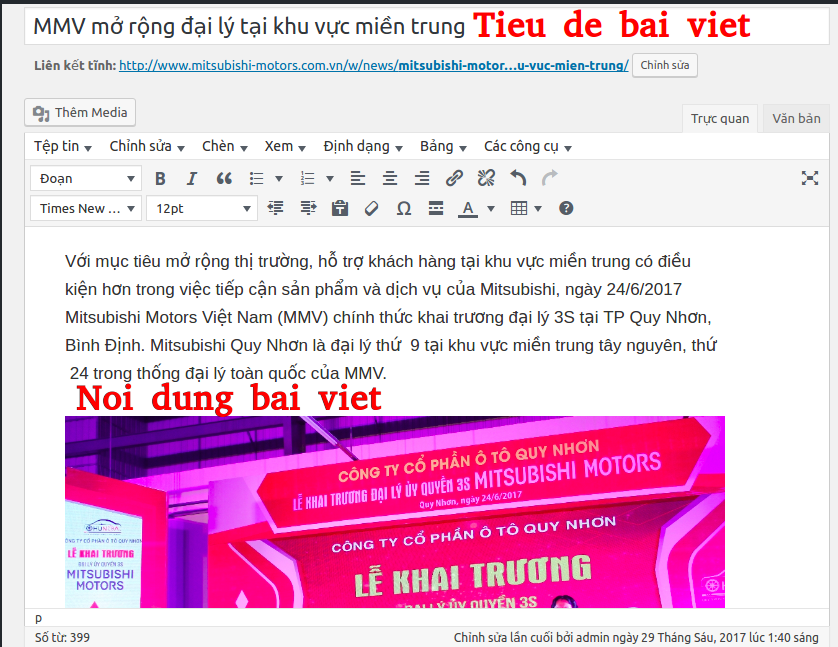
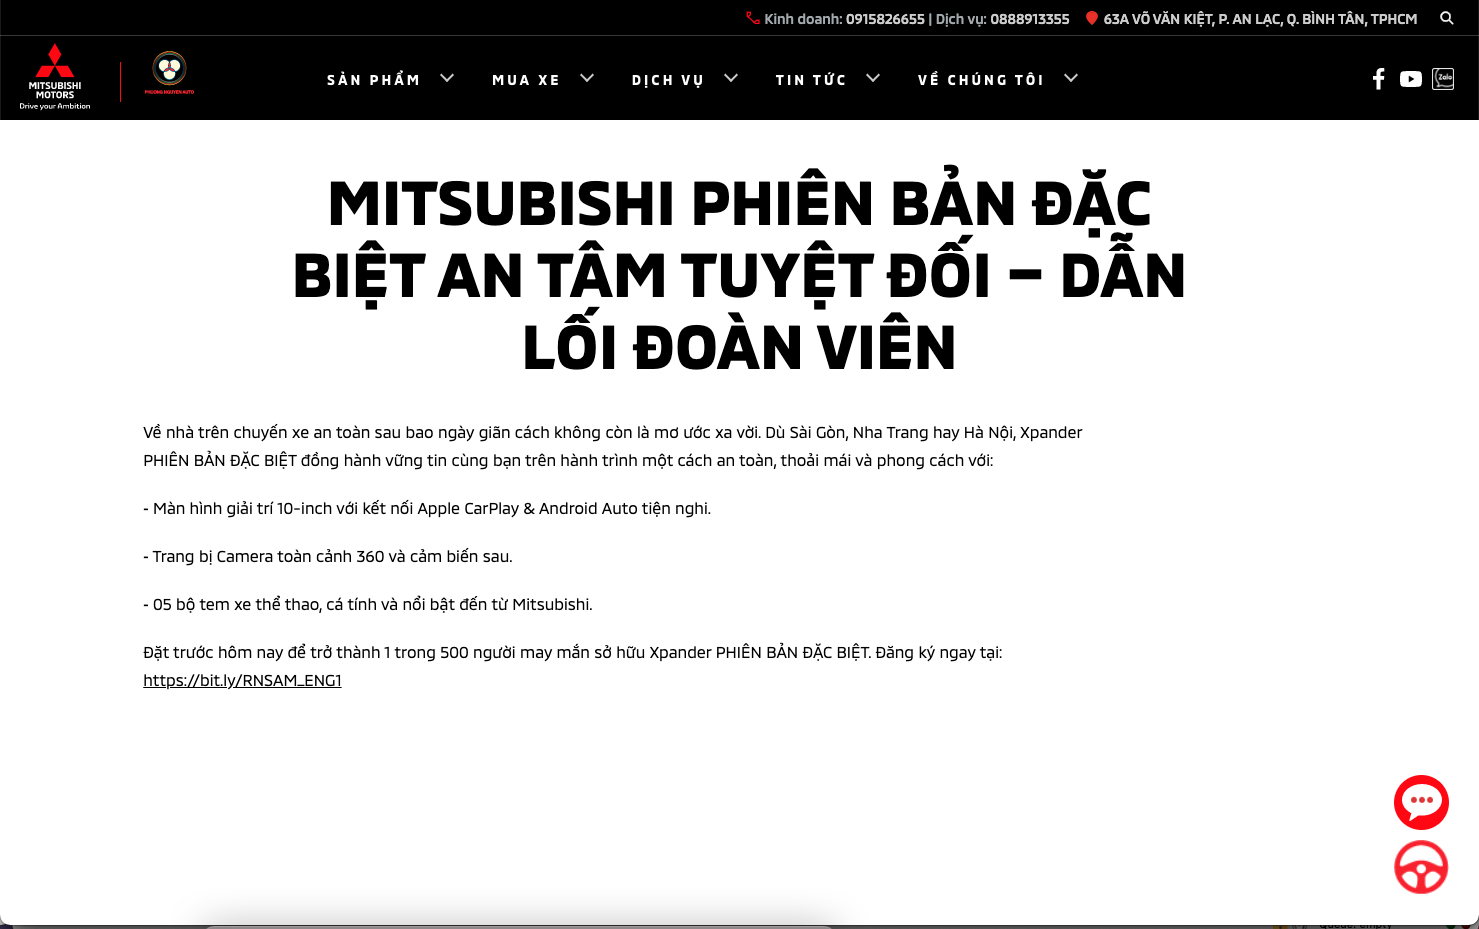
Để chỉnh sửa bài viết Click ( 3 ) sẽ hiện thông tin cần chỉnh sửa như sau:
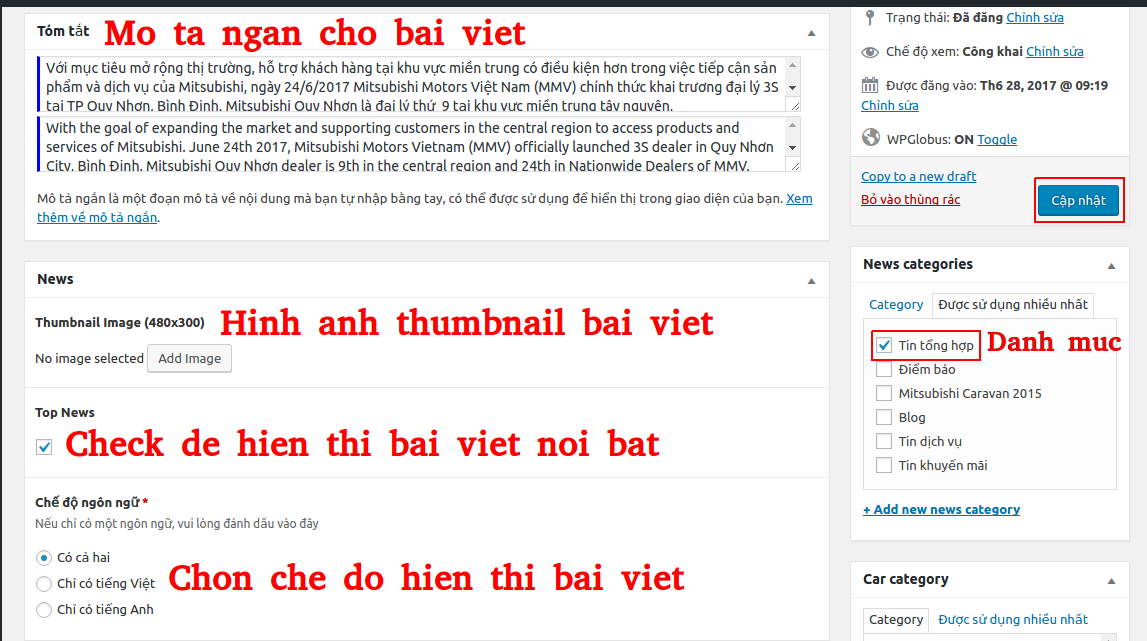
Sau khi chỉnh sửa xong nhấn button Cập nhật để lưu bài viết.
Danh sách bài viết
Chi tiết bài viết
Chỉnh sửa / Thêm mới bài viết
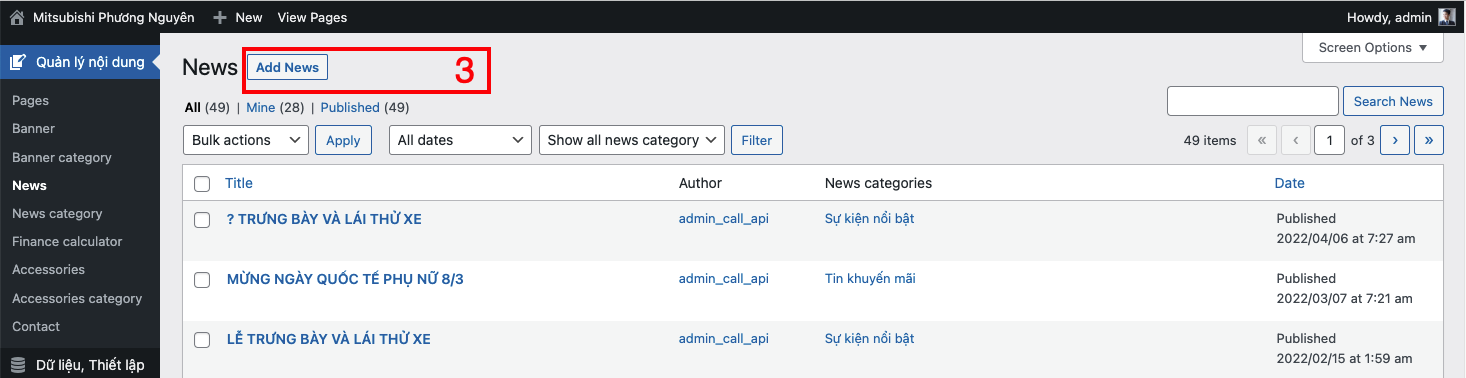
1 - Chọn Mục News
2 - Nhấn chỉnh sửa bài viết
3 - Tạo mới bài viết
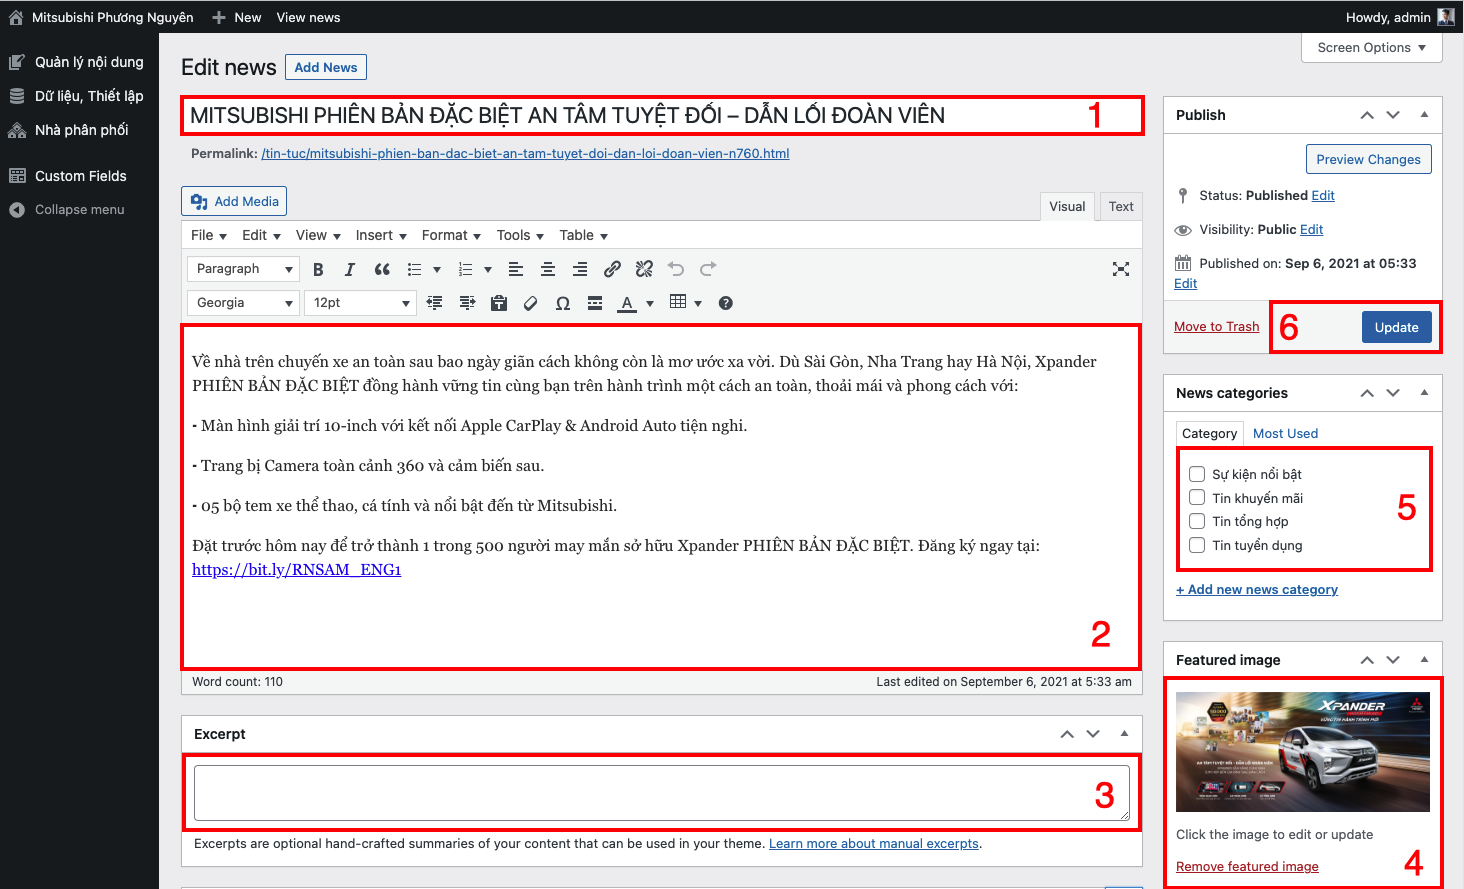
Thông tin bao gồm:
1 - Tiêu đề bài viết
2 - Nội dung bài viết
3 - Mô tả ngắn cho bài viết
4 - Hình ảnh thumbnail
5 - Danh mục bài viết
6 - Nhấn Update để lưu bài viết
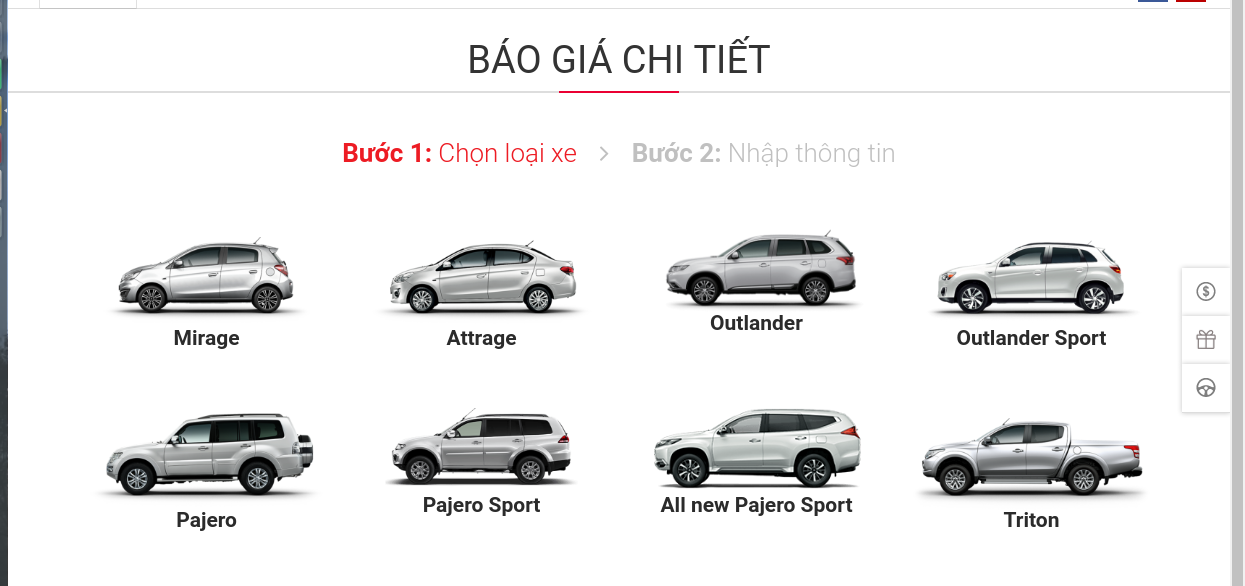
Cập nhật nội dung về giá của sản phẩm
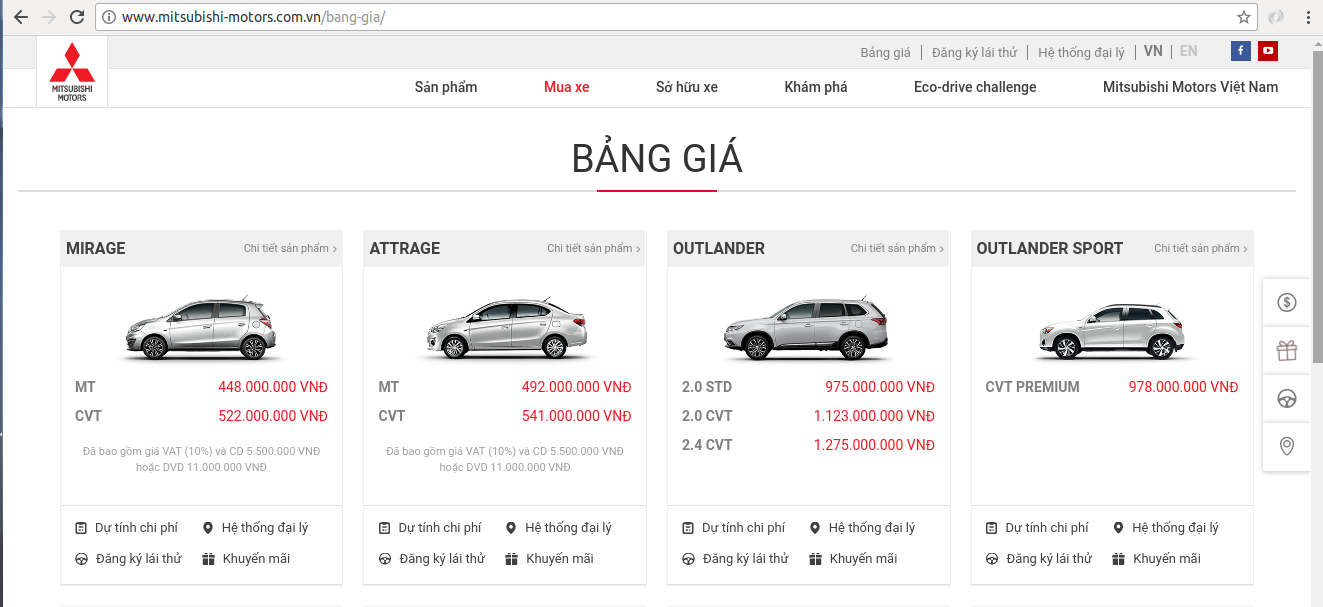
Thay đổi nội dung
Bước 1 - Đăng nhập Back-End.
Bước 2 - Chọn Mục Manage content ( 1 ) => Car ( 2 ) => ( 3 ) & ( 4 ) để lọc sản phẩm.
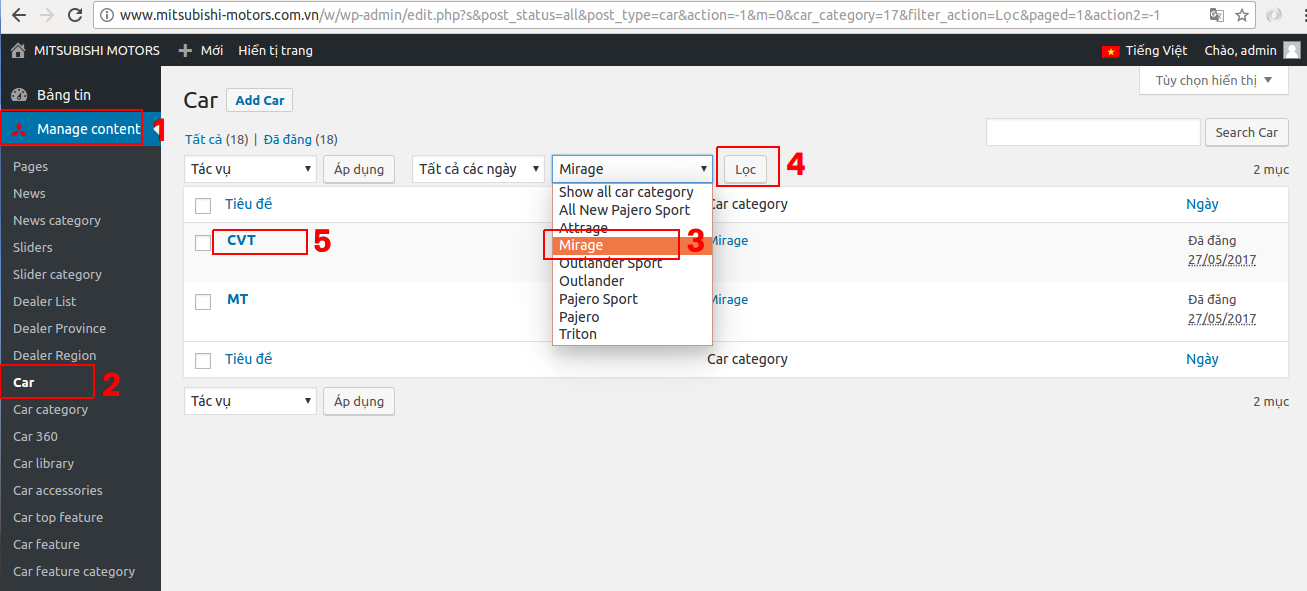
Click ( 5 ) sẽ hiện thông tin cần chỉnh sửa như sau:
Sau khi chỉnh sửa xong nhấn button Cập nhật để lưu bài viết.
Thêm mới Danh mục phụ kiện
1 - Chọn mục danh mục cho phụ kiện.
2 - Nhập tên danh mục.
3 - Upload hình ảnh.
4 - Nhấn add New để thêm.

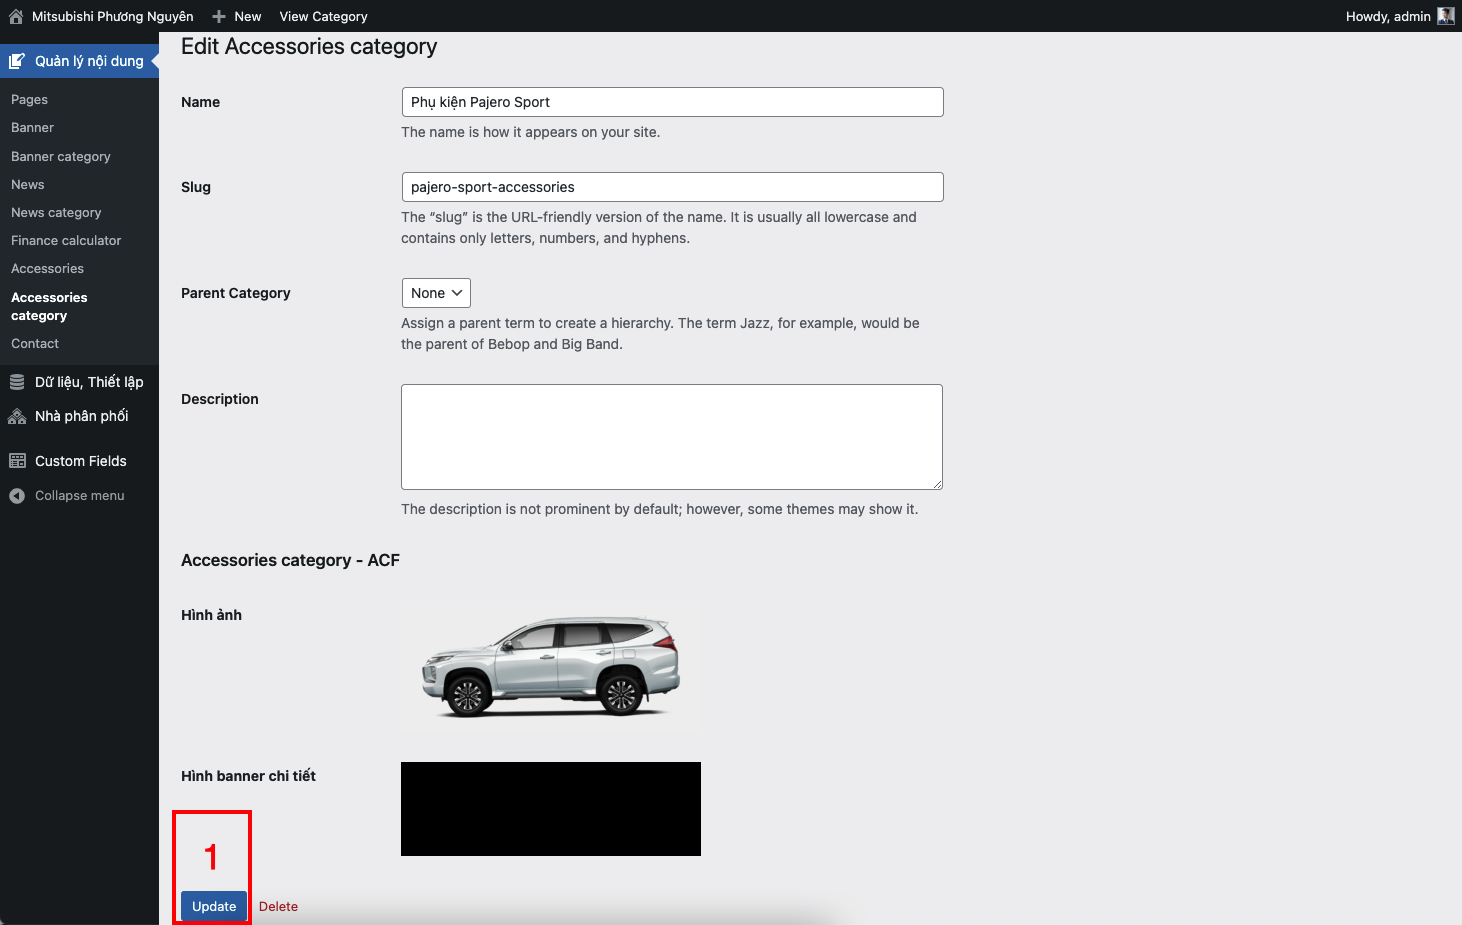
Cập nhật danh mục phụ kiện
1 - Chọn mục danh mục cho phụ kiện.
2 - Nhấn chỉnh sửa.
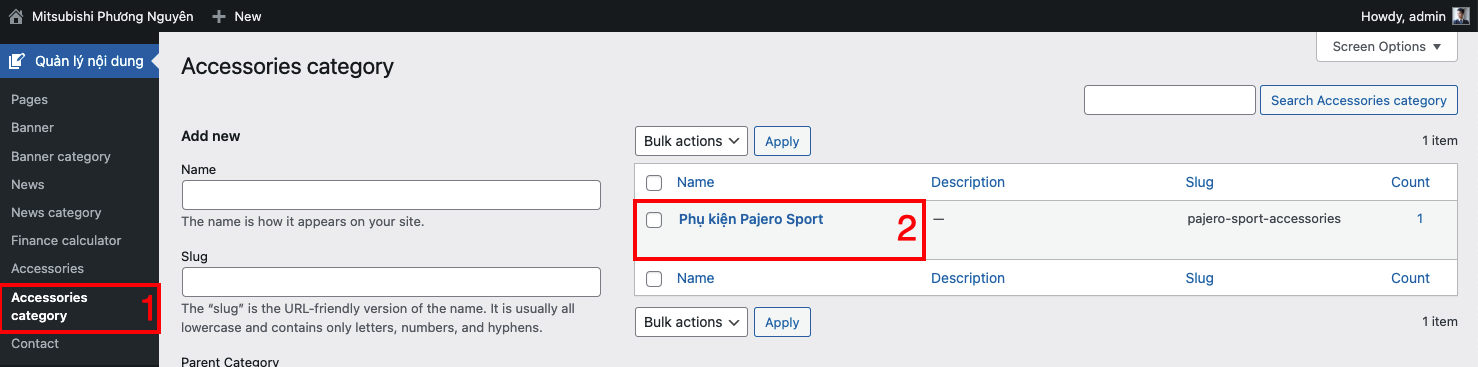
1 - Nhấn Update để lưu thông tin.
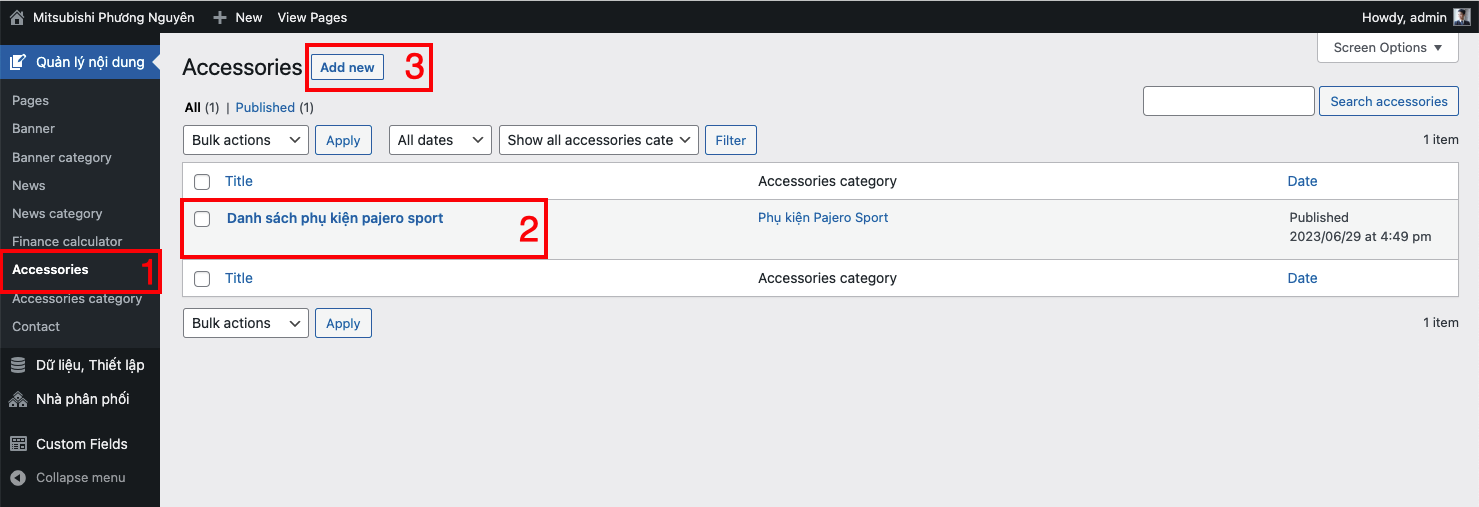
Cập nhật / Thêm mới danh sách phụ kiện
1 - Chọn mục phụ kiện.
2 - Nhấn chỉnh sửa.
3 - Tạo mới.
1 - Nhập tên phụ kiện.
2 - Upload hình ảnh phụ kiện.
3 - Chọn danh mục phụ kiện.
4 - Nhấn Update để lưu thông tin.
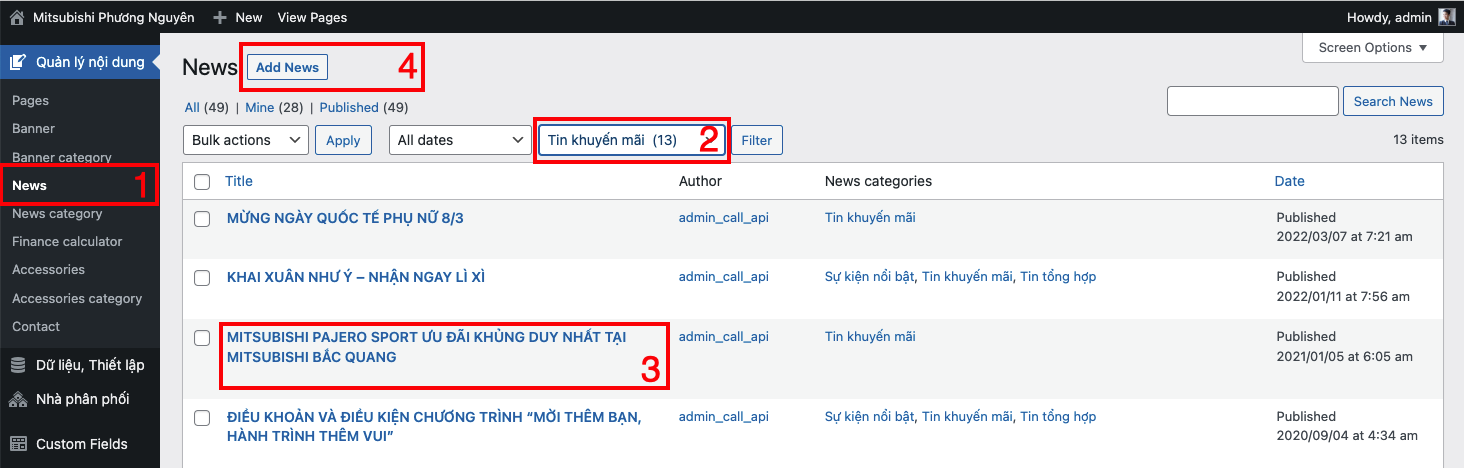
Tạo mới, chỉnh sửa bài viết
1 - Chọn mục News.
2 - Lọc bài viết theo danh mục tin khuyến mãi .
3 - Chỉnh sửa bài viết.
4 - Tạo mới.
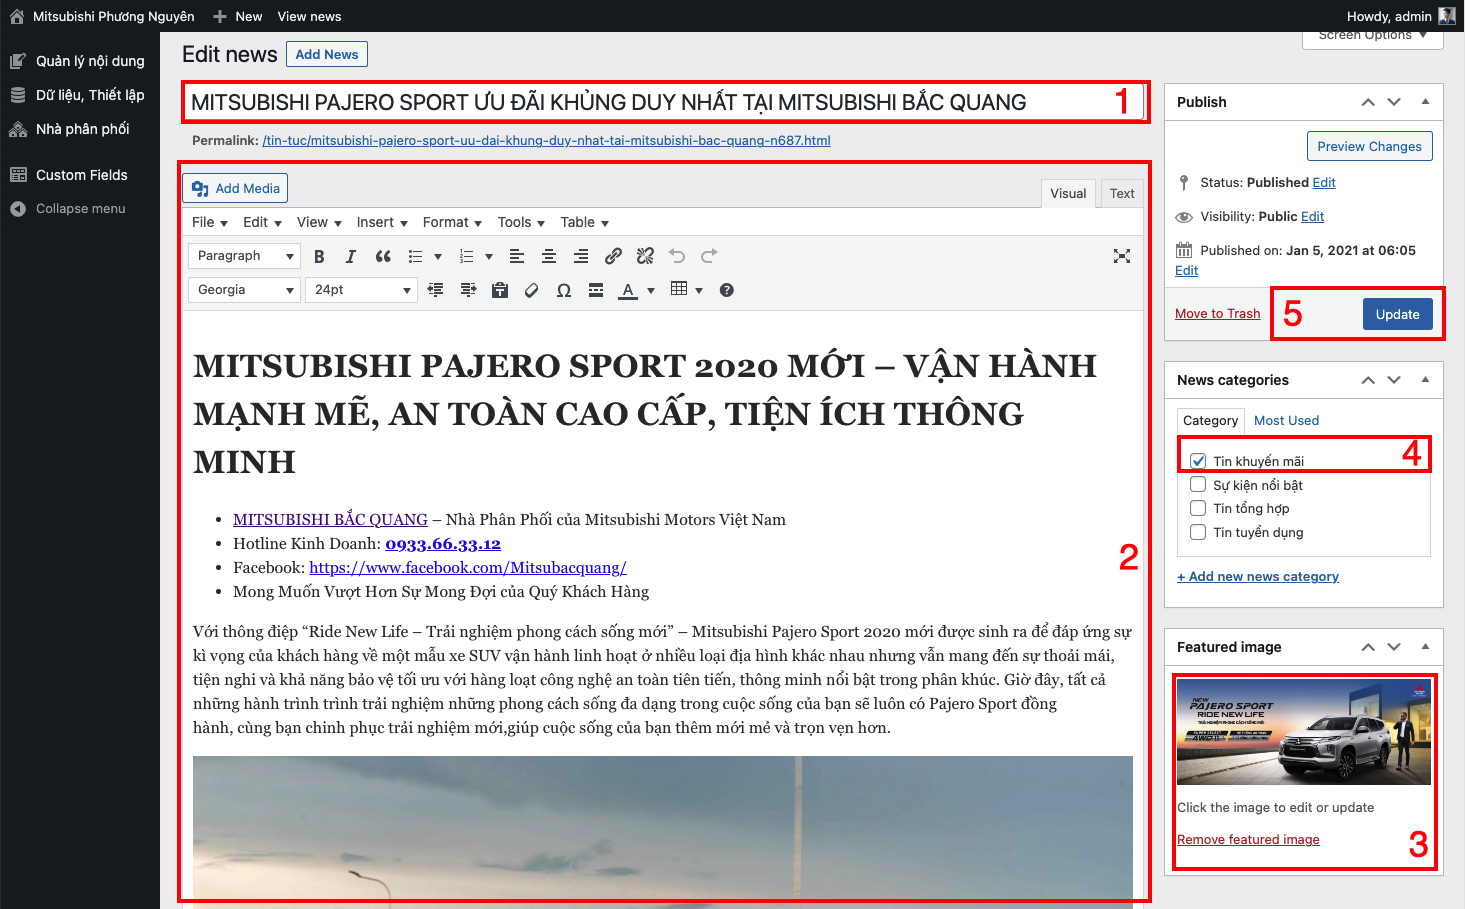
1 - Tiêu đề bài viết.
2 - Nội dung bài viết.
3 - Upload hình thumbnail cho bài viết.
4 - Chọn danh mục tin khuyến mãi.
5 - Nhấn Update để lưu thông tin.
Quản lý thông tin submit form từ khách hàng
1. Quản lý thông tin khách hàng từ website chính
Bước 1 - Đăng nhập Back-End.
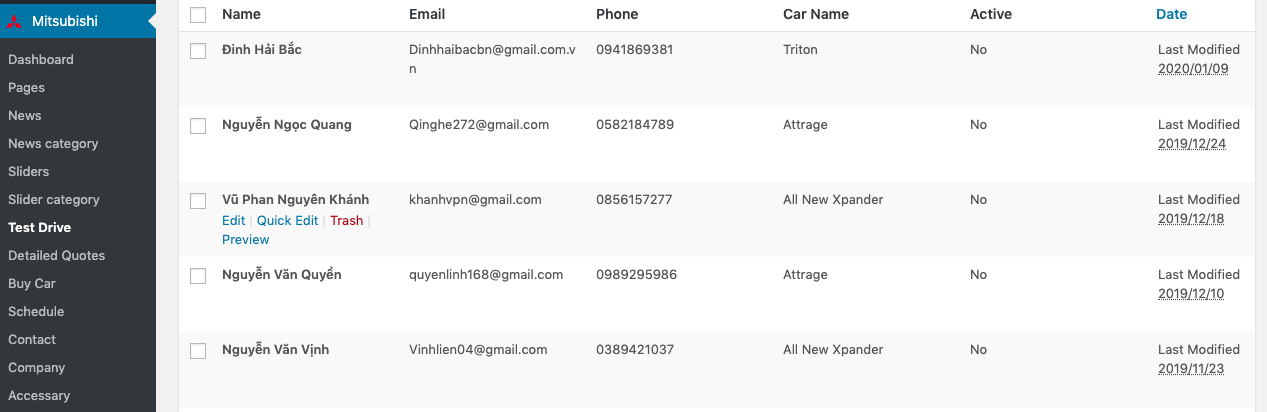
Bước 2 - Chọn Mục Mitsubishi ( 1 ) => Test Drive ( 2 ) sẽ hiện danh sách khách hàng.
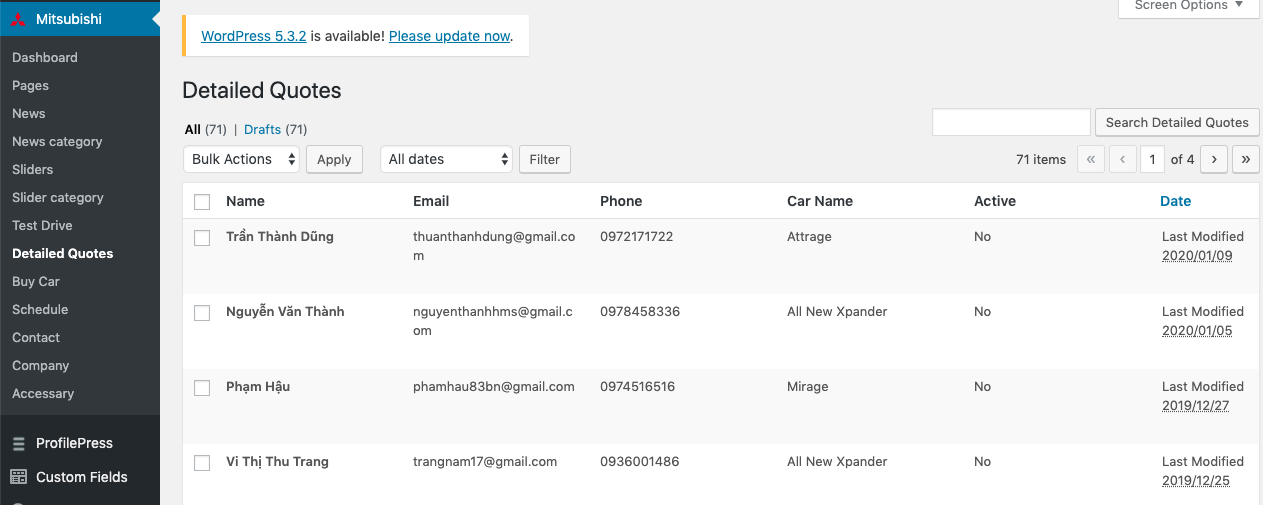
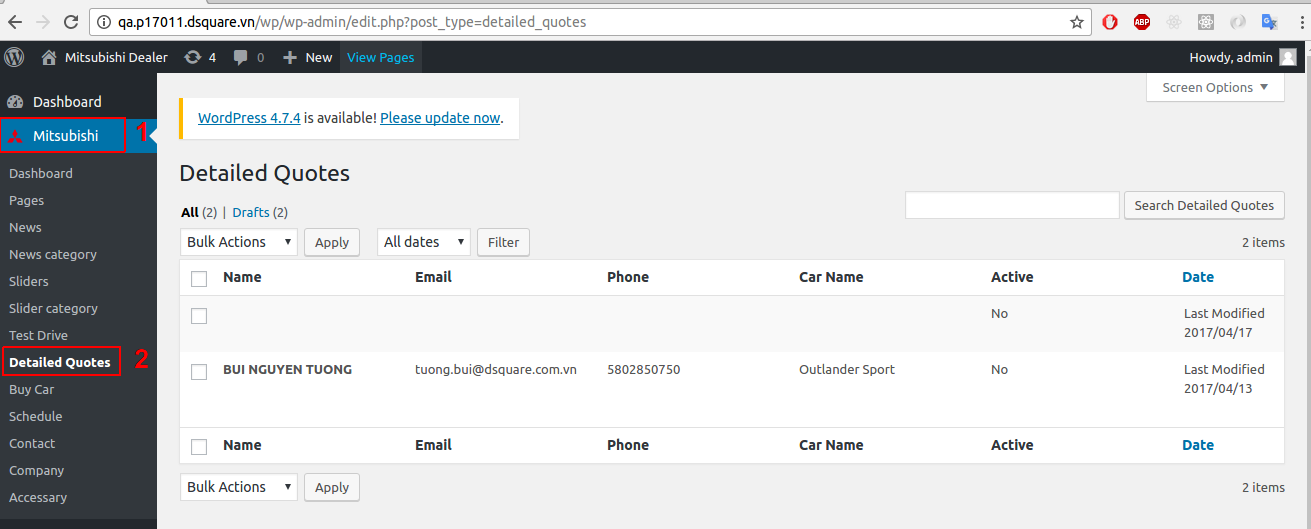
Quản lý thông tin submit form từ Nhà phân phối và khách hàng
1. Quản lý thông tin khách hàng từ website chính
Bước 1 - Đăng nhập Back-End.
Bước 2 - Chọn Mục Mitsubishi ( 1 ) => Detailed Quotes ( 2 ) sẽ hiện danh sách khách hàng.

1 - Chọn mục liên hệ.
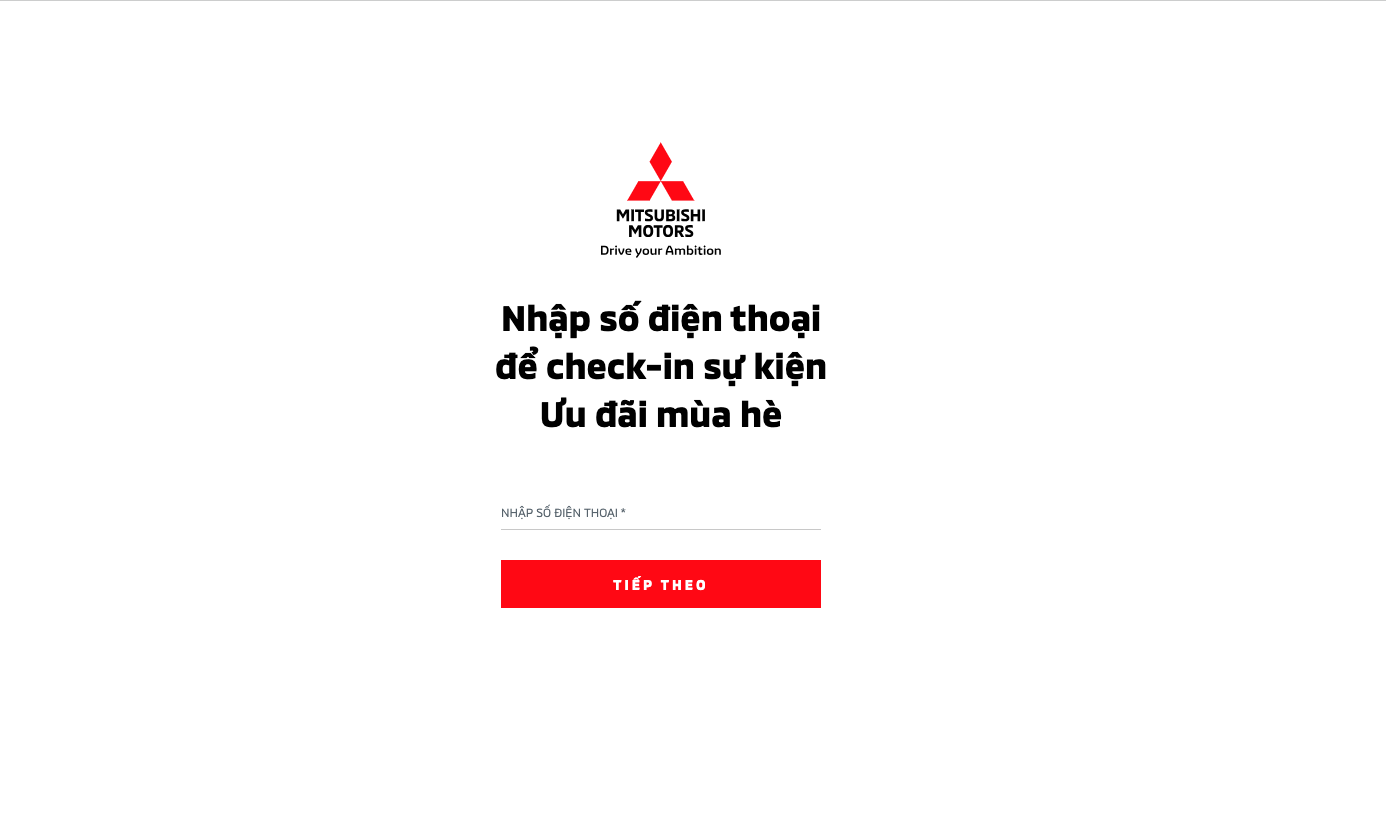
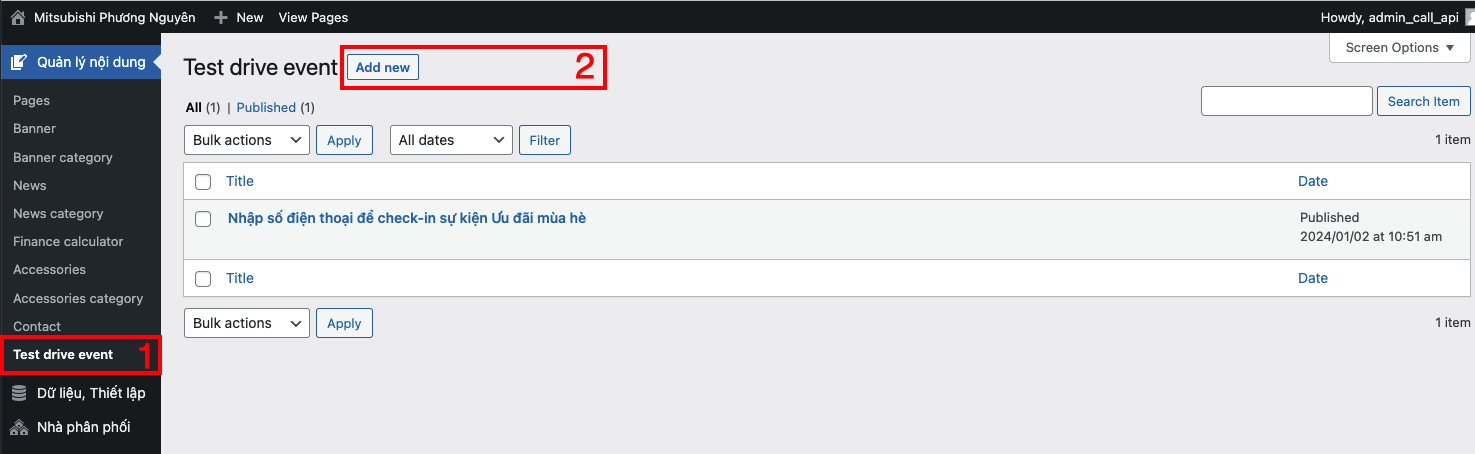
1 - Chọn mục "Test drive event"
2 - Chọn "Add new"
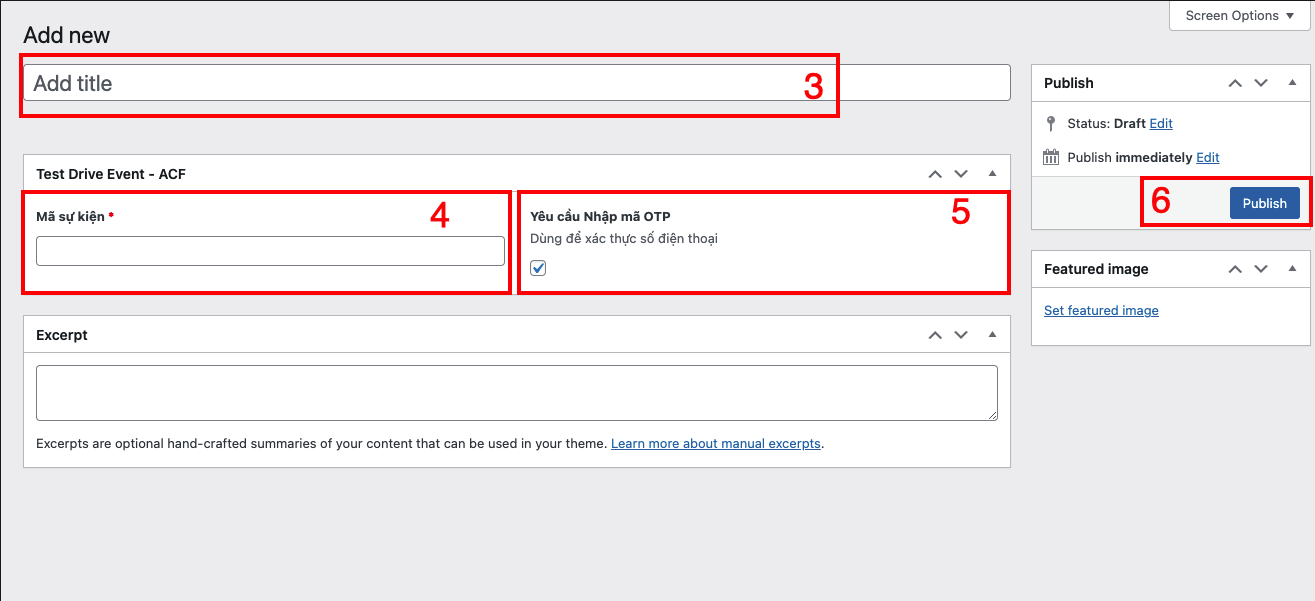
3 - Nhập tiêu đề
4 - Nhập mã sự kiện đã được khai báo trên hệ thống CRM
5 - Xác minh số điện thoại bằng mã OTP
6 - Nhấn "Publish" để lưu
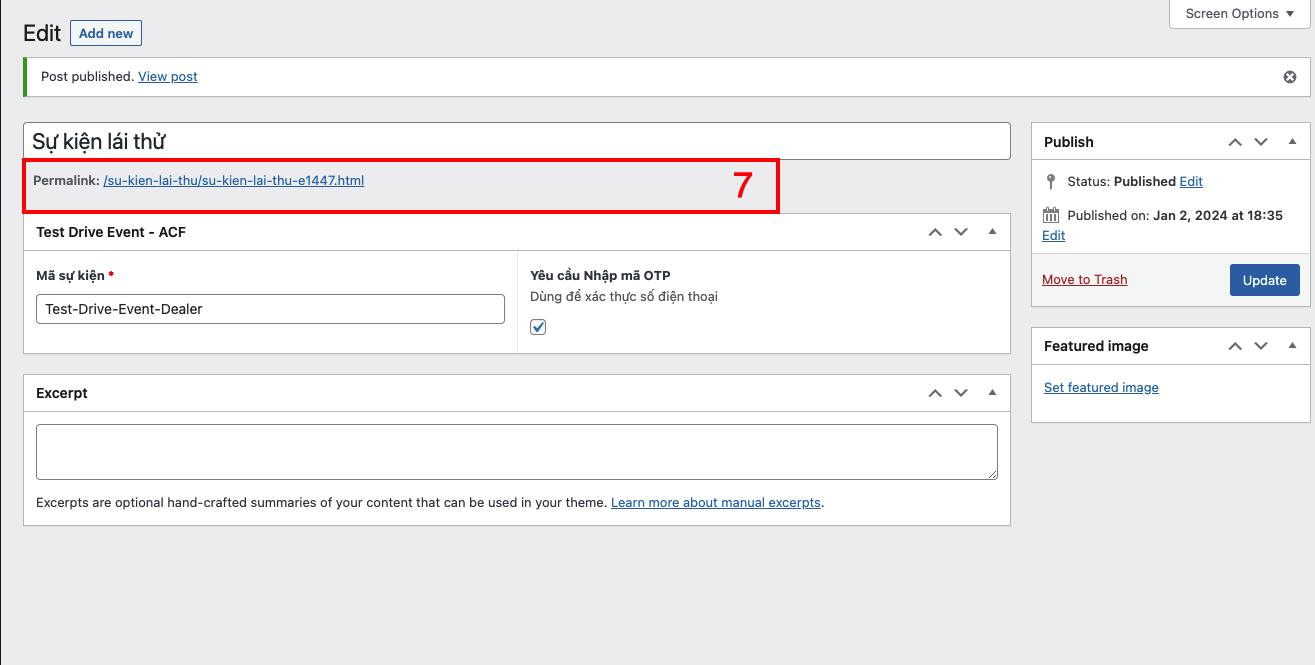
7 - Sau khi nhấn lưu sẽ xuất hiện đường dẫn như hình bên trên
Trả lời hỏi đáp
1. Cấu hình email CSKH
Để thêm các email CSKH trả lời câu hỏi của khách hàng, bạn vui lòng vào mục Manage Data > Page > Cài đặt chung (như hình dưới )
Lưu ý: Để thêm nhiều email khác nhau, thêm dấu chấm phẩy để ngăn cách các email.

2. Trả lời câu hỏi của khách hàng
Sau khi khách hàng gửi câu hỏi đến, bạn sẽ nhận được email như đã cài đặt mục 1. Nhấn vào link trong email sẽ đi đến trang trả lời hỏi đáp như hình bên dưới.
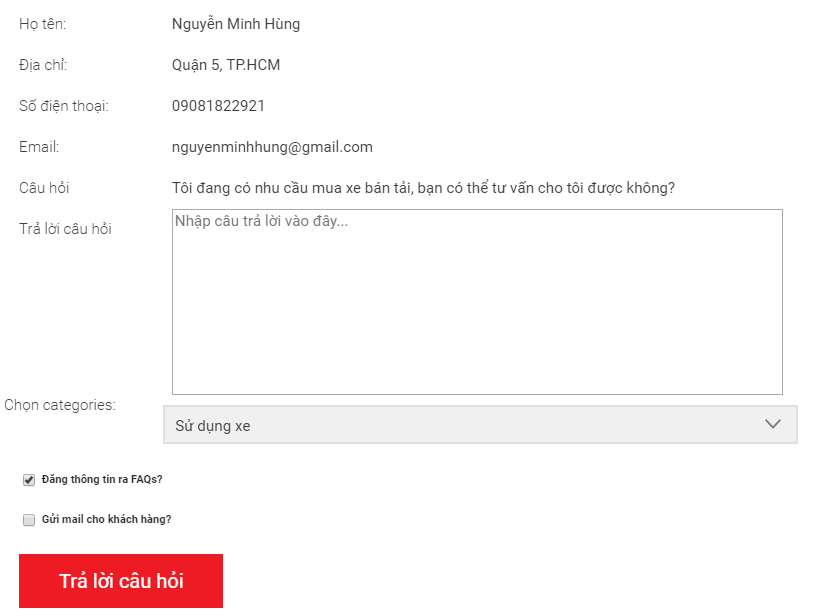
Bạn điền đầy đủ thông tin như hình trên, bao gồm:
- - Nhập vào nội dung trả lời
- - Chọn categories phù hợp với câu hỏi của khách hàng
- - Mục: 'Đăng thông tin ra FAQ', check vào nếu cho phép câu hỏi và câu trả lời được hiện ra ngoài trang Hỏi đáp.
- - Mục: 'Gửi email cho khách hàng', check vào nếu bạn muốn gửi câu trả lời đến cho email của khách hàng.
Nhấn vào 'Trả lời câu hỏi' để hoàn thành câu trả lời. Lưu ý: các email trong mục cài đặt email CSKH sẽ nhận được email phản hồi khi câu trả lời này được hoàn thành.
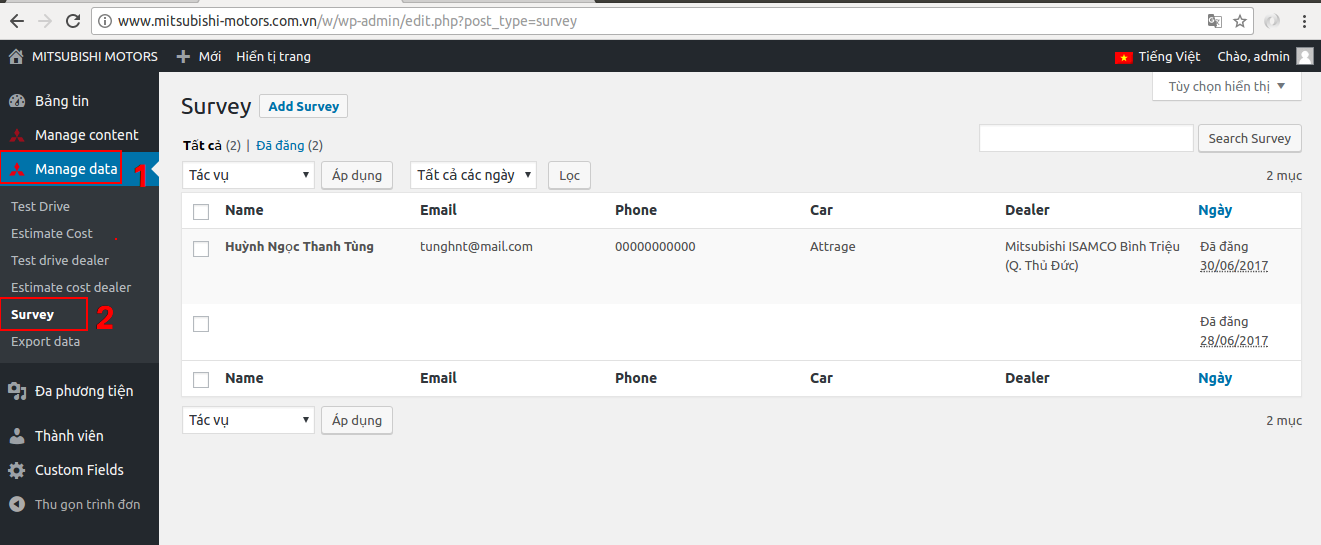
Quản lý thông tin submit form từ form khảo sát khách hàng
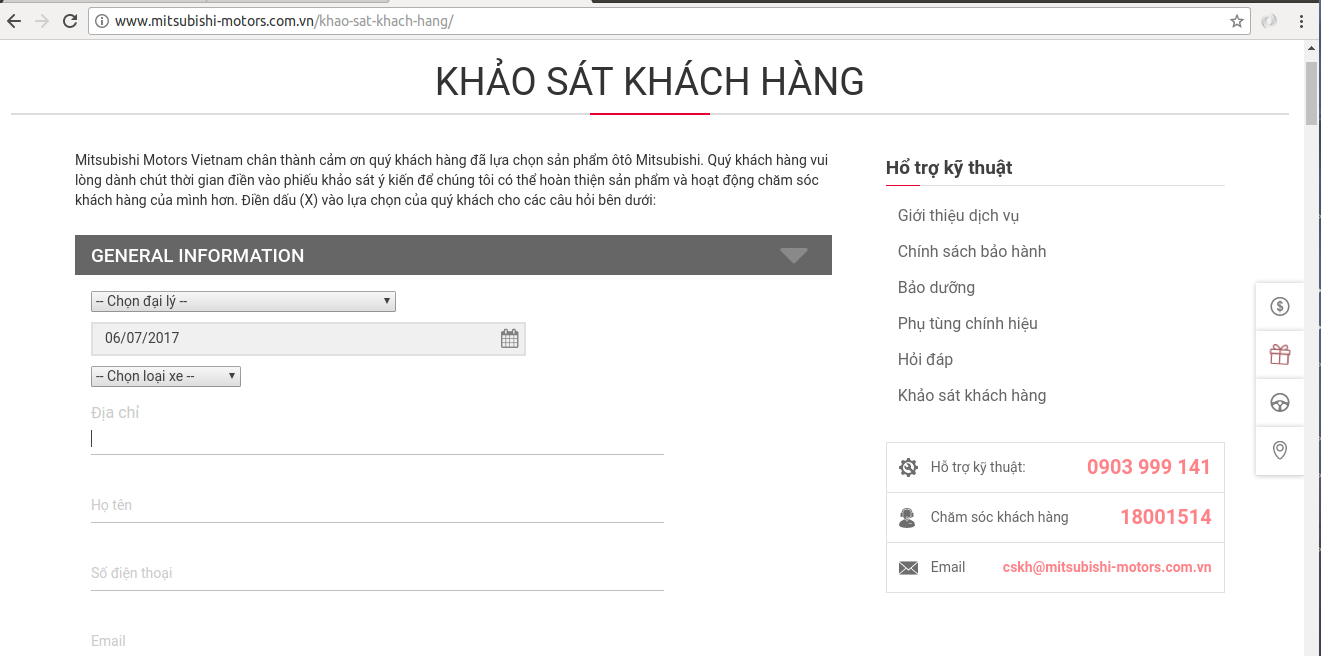
Bước 1 - Đăng nhập Back-End.
Bước 2 - Chọn Mục Manage data ( 1 ) => Survey ( 2 ) sẽ hiện danh sách khách hàng.
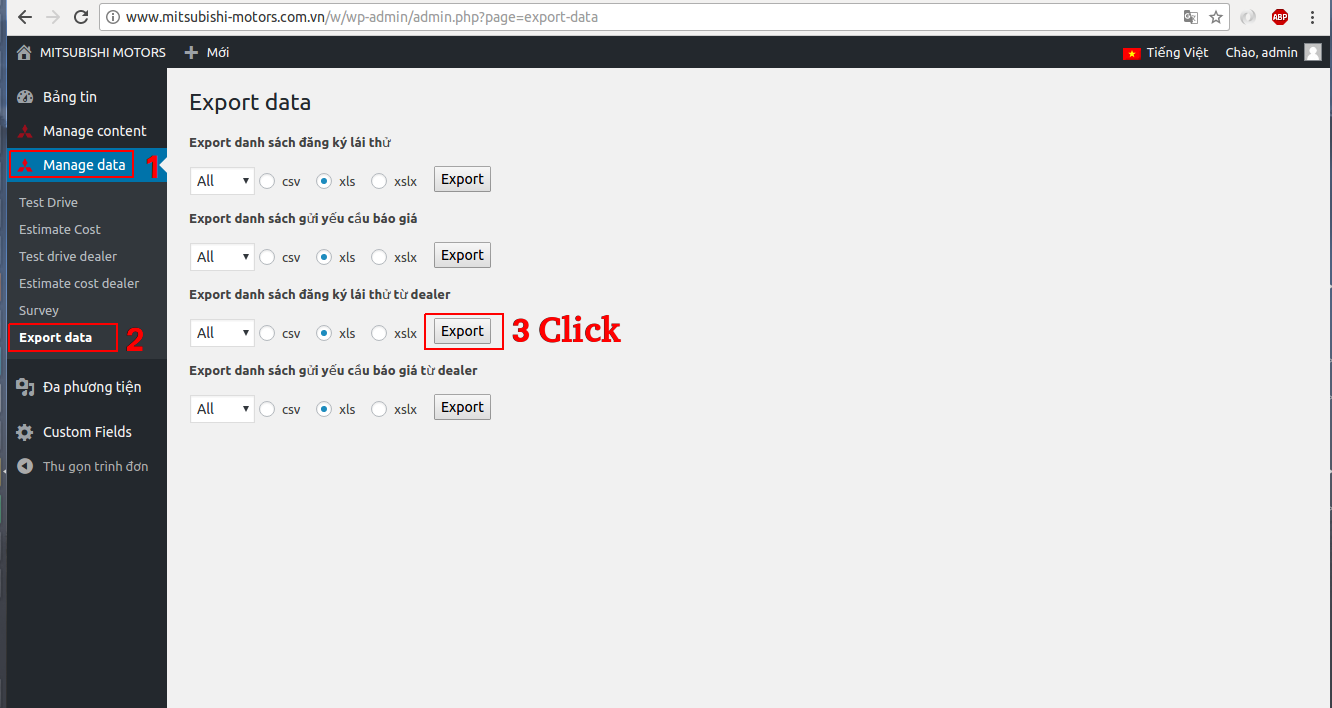
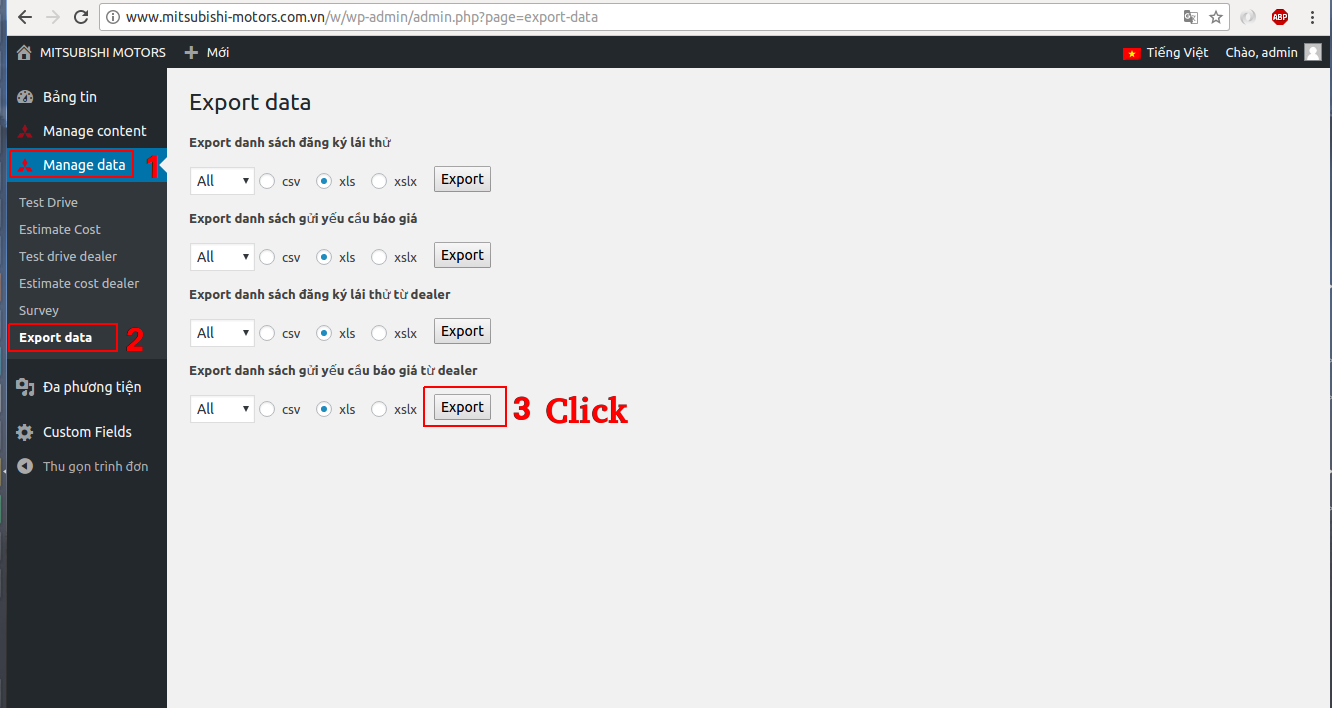
Export data từ forms submit
Bước 1 - Đăng nhập Back-End.
Bước 2 - Chọn Mục Manage data ( 1 ) => Export data ( 2 ) sẽ hiện danh sách cần export.
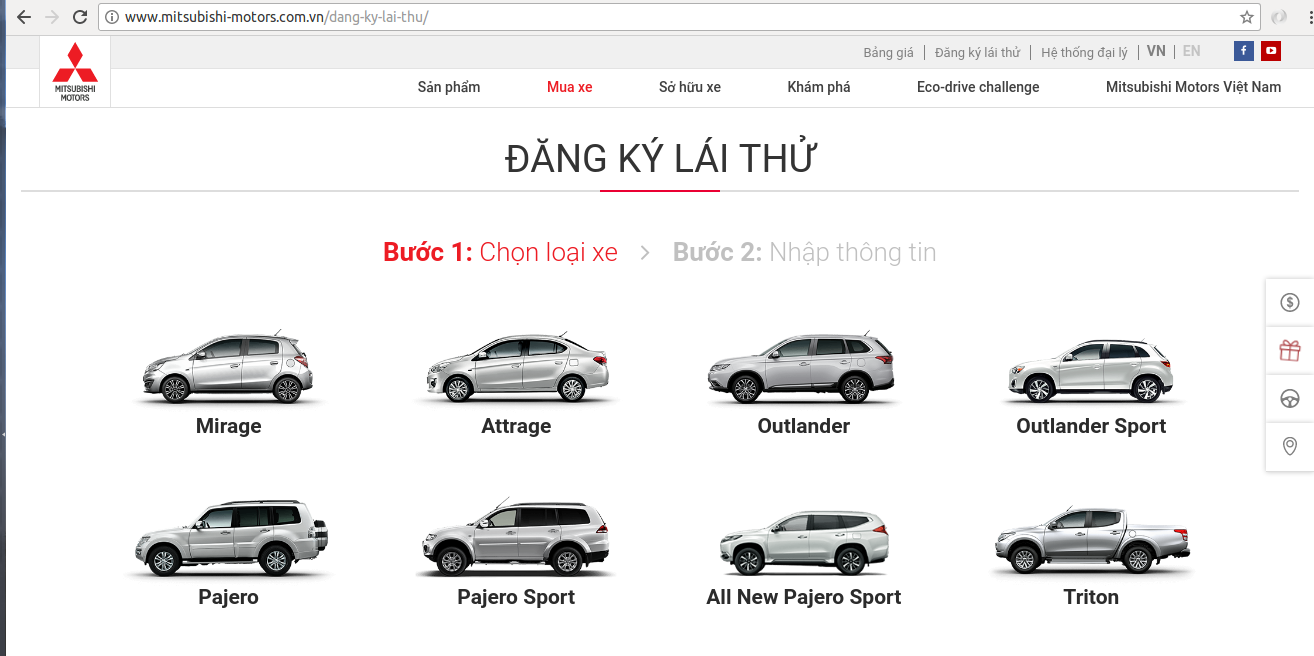
1. Dánh sách đăng ký lái thử
( Submit forms từ website mitsubishi-motors.com.vn )
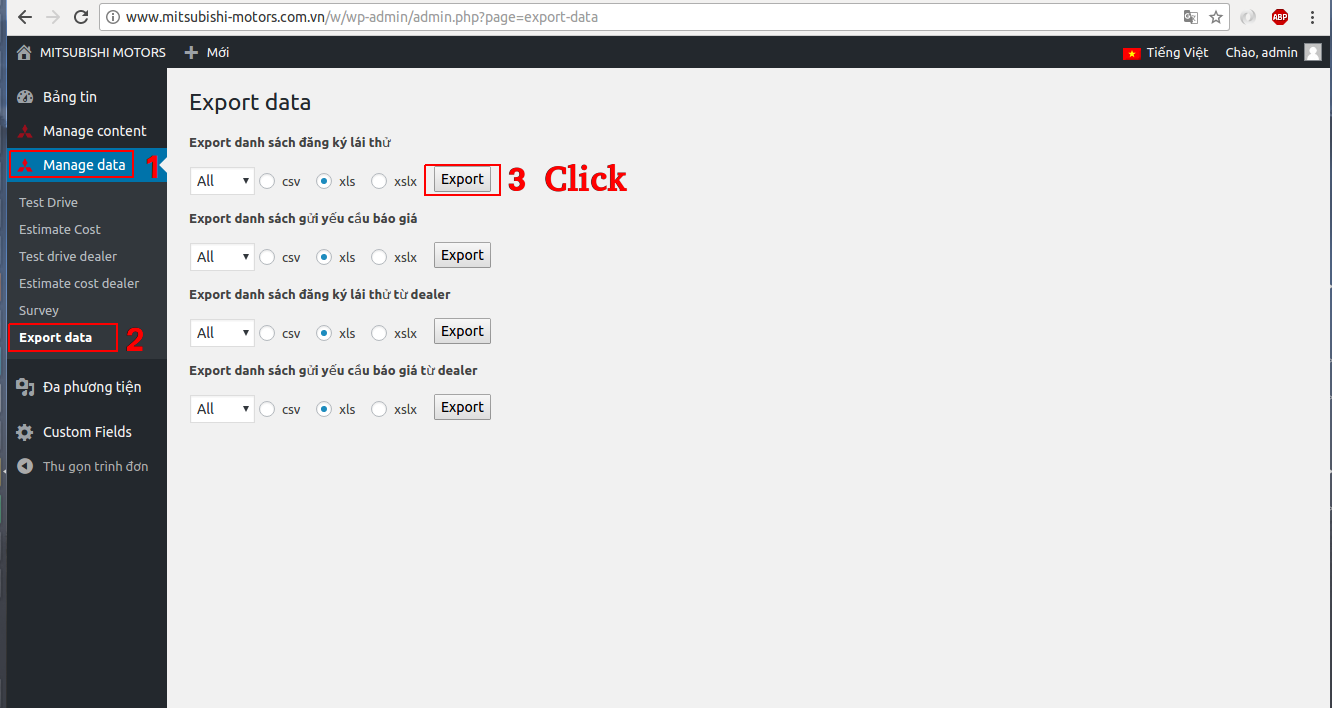
2. Dánh sách báo giá chi tiết
( Submit forms từ website mitsubishi-motors.com.vn )
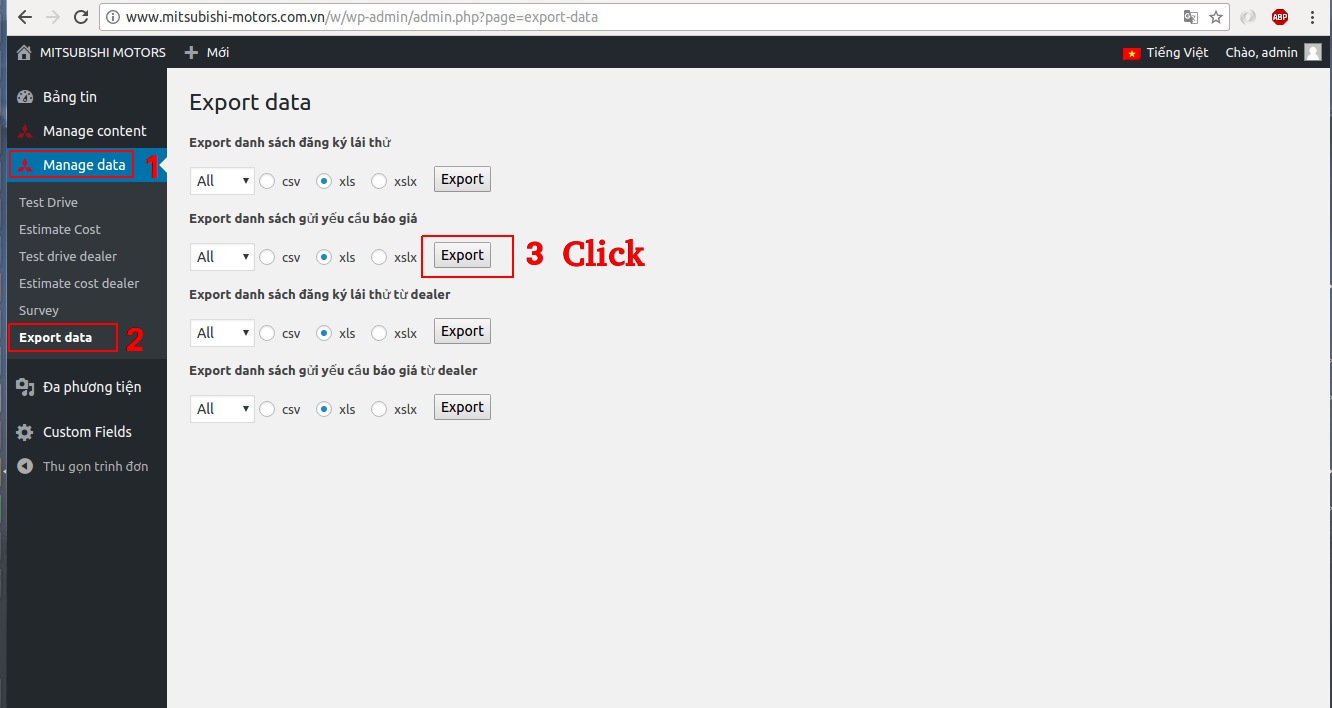
3. Dánh sách đăng ký lái thử từ Nhà phân phối
4. Dánh sách báo giá chi tiết từ Nhà phân phối
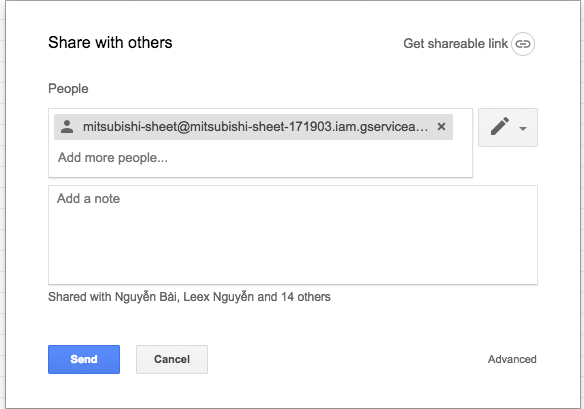
Đồng bộ dữ liệu lên Google sheet
Bước 1: Share quyền Write (Can edit) cho email trên google sheet:
mitsubishi-sheet@mitsubishi-sheet-171903.iam.gserviceaccount.com
Bước 2: Cập nhật Link, Sheet name, Range name cho Nhà phân phối
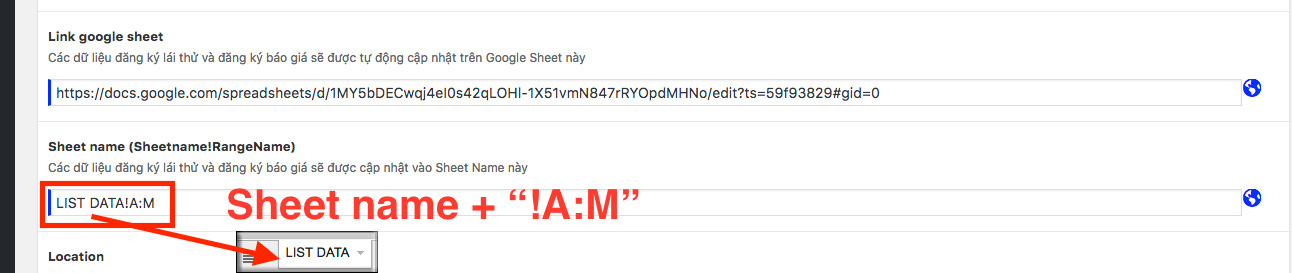
Trường hợp dữ liệu thêm vào không map đúng với range đã khai báo:
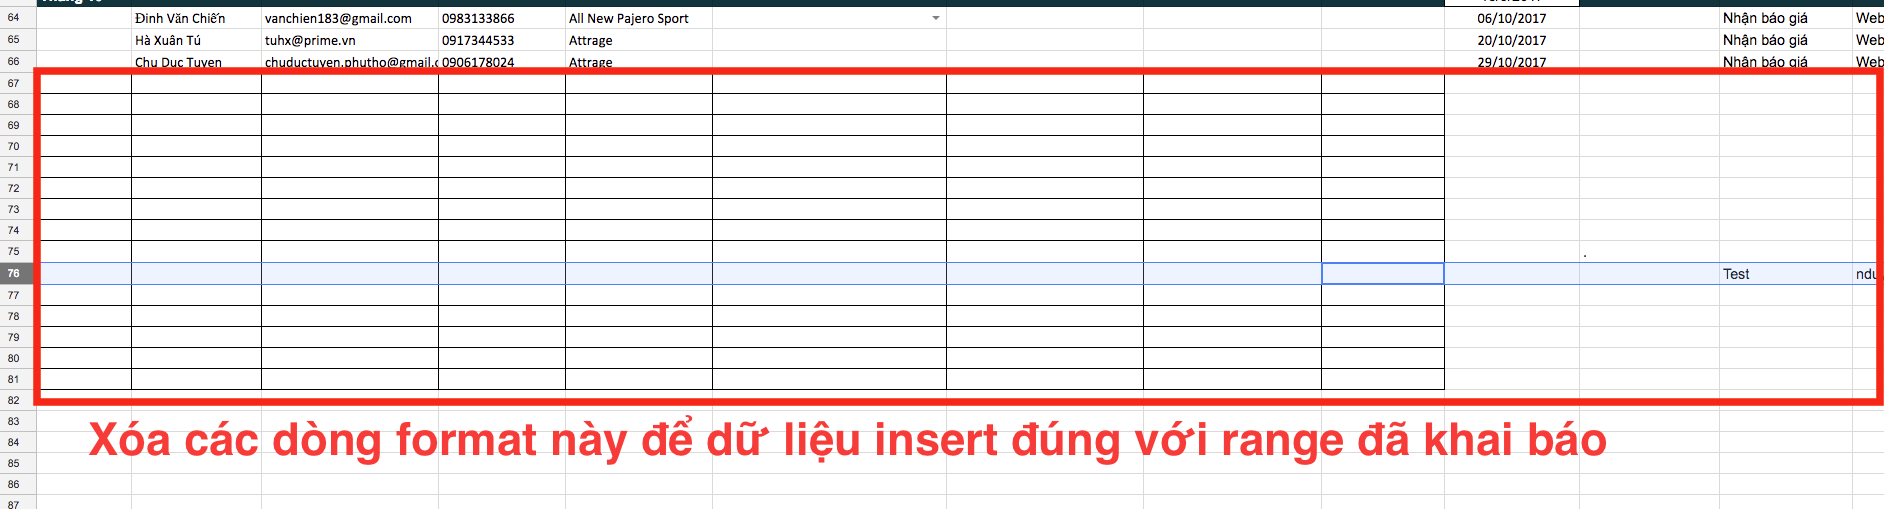
Cập nhật chỉnh sửa nội dung.
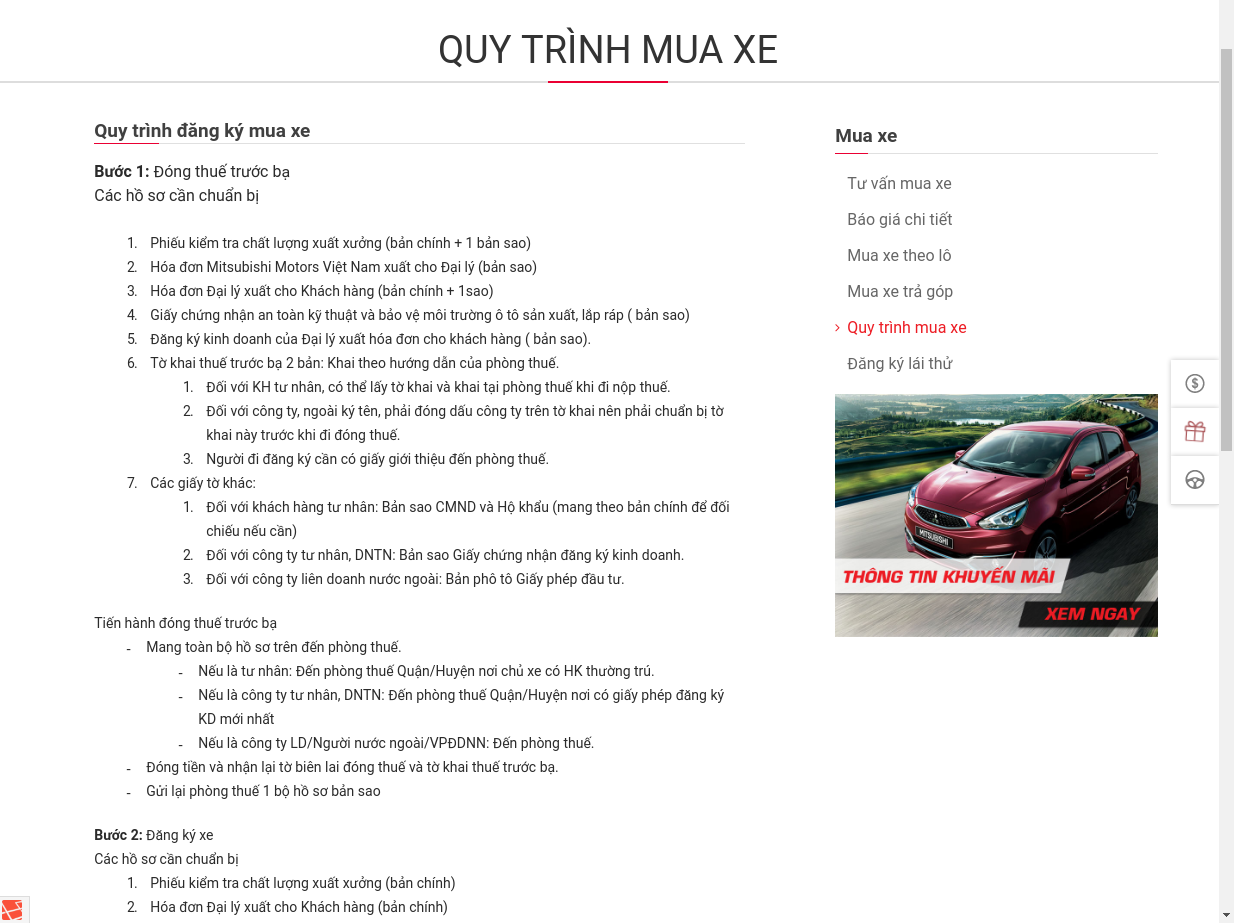
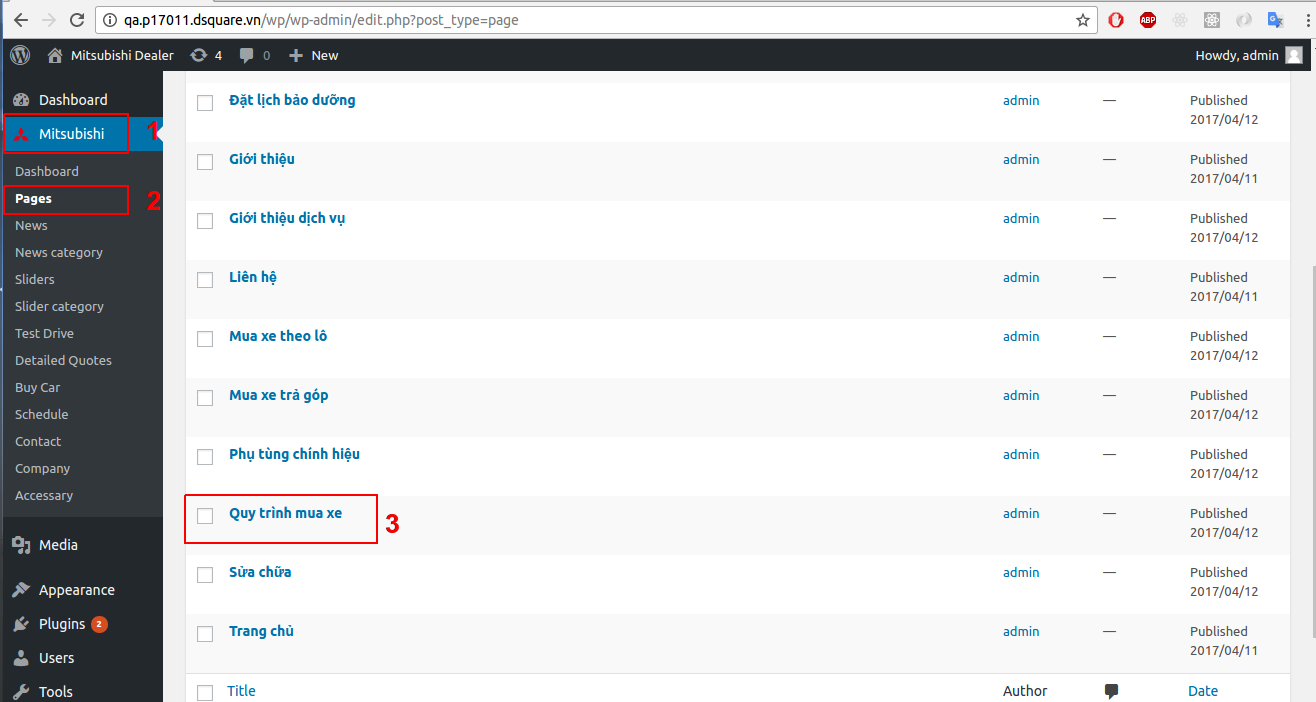
Bước 1 - Đăng nhập Back-End.
Bước 2 - Chọn Mục Mitsubishi ( 1 ) => pages ( 2 ) - Sau đó chọn Click "Quy trình mua xe" ( 3 ).
Bước 3 - Chỉnh sửa nội dung.
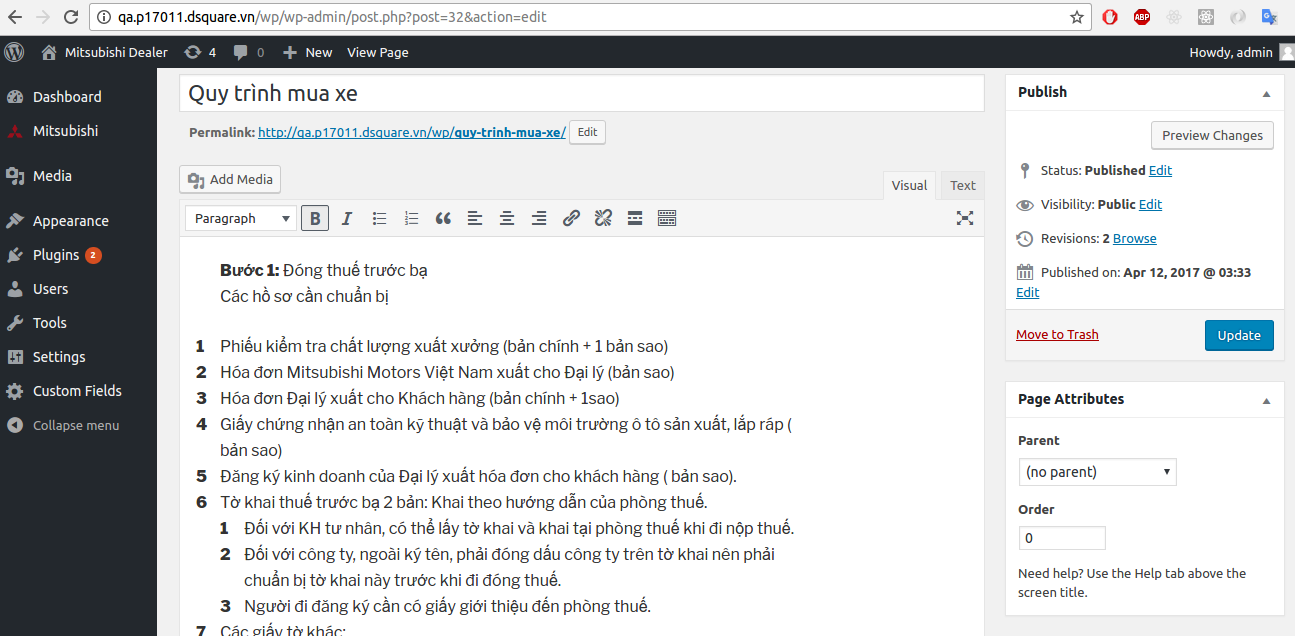
Bước 4 - Nhấn update để lưu lại.
Quản lý thông tin khách hàng.
Bước 1 - Đăng nhập Back-End.
Bước 2 - Chọn Mục Mitsubishi ( 1 ) => Test Driver ( 2 ).
Quản lý thông tin khách hàng.
Bước 1 - Đăng nhập Back-End.
Bước 2 - Chọn Mục Mitsubishi ( 1 ) => Detailed Quotes ( 2 ).
Sửa nội dung.
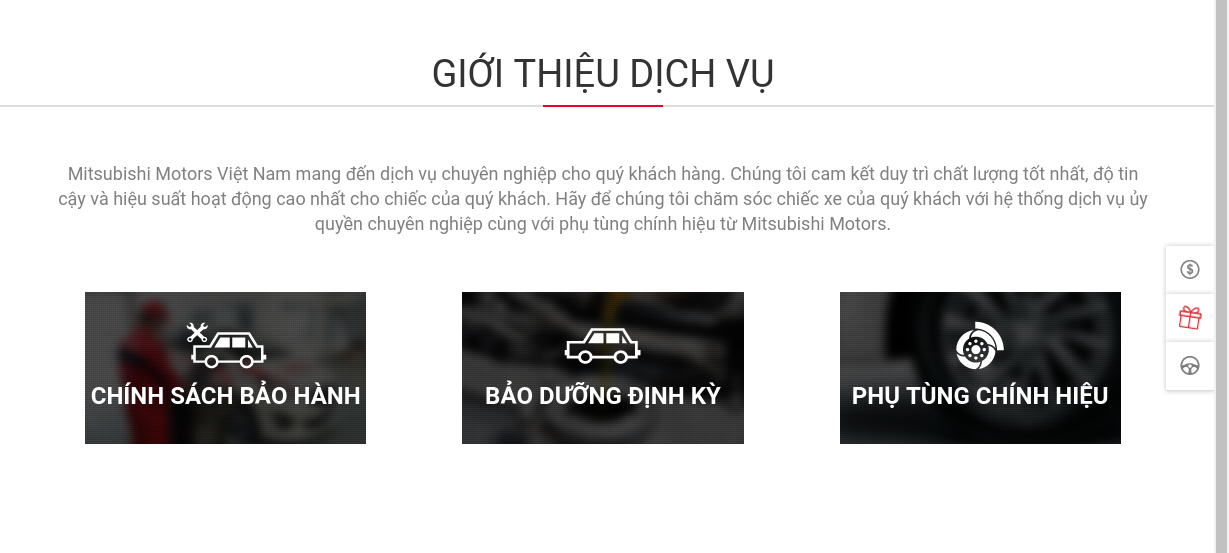
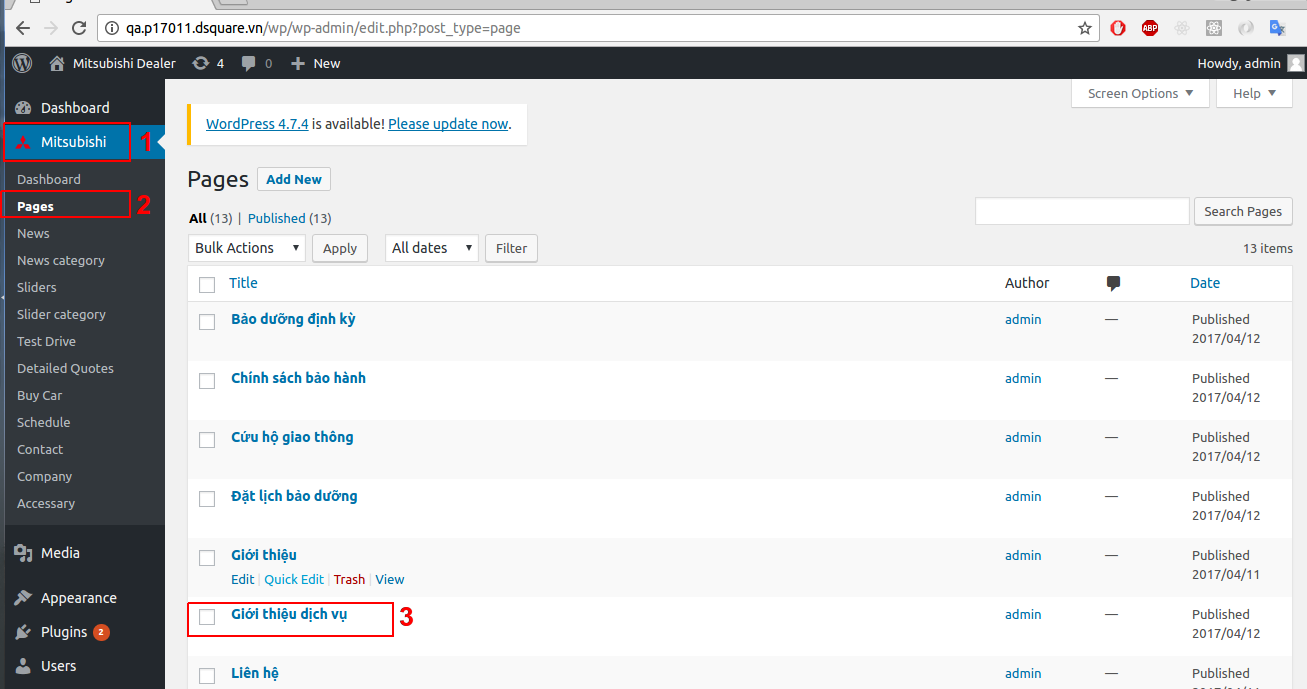
Bước 1 - Đăng nhập Back-End.
Bước 2 - Chọn Mục Mitsubishi ( 1 ) => pages ( 2 ) => Giới thiệu dịch vụ ( 3 ).
Bước 3 - Chỉnh sửa mô tả giới thiệu dịch vu.
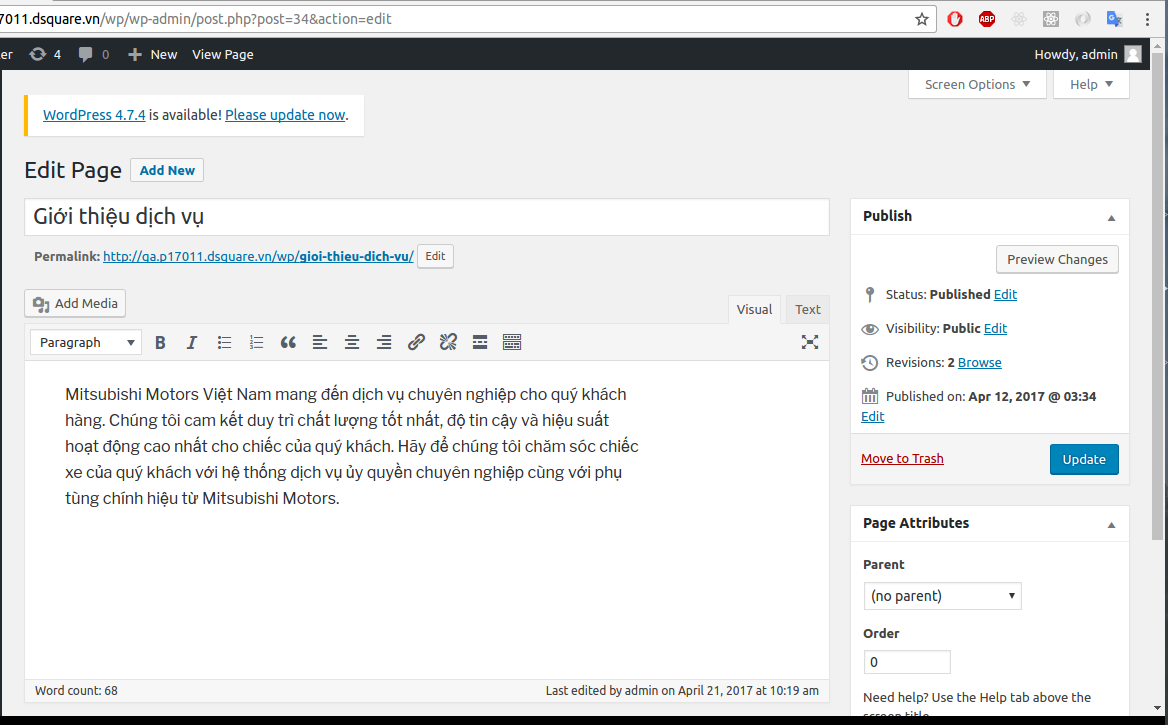
Bước 4 - Nhấn Update để lưu lại.
Cập nhật nội dung
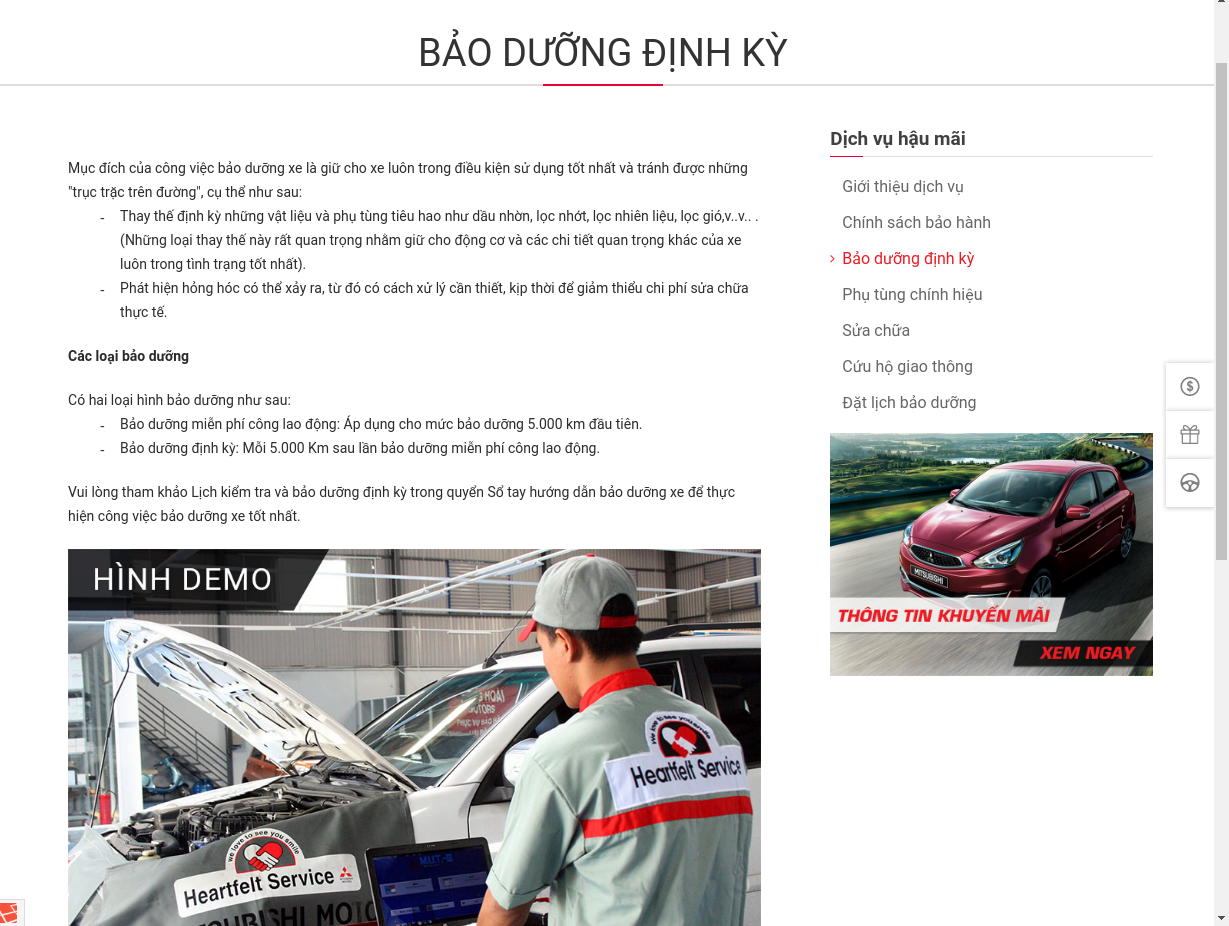
Bước 1 - Đăng nhập Back-End.
Bước 2 - Chọn Mục Mitsubishi ( 1 ) => pages ( 2 ) => Bảo dưỡng định kỳ ( 3 ).
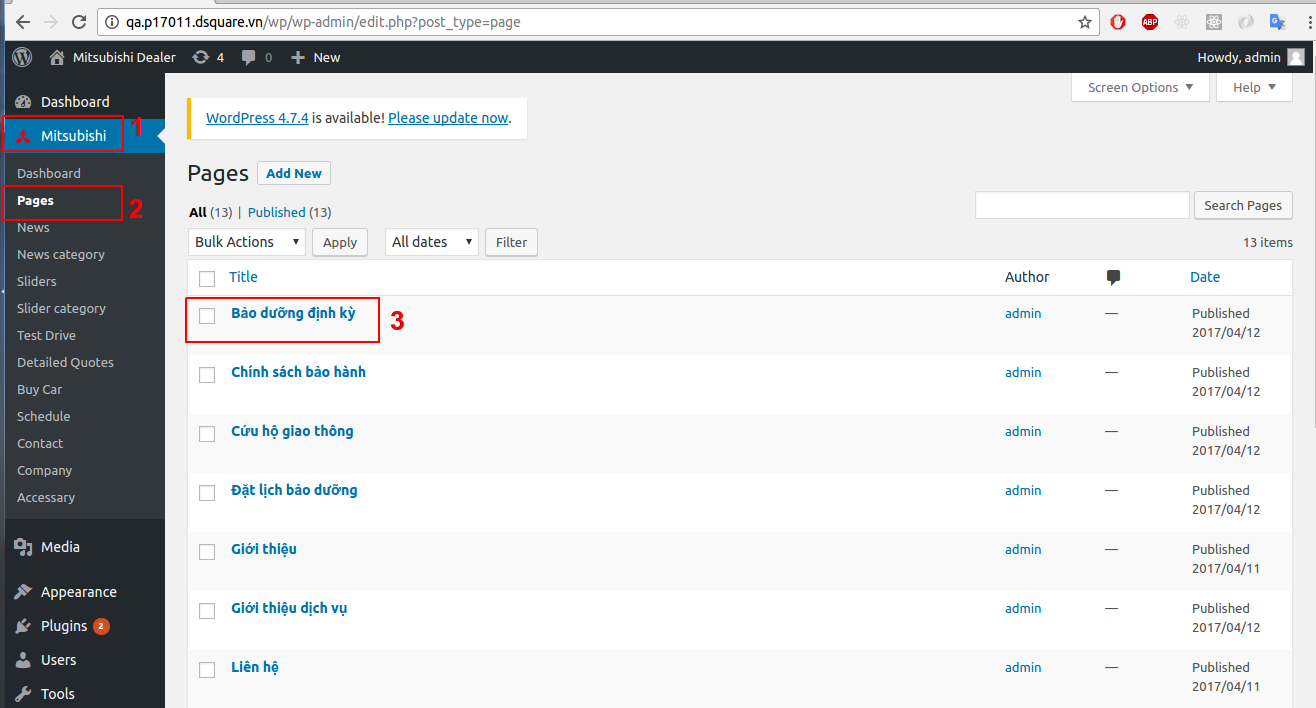
Bước 3 - Cập nhật nội dung.
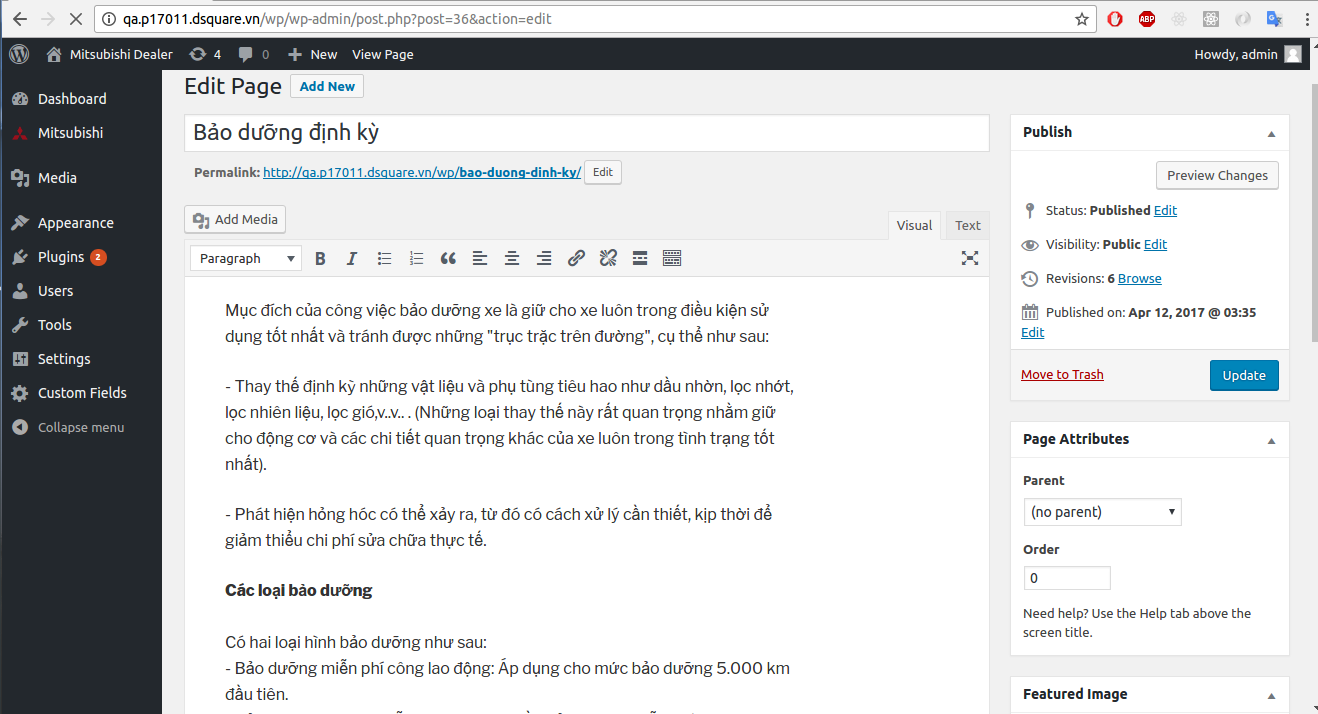
Bước 4 - Nhấn update để lưu lại.
Cập nhật nội dung
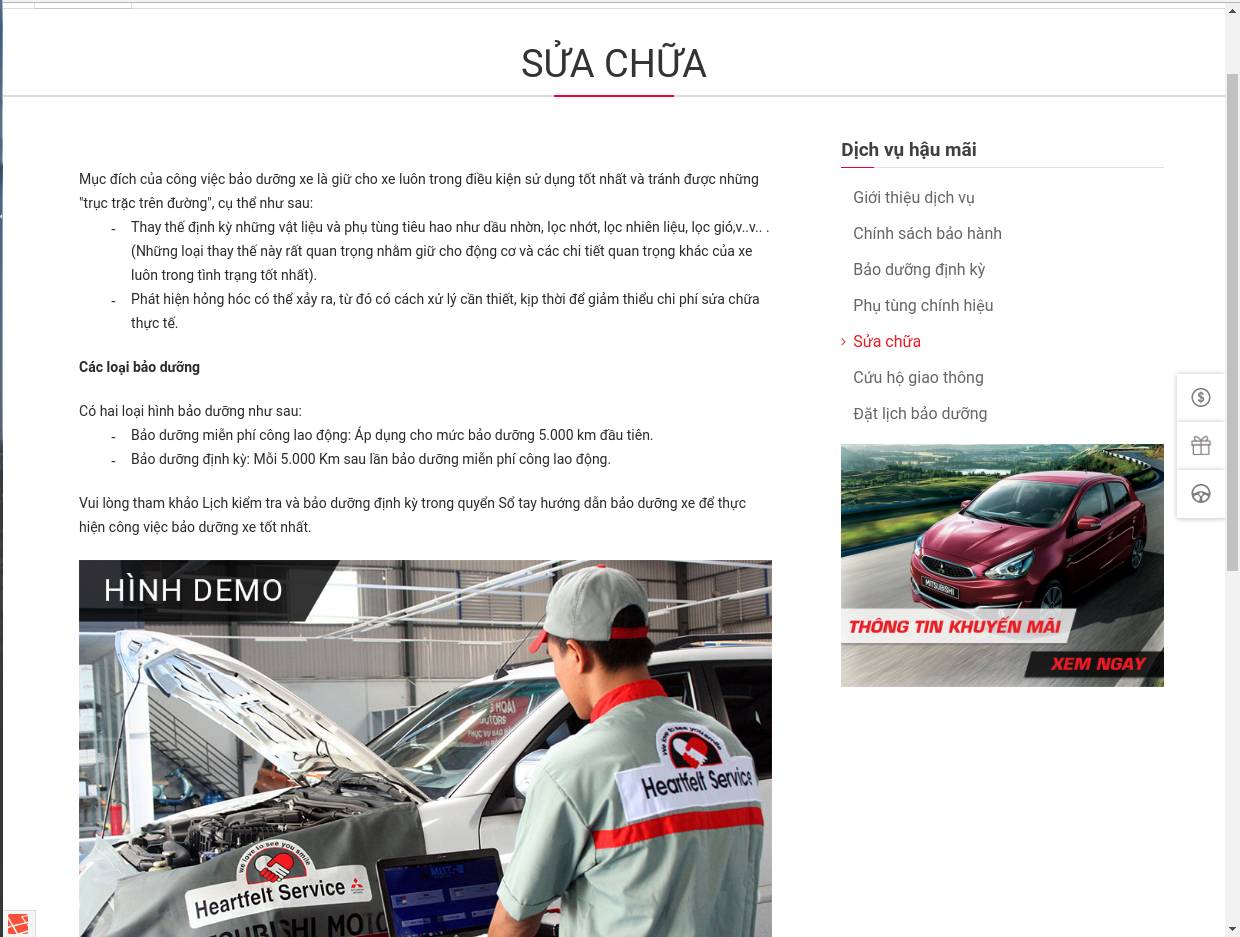
Bước 1 - Đăng nhập Back-End.
Bước 2 - Chọn Mục Mitsubishi ( 1 ) => pages ( 2 ) => Sửa chữa.
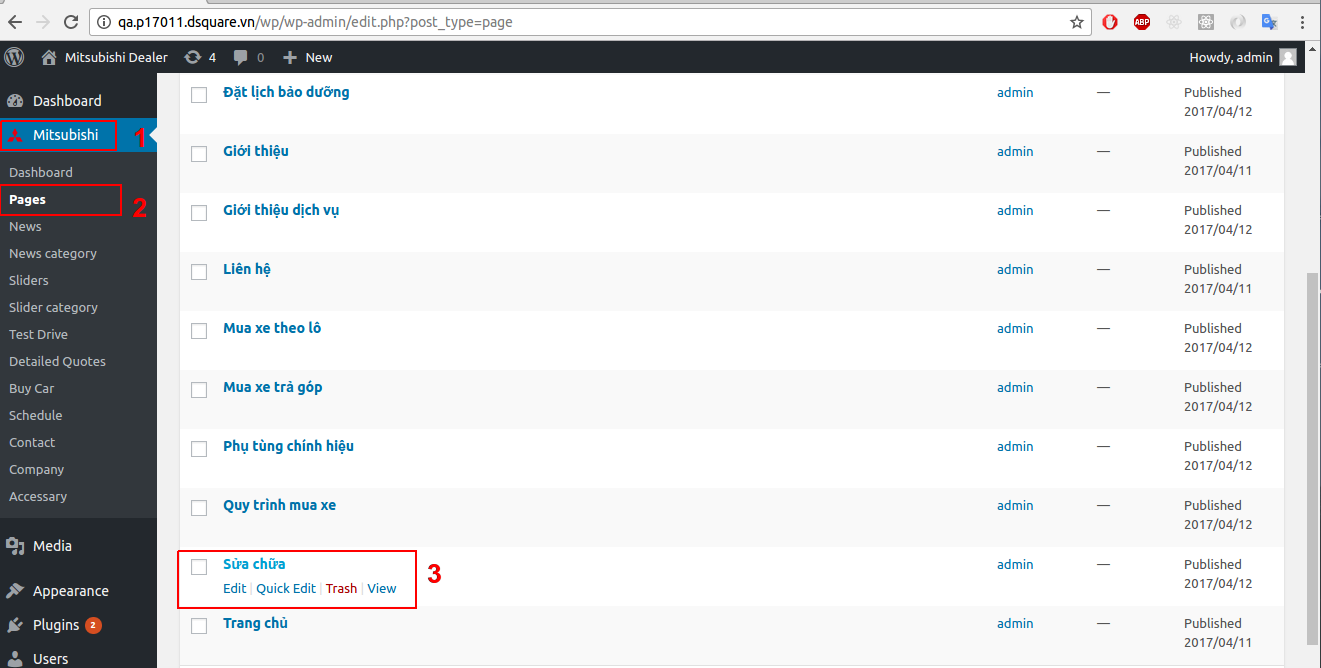
Bước 3 - Cập nhật nội dung
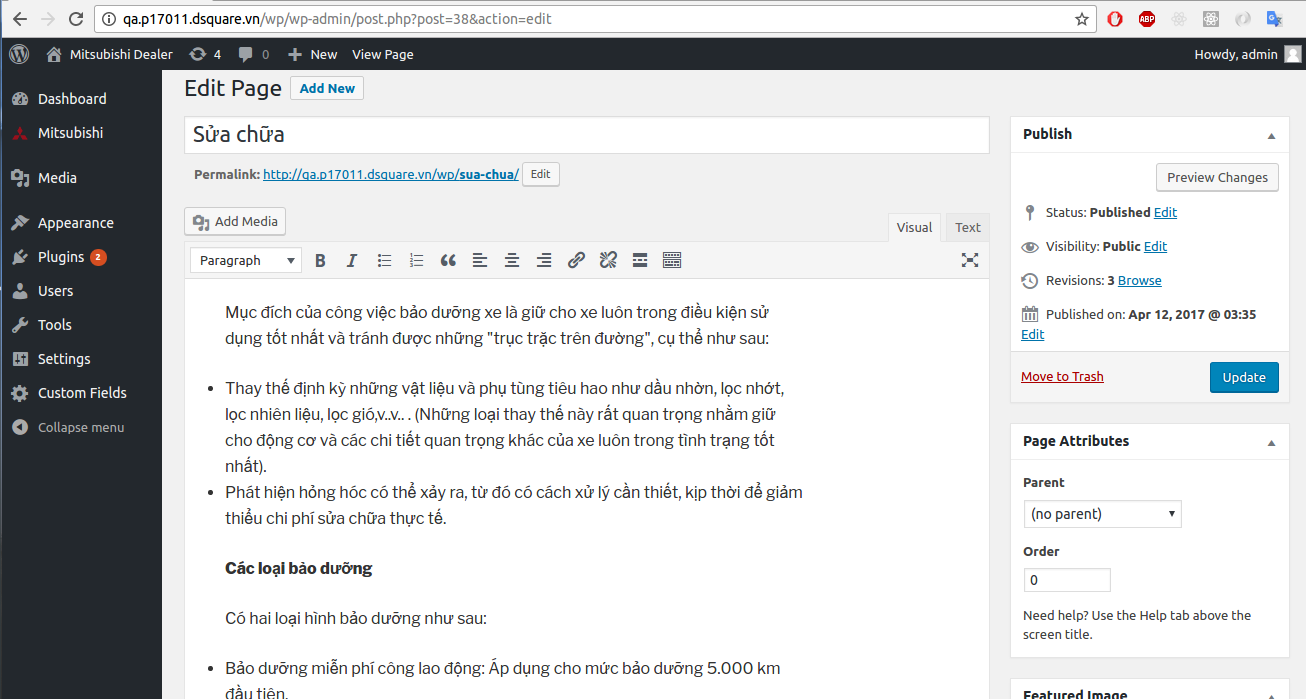
Bước 4 - Nhấn update để lưu lại.
Cập nhật nội dung
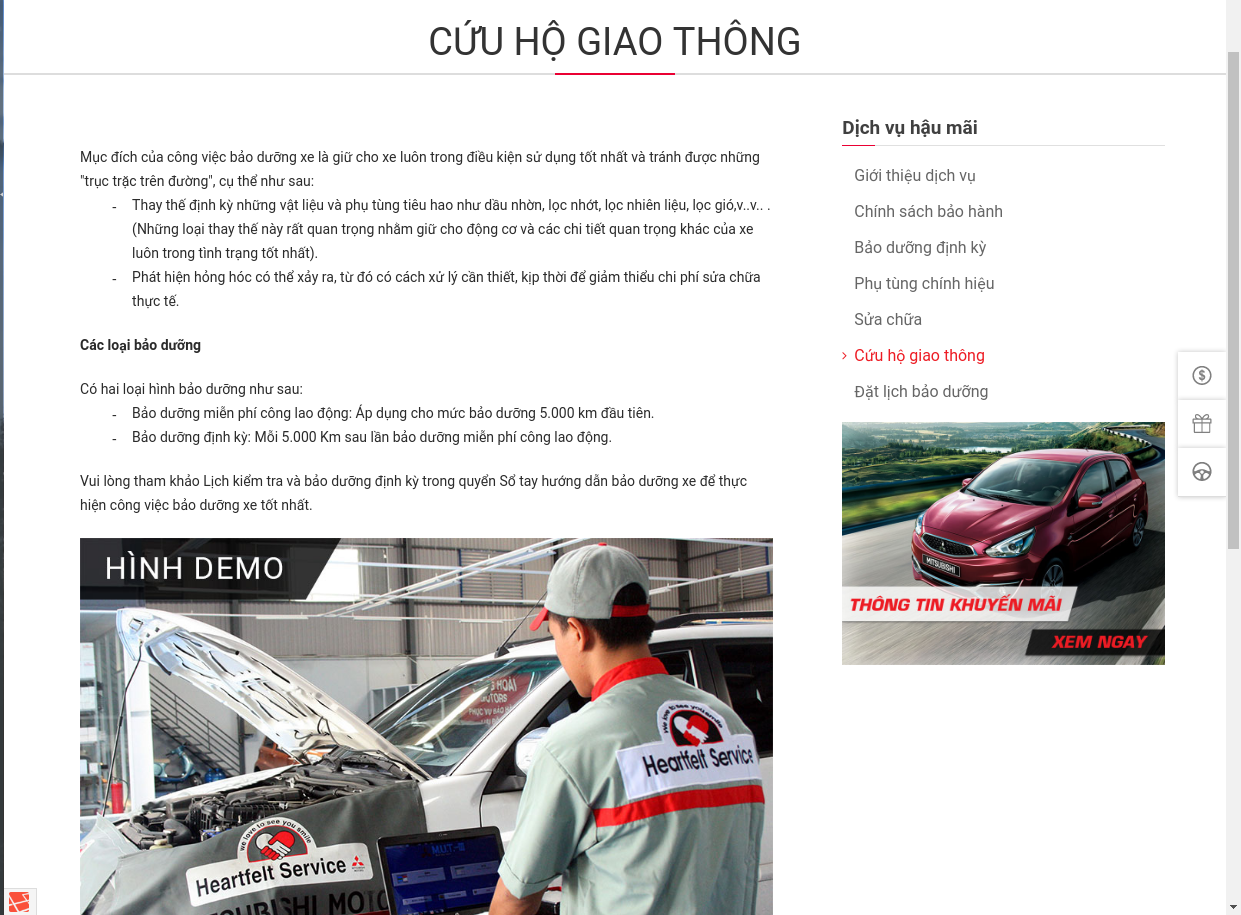
Bước 1 - Đăng nhập Back-End.
Bước 2 - Chọn Mục Mitsubishi ( 1 ) => pages ( 2 ) => cứu hộ giao thông ( 3 ).
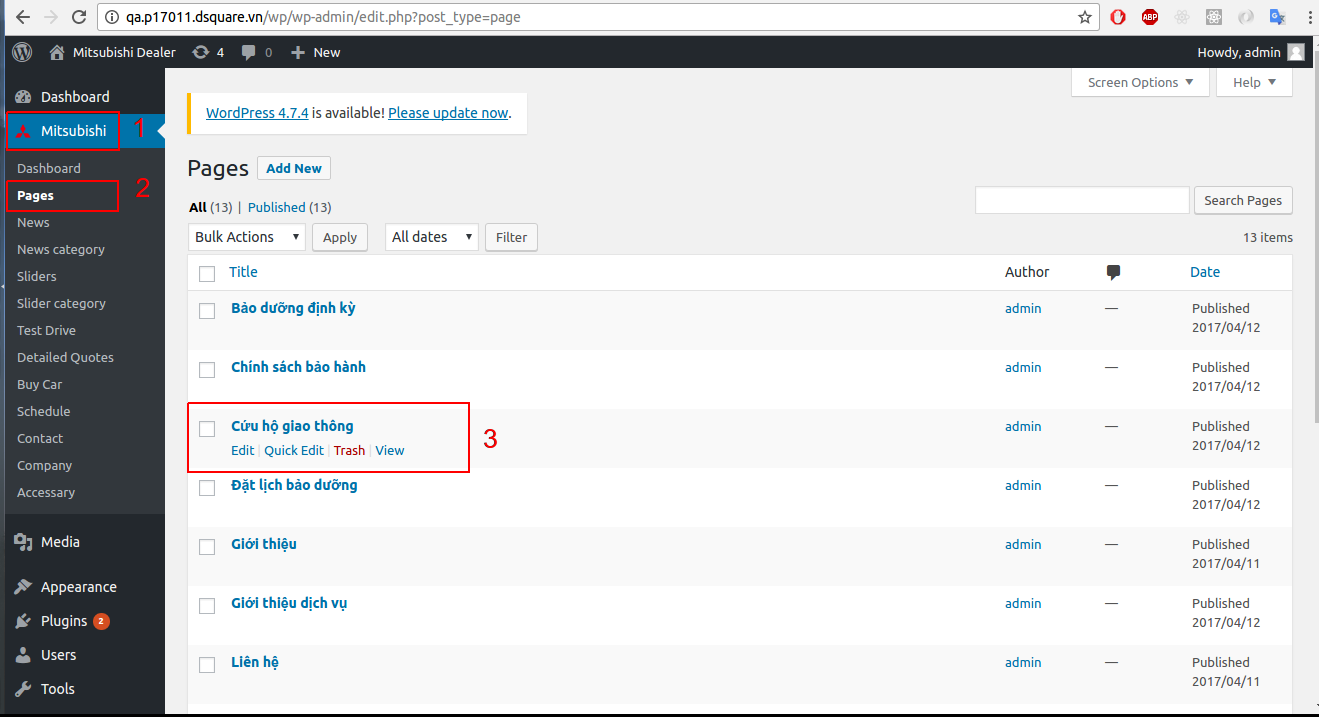
Bước 3 - Cập nhật nội dung.
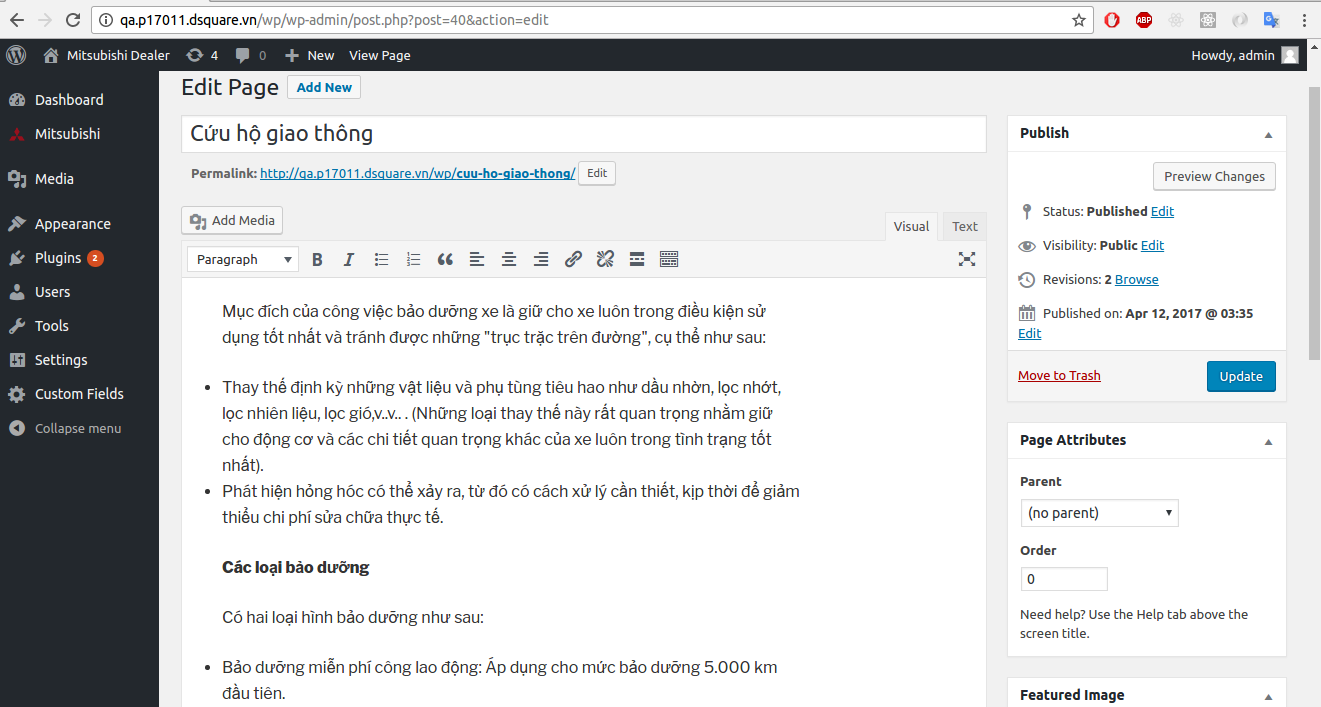
Bước 4 - Nhấn update để lưu lại.
Cập nhật nội dung
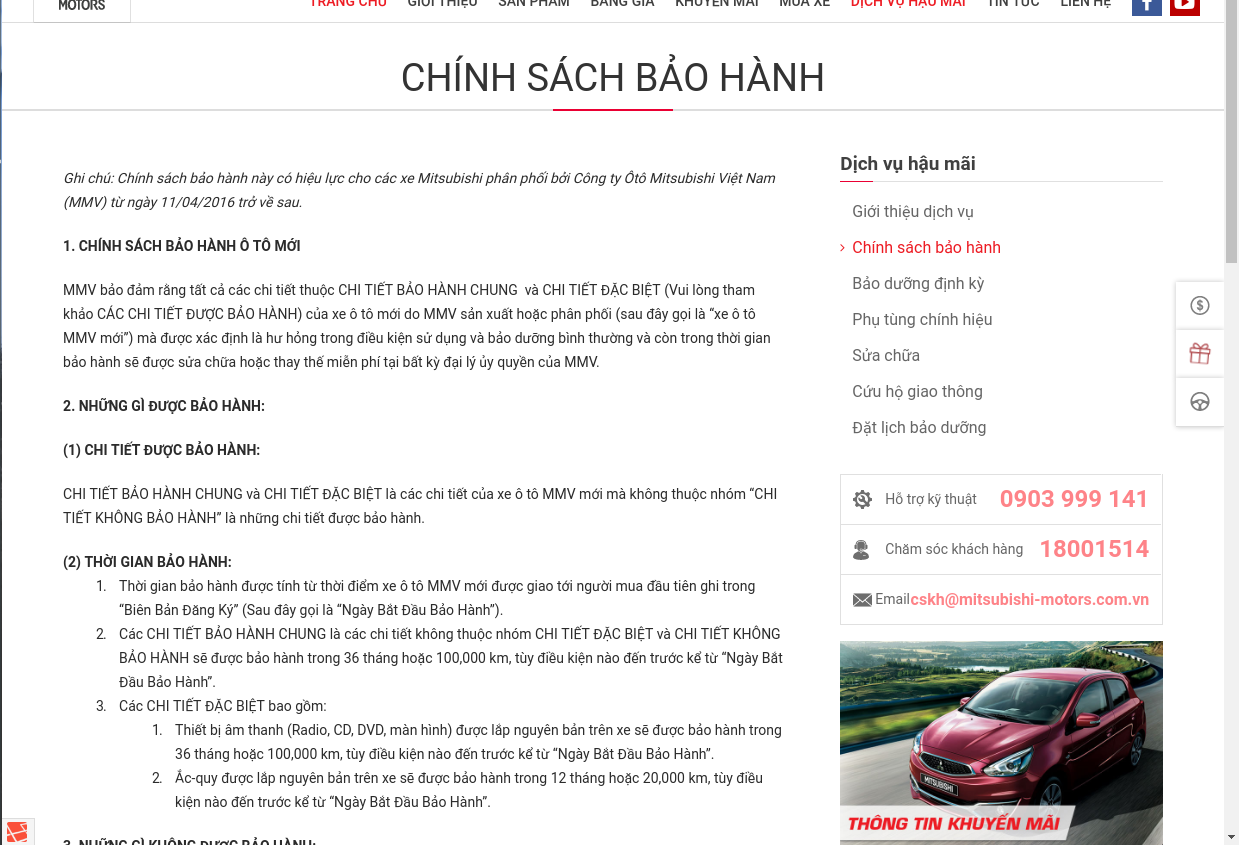
Bước 1 - Đăng nhập Back-End.
Bước 2 - Chọn Mục Mitsubishi ( 1 ) => pages ( 2 ) => chính sách bảo hành ( 3 ).
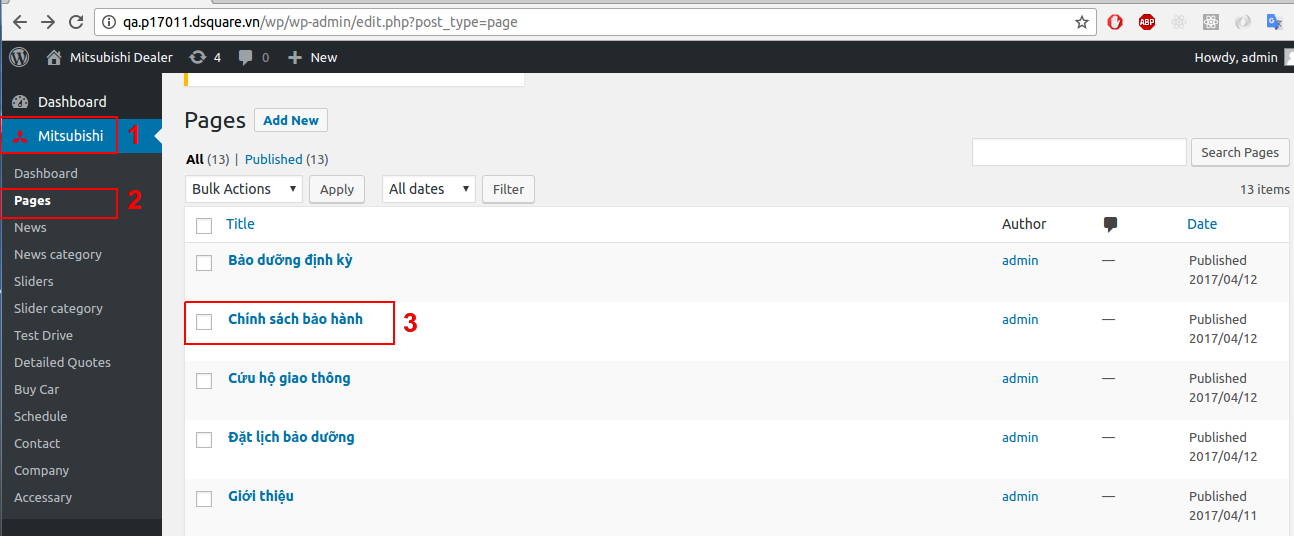
Bước 3 - Cập nhật nội dung.
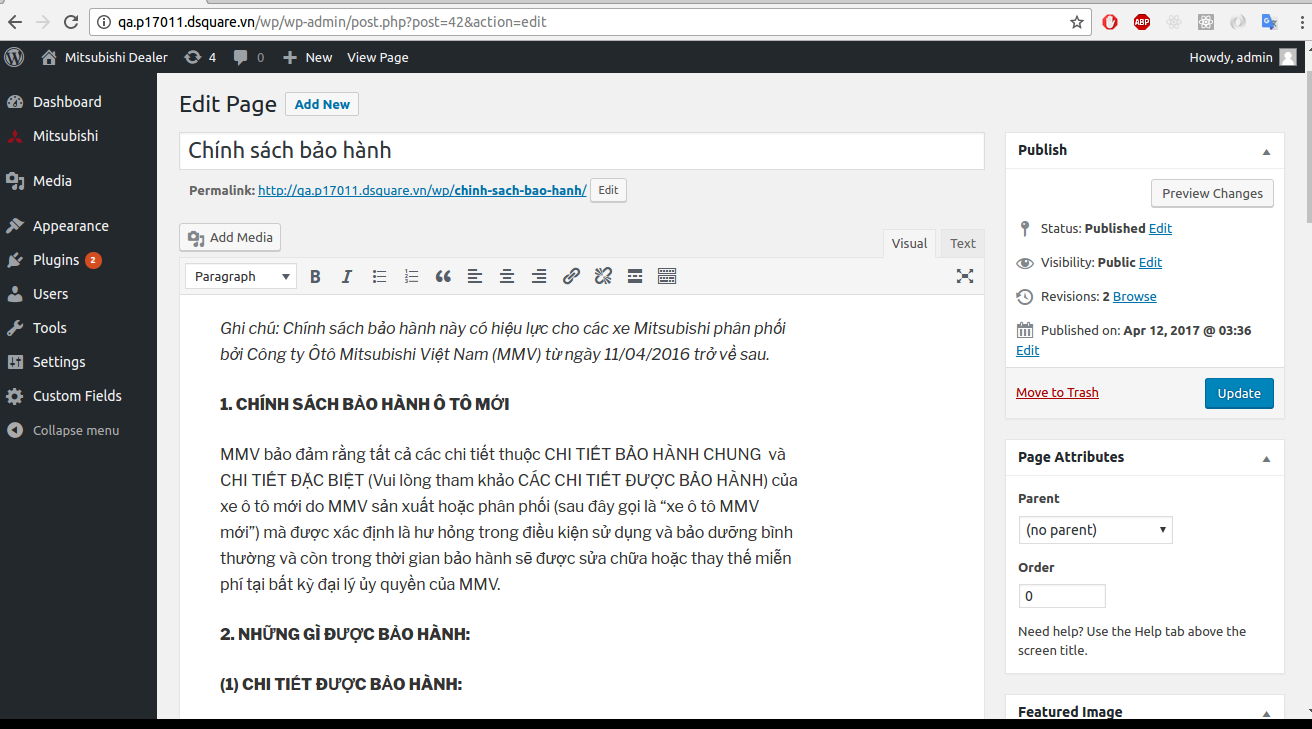
Bước 4 - Nhấn update để lưu lại.
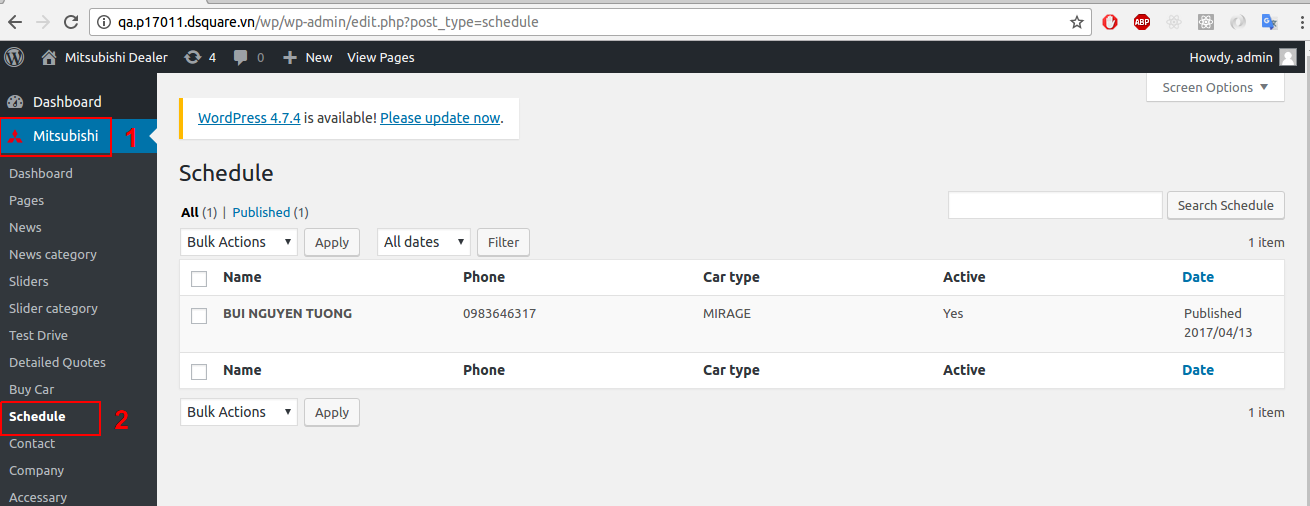
Quản lý thông tin khách hàng
Bước 1 - Đăng nhập Back-End.
Bước 2 - Chọn Mục Mitsubishi ( 1 ) => Schedule ( 2 ).
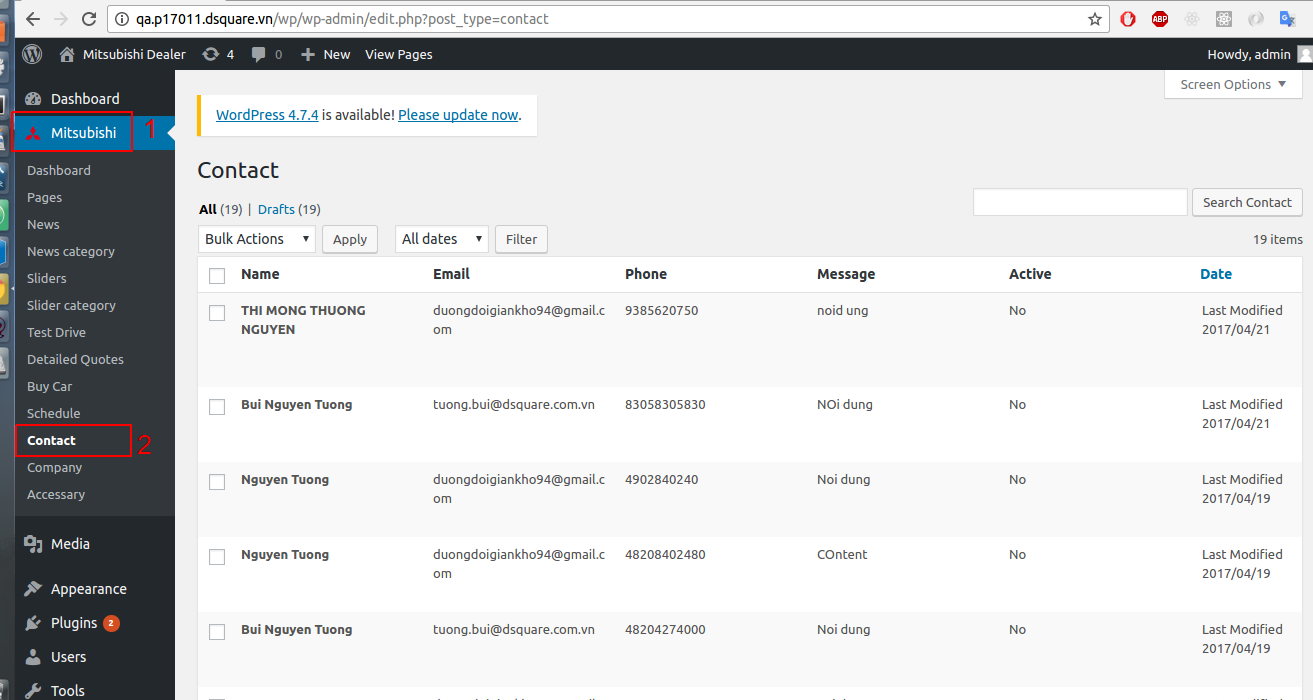
Quản lý thông tin khách hàng

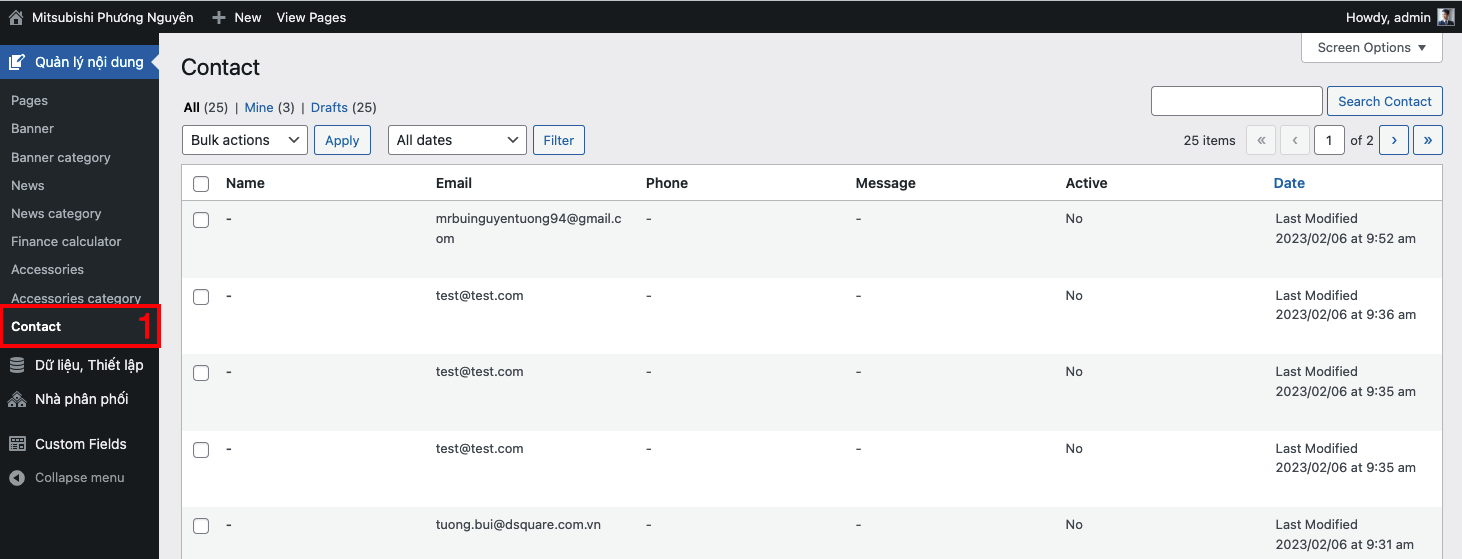
Bước 1 - Đăng nhập Back-End.
Bước 2 - Chọn Mục Mitsubishi ( 1 ) => Contact ( 2 ).
Blog Options
Follow the steps below to find out how to change the Archive Post:
Step 1 - Login to your WordPress Dasrdoard.
Step 2 - Go to Appearance > Theme Options > Blog .
Step 3 - Choose which part of the Blog you want to modify.
Archive Post Options
- Select Layout: To modify layout of blog.
- Content Column: To modify class bootstrap content column.
- Sidebar Left Column: To modify class bootstrap sidebar left column.
- Sidebar Right Column: To modify class bootstrap sidebar right column.
- Read More Text: To modify text of label button read more in blog.
Signle Post Options
- Select Layout: To modify layout of blog.
- Content Column: To modify class bootstrap content column.
- Sidebar Left Column: To modify class bootstrap sidebar left column.
- Sidebar Right Column: To modify class bootstrap sidebar right column.
- Show Navigation: To show or not post navigation on your single blog.
- Show Author: To show or not post author on your single blog.
- Show Comment: To show or not post comment on your single blog.
Step 4 - When you have finish to customize the color don't forget to save.
Page Options
Follow the steps below to find out how to change the page options:
Step 1 - Login to your WordPress Dasrdoard.
Step 2 - Go to Appearance > Theme Options > Page .
Step 3 - Choose whether or not you would like to show page comments.
Step 4 - When you have finish to customize the color don't forget to save.
Custom CSS Options
Follow the steps below to find out how to change the custom css:
Step 1 - Login to your WordPress Dasrdoard.
Step 2 - Go to Appearance > Theme Options > Custom CSS .
Step 3 - Quickly add some CSS to your theme by adding it to this block.
Step 4 - When you have finish to customize the color don't forget to save.
Create Blog Posts
Adding Posts
You can customize each posts modifying the post options.
We will explain you how to create post using Lemon.
Show your Posts
How to create a Blog page to show your post
Adding Posts
Step 1 - Log in to your WordPress Administration Panel (Dasrdoard)..
Step 2 - Click the 'Posts' tab.
Step 3 - Click the 'Add New' sub-tab.
Step 4 - Start filling in the
blanks: enter your post title in the upper field, and enter your post
body content in the main post editing box below it.
Step 5 - As needed, select a category, add tags, post format, fill in the meta setings below the editor.
Step 6 - Upload a featured image for your Post.
Show your Posts
To you show your posts you need to create a Blog page. Click here to check how create a blog page.
Create Blog page
Follow the steps bellow to understand how to create a blog page.
Create blog page
Step 1 - Log in to your WordPress Administration Panel (Dasrdoard)..
Step 2 - Click on Pages > Add New.
Step 3 - Give your page a name then Change the Editor to Backend Editor ( you need to have the Visual Composer plugin activated ).
Step 4 - Click on the Add Element button
Step 5 - Select the Blog module.
Step 6 - The Blog Settings should appear. You can customize the Blog by modifying the settings
Step 7 - After finishing, Publish the page.
Create Service Post
Add Service Items
How to create your service post.
Add Service Items
Step 1 - Log in to your WordPress Administration Panel (Dasrdoard)..
Step 2 - Click the Teams > Add New.
Step 3 - Fill the title field with the service name, add a Group and Filter category if needed.
Step 4 - Add a featured image, it will represent your service member's image.
Step 5 - Scroll down until you see the Service Settings.
Step 6 - The content is
optional, it will appear under the service main information. Check the
screenshot below to see how service post works.
Step 7 - If you want to change the service member order you will need to change the publish time.
Showing Services
You need to use the Service module in order to list your services.
Check the service module page for more information
Create Service page
Create Service page ( standard )
We will explain how to create a service page.
Create Service page ( carousel )
We will explain how to create a service page using Carousel.
Create Service page ( standard )
Step 1 - Log in to your WordPress Administration Panel (Dasrdoard)..
Step 2 - Click on Pages > Add New.
Step 3 - Give your page a name then Change the Editor to Backend Editor ( you need to have the Visual Composer plugin activated ).
Step 4 - Click on the Add Element button
Step 5 - Select the Service module.
Step 6 - The Service should appear. You can customize the Service by modifying the settings
Step 7 - After finishing, Publish the page.
Create Service page ( carousel )
Step 1 - Log in to your WordPress Administration Panel (Dasrdoard)..
Step 2 - Click on Pages > Add New.
Step 3 - Give your page a name then Change the Editor to Backend Editor ( you need to have the Visual Composer plugin activated ).
Step 4 - Click on the Add Element button
Step 5 - Select the Service Carousel module.
Step 6 - The Service Carousel should appear. You can customize the Service Carousel by modifying the settings
Step 7 - After finishing, Publish the page.
Create Team Post
Add Team Items
How to create your team post.
Add Team Items
Step 1 - Log in to your WordPress Administration Panel (Dasrdoard)..
Step 2 - Click the Teams > Add New.
Step 3 - Fill the title field with the team name, add a Group and Filter category if needed.
Step 4 - Add a featured image, it will represent your team member's image.
Step 5 - Scroll down until you see the Team Settings.
Step 7 - If you want to change the team member order you will need to change the publish time.
Showing Teams
You need to use the Team module in order to list your teams.
Check the team module page for more information
Create Team page
Create Team page
We will explain how to create a team page.
Create Team page
Step 1 - Log in to your WordPress Administration Panel (Dasrdoard)..
Step 2 - Click on Pages > Add New.
Step 3 - Give your page a name then Change the Editor to Backend Editor ( you need to have the Visual Composer plugin activated ).
Step 4 - Click on the Add Element button
Step 5 - Select the Team module.
Step 6 - The Team should appear. You can customize the Team by modifying the settings
Step 7 - After finishing, Publish the page.
Create Orther posts & Page
Please do it same post or service or team.
Theme Options
The theme comes with an extensive Theme Options Panel. From the Theme options panel you will be able to set or change the color of the theme, layout, header style, social icons and a lot more. You should take the time to go through all of these options to ensure that you are getting the most out of the theme. Click Theme Options to access the Theme Options Panel.
General setting
Less Design - Use the less design features.
Layout - Body layout with wide or boxed.
Body Background - Body background with image, color, etc.
Page Loader - Enable/Disable page loader.
Color setting
Main Color - Set primary color.
Typography setting
Body Font Options - Set value of Font Family, Font Subsets, etc.
H1 - H6 Font Options - Set value of Font Family, Font Subsets, etc.
Logo setting
Logo - Select an image file for your logo.
Logo Stick - Select an image file for your logo stick.
Header setting
Header Layout - Select header layout in your site.
Main Menu setting
Fixed - Enable/Disable fixed menu.
Stick - Enable/Disable stick menu.
First Level Font Options - Set value of Font Family, Font Subsets, etc.
Stick First Level Font Options - Set value of Font Family, Font Subsets, etc.
Sub Level Font Options - Set value of Font Family, Font Subsets, etc.
Background - Seclect background for menu.
Background Sub Level - Seclect background for dropdown menu.
Stick Background - Seclect background for stick menu.
Footer setting
Footer Layout - Select footer layout in your site.
Footer Top Margin - Enter the value of margin for Footer Top.
Footer Top Padding - Enter the value of padding for Footer Top.
Footer Top Background - Seclect background for Footer Top.
Footer Bottom Padding - Enter the value of padding for Footer Bottom.
Footer Top Background - Seclect background for Footer Bottom.
Title Bar setting
Margin - Enter the value of margin for Title Bar.
Padding - Enter the value of padding for Title Bar.
Background - Seclect background for Title Bar.
Title Bar Heading - Set value of Font Family, Font Subsets, etc.
Title Bar Path - Set value of Font Family, Font Subsets, etc.
Sub Text - Enter sub text of Title Bar.
Sub Text Format - Set value of Font Family, Font Subsets, etc.
Delimiter - Enter Delimiter of page breadcrumb in Title Bar.
Blog setting
Select Layout - Select layout of blog.
Content Column - Enter class bootstrap content column.
Sidebar Left Column - Enter class bootstrap content column.
Sidebar Right Column - Enter class bootstrap content column.
Read More Text - Enter text of label button read more in blog.
Show Navigation - Show or not post navigation on your single blog.
Show Author - Show or not post author on your single blog.
Show Comment - Show or not post comment on your single blog.
Page setting
Show Page Comment - Show or not page comment on your page.
Custom CSS
Custom CSS Code - Quickly add some CSS to your theme by adding it to this block.
Demo Importer
Demo Importer - Click on the demo you want to import
Page Options
For each page you can change the title style, title background color, select to use a slider and much more! Check the screenshot and read the documentation to see how it works
General setting
Body Layout - Select body layout for page.
Header setting
Select Header - Select header layout for page.
Logo - Select an image logo for page.
Stick Logo - Select an image stick logo for page.
Select Menu - Select menu for page.
Select Position - Select position menu for page.
Disable Stick Menu - Disable Stick Menu for page.
Title Bar setting
Body Layout - Select Background title bar for page.
Footer setting
Select Footer - Select footer layout for page.
Show Footer Top - Show or hide footer top for page.
Show Footer Bottom - Show or hide footer bottom for page.
Revolution Slider
Lemon theme includes the premium plugin - Revolution Slider.
Once you've installed and activated the Revolution Slider
plugin, you will then see the menu item appear at the bottom of the
WordPress menu, as below:
Documentation
You can import the revolution slider we used in our demo, all slider are in the slider folder. To learn more about the Revolution Slider plugin please read the Plugin documentation
Widgets
Widgets
Lemon theme comes with Custom widget created specially for the theme.
To set the Widget go to Appearance > Widgets.
Additional Links:
Use Page Builder
Activate Page builder
We will explain how to active the Visual Composer.
Add and modify Row Layout
We will explain how to add Row and change Row layout works.
Edit Element
We will explain how to edit element.
Duplicate Element
We will explain how to duplicate element.
Remove Element
We will explain how to remove element.
About Row / Column / Custom heading / Text Block Design options
We will explain how to edit design options to make your page looks beautiful.
Official Plugin Documentation
For More information about the Visual Composer check the official documentation.
Activate Page builder
Step 1 - Log in to your WordPress Administration Panel.
Step 2 - Click on Pages > Add New.
Step 3 - Click on Backend Editor.
Add and modify Row Layout
Step 1 - Go to your page / post, first activate the backend editor and click Add Element Step 2 - Select the Row Module Step 3 - Click on the Edit This Row (pencil icon) to Edit the Row element ( in our example we use row with 3 columns filled with text block ) Step 4 - To change the Row layout ( number of columns ) you need to click the second Icon from the left then select a layout or custom to make your own
Edit Element
Pencil Icon - To Edit Row, Column or Module you need to click the Pencil icon.
Duplicate Element
Pages Icon - To Duplicate Row or Module you need to click the Pages icon.
Remove Element
Trash Box Icon - To Remove Row, Column or Module you need to click the Trash Box icon.
About Row / Column / Custom heading / Text Block Design options
Design Options - When you edit row / column / custom heading / text block module, you can edit the design options . Row / Custom Heading / Text Block element have a default Bottom Margin of 35 pixel, you may want to set it to 0 if you don't want to have bottom space It is Good to add bottom Padding to your Column, so they will looks good on mobile Left and Right Margin should NEVER be modified, please left blank For Row module the Left and Right Padding should also NEVER be modified, please left blank
Create Full width Section
We will explain how to create a full width content section.
Step 1 - Go to your page / post, first activate the backend editor and click Add Element Step 2 - Select the Row Module Step 3 - Click on the Edit This Row (pencil icon) Step 4 - Change the Type setting to Full width content then click Save changes
Set Background Section
Fixed Section
We will explain how to create Fixed Section
Parallax Section
We will explain how to create a Parallax Section
Video Section
We will explain how to create a Video section.
Fixed Section
Step 1 - Go to your page / post, first activate the backend editor and click Add Element
Step 2 - Select the Row Module
Step 3 - Click on the Edit This Row (pencil icon)
Step 4 - Click on Design Options ADD padding and REMOVE margin for better result, add a Background Image change to Cover and then Saves changes
Step 5 - Seclect background overlay and Enable background fixed in this row.
Step 6 - Update or Publish your page and you should now have a section with background fixed
Parallax Section
Step 1 - Go to your page / post, first activate the backend editor and click Add Element
Step 2 - Select the Row Module
Step 3 - Click on the Edit This Row (pencil icon)
Step 4 - Add parallax type background for row (Note: If no image is specified, parallax will use background image from Design Options).
Step 5 - Click on Design Options ADD padding and REMOVE margin for better result, add a Background Image change to Cover and then Saves changes
Step 6 - Update or Publish your page and you should now have a section with parallax background
Video Section
Step 1 - Go to your page / post, first activate the backend editor and click Add Element
Step 2 - Select the Row Module
Step 3 - Click on the Edit This Row (pencil icon)
Step 4 - If checked, video will be used as row background.
Step 5 - You can edit the Design options ( remove margin and add padding "optional" ) and then Saves Changes and Update / Publish your page. You should now have a Full width Section with Video
Set your Homepage
Step 1 - Go to Settings > Reading in your WordPress Dasrdoard panel.
Step 2 - Set "Front page displays" to a "Static Page".
Step 3 - In the drop down menu for "Front Page" choose a page which will be your home page.
Step 4 - Leave the drop down menu for "Posts page" empty, as this is not used by the theme.
Step 5 - Save changes.
How to Create One Page
Set the One page sections ID
First we will explain how to create the page
Set the menu for the One page
We will explain how to set the menu needed for your one page.
Set the One page sections ID
Step 1 - Go create or edit a page : Page > Add new.
Step 2 - Select the Row Module
Step 3 - Click on the Edit This Row (pencil icon)
Step 4 - Set an ID for the row, You need to use the Same ID when you create the Menu
Step 5 - Repeat the step 3 and 4 for all the row you want to link for the Menu
Step 6 - Update or Publish your page then go create the Menu needed for your page to work
Set the menu for the One page
Step 1 - Login to the WordPress Dasrdoard.
Step 2 - From the 'Appearance' menu on the left-hand side of the Dasrdoard, select the 'Menus' option to bring up the Menu Editor.
Step 3 - Select Create a new menu at the top of the page.
Step 4 - Enter a name for your new menu in the Menu Name box.
Step 5 - Click the Create Menu button.
Step 6 - Click on Custom Links and add the div ID you used in you page ROW ( example if you set row id to : the_portfolio you need to set the custom link to #the_portfolio ).
Step 7 - Repeat and add custom link for each section you want to link, then set the menu as One Page menu(Edit page and scroll down until you see the Page Options).
Create Contact Form
Create Contact Form
Lemon uses the contact form 7 plugin, check the steps below to see how to create the contact form.
Create Contact Page
We will explain how to use the form you just created in your page or post.
Contact Form 7 Documentation
Link to the Official Documentation of the Plugin.
Create Contact Form
Step 1 - Log in to your WordPress Dashboard, go to Contact > Add New Step 2 - Give a Name to your form and change Mail Info Step 3 - Edit the Form field to change the Form Layout ( if you want to use one of the layout you saw on the demo check the next step ) Step 4 - Save your Form
Create contact page
Step 1 - Log in to your WordPress Administration Panel (Dasrdoard)..
Step 2 - Click on Pages > Add New.
Step 3 - Give your page a name then Change the Editor to Backend Editor ( you need to have the Visual Composer plugin activated ).
Step 4 - Click on the Add Element button
Step 5 - Select the Contact Form 7.
Step 6 - The Contact Form 7 Settings should appear. Select the Form you want to use you can also customize the Color and change the fields layout and button design
Step 7 - Update / Publish your page
WooCommerce
Lemon themes is 100% compatible with the WooCommerce plugin for WordPress. It includes full design integration of the WooCommerce pages, shortcodes and widgets.
If you want to use Woocommerce you will have to install the plugin, to do so go to Plugins > Add New , search for Woocommerce.
The Plugin you need to install is WooCommerce - excelling eCommerce by WooThemes
For full documentation visit the following websites:
Child Theme
Lemon comes with a Child Theme.
Simply install Lemon_Child.zip like a regular WordPress theme.
What is a Child Theme?
A child theme is a theme that inherits the functionality of another theme, called the parent theme. Child themes allow you to modify, or add to the functionality of that parent theme. A child theme is the best, safest, and easiest way to modify an existing theme, whether you want to make a few tiny changes or extensive changes. Instead of modifying the theme files directly, you can create a child theme and override within.
Why use a Child Theme?
If you modify an existing theme and it is updated, your changes will be lost. With a child theme, you can update the parent theme (which might be important for security or functionality) and still keep your changes. It’s a great way to get started if you are just learning WordPress theme development.
Additional Links
Disable Comments
Comments are enabled on WordPress by default. You can change this default for new posts or pages you’ll publish in the future, as well as change it for posts or pages you already published.
To change the defaults for new posts or pages, go to Settings → Discussion.
To disable comments on an existing post/page/project, open it up for editing. Now beneath the main content area, you should see a box labeled “Discussion”. Simply uncheck both boxes and save your changes.
What if you can’t see the discussion box?
Then you need to click the “Screen Options” tab in the upper right corner of your screen and check the box to enable the discussion module. You still need to close the tab and navigate to the bottom of the page and uncheck “Allow Comments” in the discussion module.
Theme Update via WordPress
Updating the theme via WordPress is very similar to the install process via WordPress.
Follow the steps below to update your theme via WordPress:
Step 1 - Log into your WordPress Dasrdoard.
Step 2 - Go to Appearance > Themes.
Step 3 - Deactivate the Lemon Theme by simply activating a different theme. Once you activate a different theme, you can delete the Lemon theme.
Step 4 - Delete the Lemon Theme. Do not worry, your content will not be lost!
Step 5 - Then simply upload the new “Lemon.zip” file in the Appearance > Themes section. Click on the Install Themes tab at the top and choose to upload the zip file. You have this step explained in section: Theme Installation via WordPress.
Theme Update via FTP
Updating the theme via FTP is very similar to the install process via FTP.
Follow the steps below to update your theme via FTP:
Step 1 - Go to .../wp-content > themes
location on your server using a FTP client and backup your "Lemon"
theme folder by saving it to your computer, or you can choose to simply
delete it. Your content will not be lost.
Step 2 - Download the new version of Lemon theme from your Themeforest and retrieve Lemon folder by unpacking the zip that you download from Themeforest and Lemon_(version.number).zip.
Step 3 - Then simply drag and drop the new "Lemon" theme folder into .../wp-content > themes location. Choose to “Replace” the current one if you did not delete it.
Step 4 - Log into your WordPress Dasrdoard, go to Appearance > Themes and activate the new Lemon theme.
Speed Optimization
If you think your website takes too much time to load maybe you should.
- Install a Cache Plugin for WordPress. We recommend W3 Total Cache.
- Install an Image Compress Plugin. We recommend WP Smush It.
- Install a Database Optimizer Plugin We recommend WP Optimize
- Reduce the number of posts on the page
- Reduce the number of unnecessary plugins.
- Use more icons and less images.
Changelog
Version 1.0 (2016.08.08)
- First Release!